Discounts
Discounts
Discount configurationPressing the + icon in one of the layers prompts you to create a discount. Based on your role functionalities you'll then be allowed to either select Creating new discount (from scratch), Create discount from template (a discount with some prefilled and non-editable discount variables), or you'll have both choices available. Editing discounts also flows similarly.
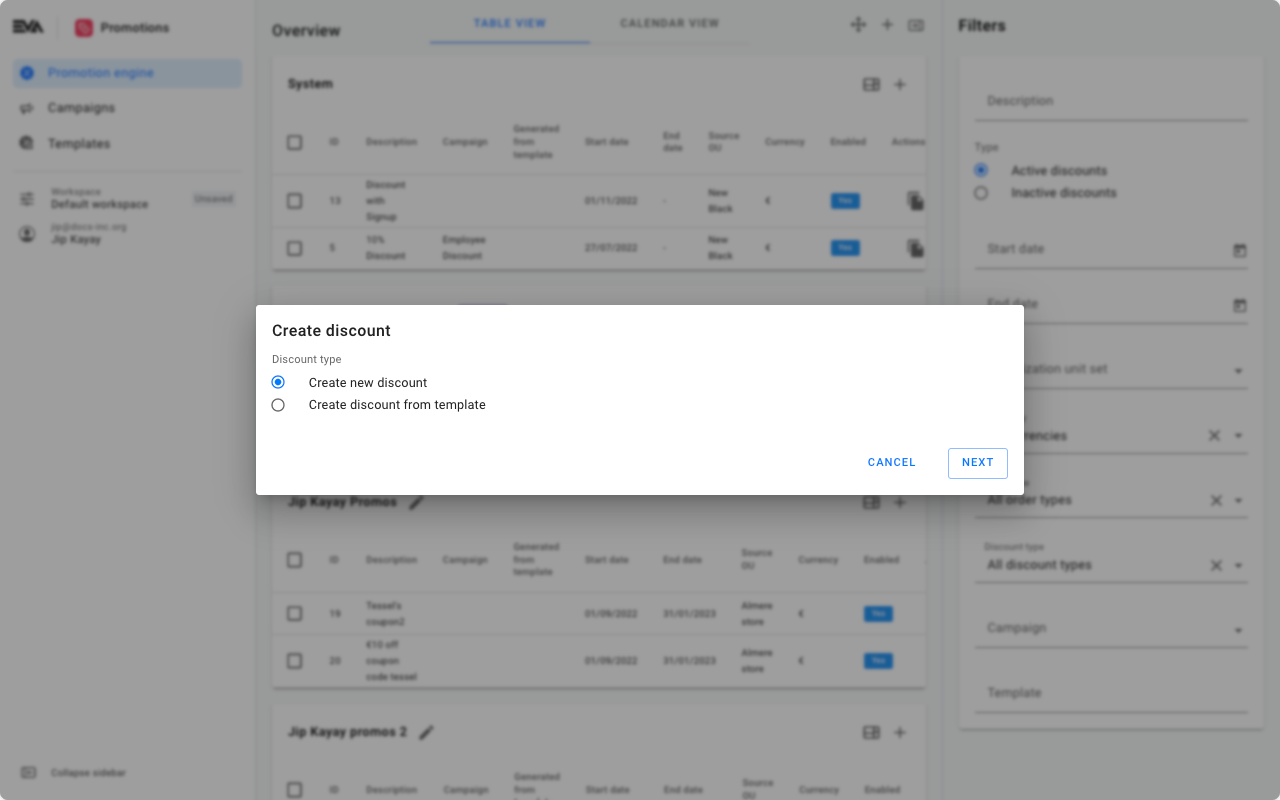
After making a selection (from template or new), tapping next will take you through some steps. For new it'll be five or six steps depending on your choices.
The steps are as follows:
- General information
- Financial information
- Actions
- Conditions
- Validation
- Coupons (Trigger type Coupons only)
General information
The two main parts of a discount are conditions and actions. In its very essence a discount works as follows:
If conditions x and y are met, action z will be triggered.
With this in mind, we can elaborate on discount triggers.
Trigger types
There are five trigger types:
- Price rule
- Manual
- Coupon
- Generated coupons
- Loyalty
Price rule
Trigger type Price rule indicates that the given action will be automatically applied, as soon as all conditions are met.
Manual
Trigger type Manual indicates that the given action can be manually applied, as soon as all specified conditions are met.
There are two permissions that impact in-store use of manual discounts. Permissions are managed from the Roles and rights chapter namely, from the functionalities card of a users role.
Show manual discount related functionalites
| Functionality name | Scope when functionality Manage is ticked |
|---|---|
| ApplyManualDiscount | Enables in-store associates to Apply manual discounts on orders |
| CancelManualDiscount | Enables in-store associates to Cancel manual discounts on orders |
Further, the above stated discount permissions can be elevated in combination with the use of the setting Security:ElevatedFunctionalityProvider and a value of TemporaryElevationCode, or ElevationBarcode.
Coupon
When setting trigger type to Coupon, conditions are not mandatory. For coupon discounts, the given action will be applied as soon as the coupon code is given. If conditions are specified, these have to be met before the coupon code can be applied. Using this trigger you will subsequently need to create a discount with trigger Price rule and in the Discount actions click on the Generate Coupon tab and choose the discount which you've already created using the Coupon trigger.
Generated coupons
This trigger type works exactly the same as the regular coupon trigger type with one difference; coupons for this discount can't be manually specified. They are generated on certain orders, using a discount, crazy right? Using this trigger you will subsequently need to create a discount with trigger Price rule and in the Discount actions click on the Generate Coupon tab and choose the discount which you've already created using the Generate Coupon trigger.
Loyalty
This trigger type works hand in hand with loyalty programs and pertains to the method that consumes loyalty points.
This trigger will include two extra mandatory fields:
- Loyalty program: A dropdown showing loyalty program(s) configured will be shown here.
- Loyalty point withdrawal: This field requires an integer input. The integer you specify here will determine the number of points deducted from a user's loyalty points balance when the discount is applied. Keep in mind that the discount can only be triggered if the user has the specified balance.
With trigger type Loyalty, a discount of trigger type 'Loyalty' cannot have conditions since the condition is basically that user should have the amount of points specified in the Loyalty point withdrawal field in order to avail the discount. If you mistakenly add a discount condition(s) you will be presented with an error message at the validation stage stating "A discount of trigger type 'Loyalty' cannot have other conditions".
Check the Loyalty points (consuming loyalty points) use case.
Marketing descriptions and promotion label
Discounts also contain marketing description and promotion label fields. These fields are translatable, but not during the discount's creation directly (for now, at least). If you'd like to set translations for this field, simply finish the creation of your field and then open it again to add translations.
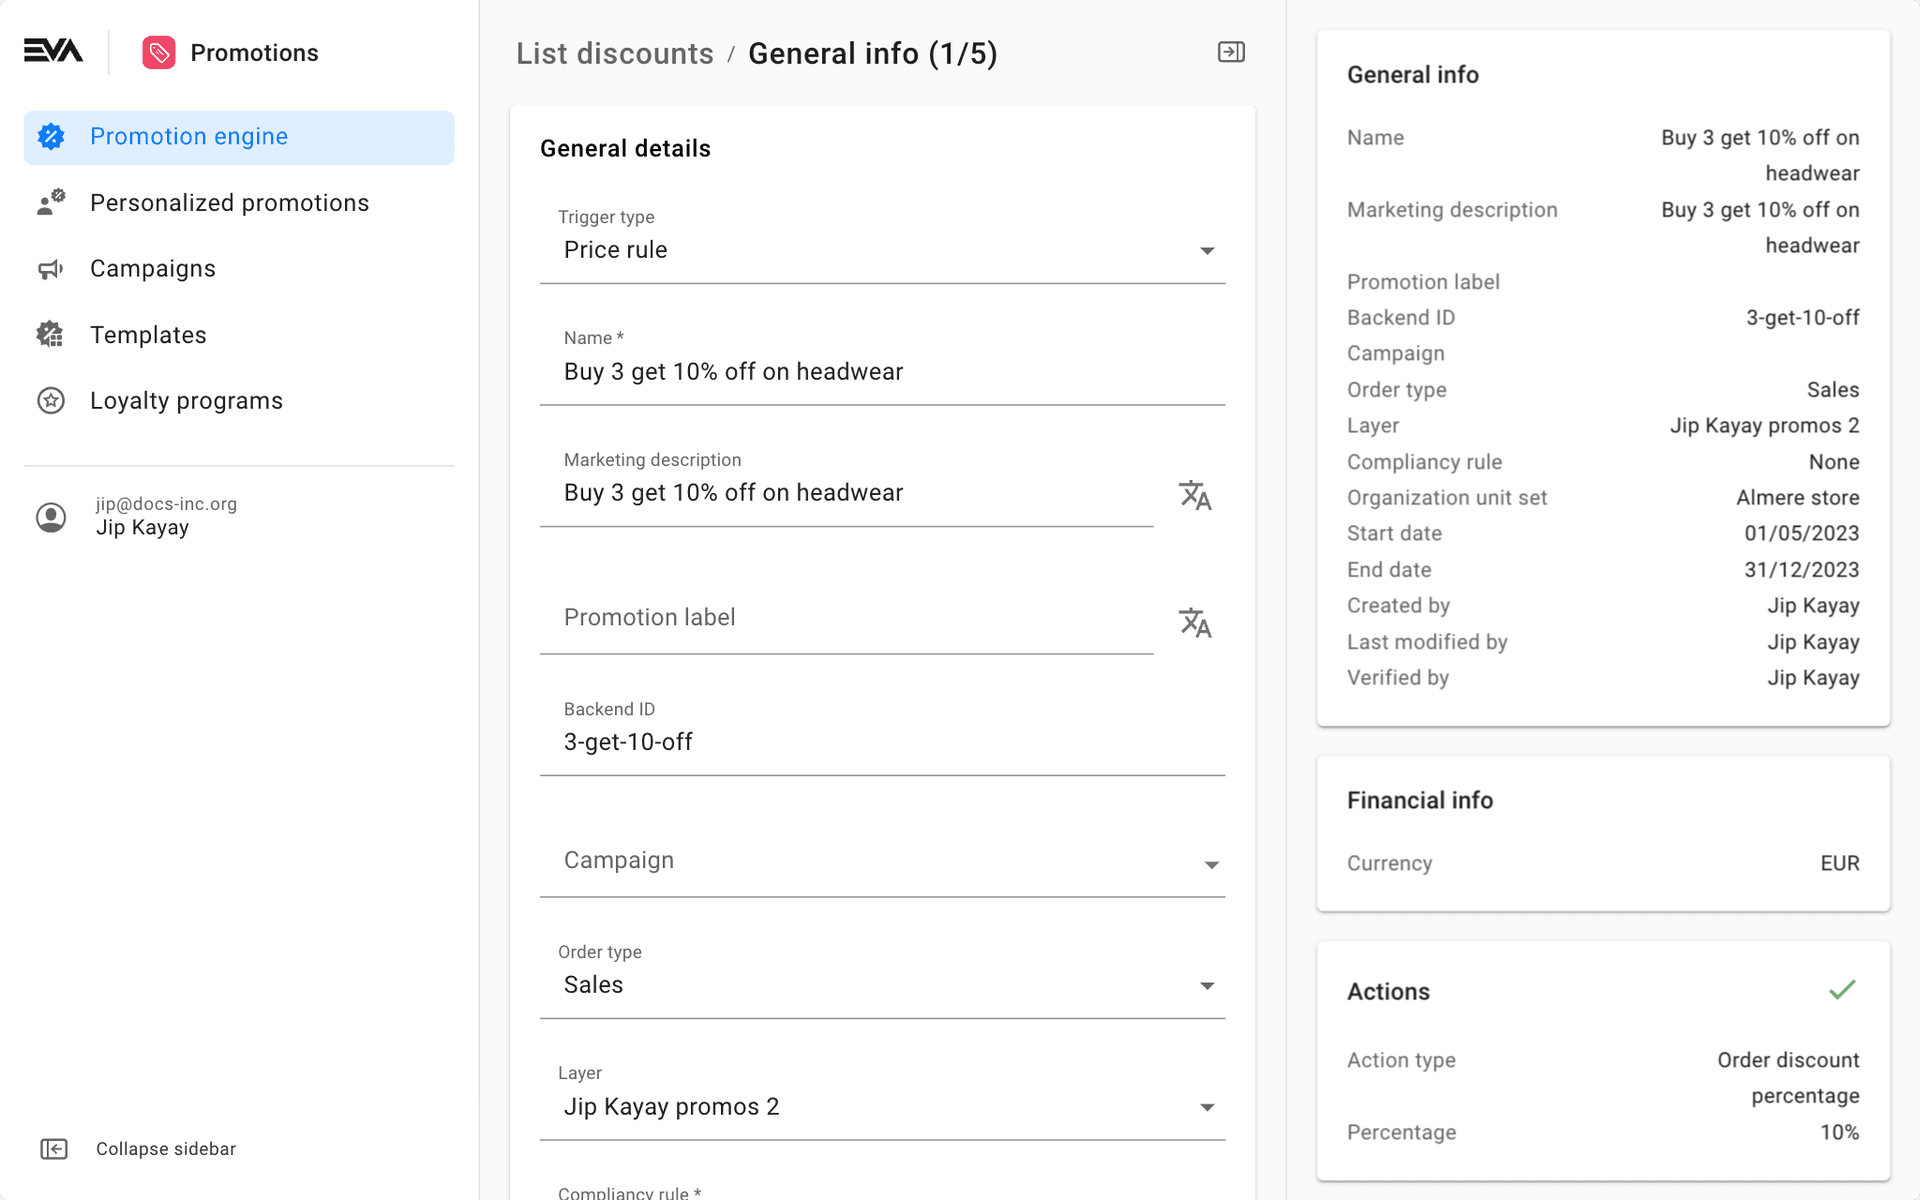
Your input under the Marketing description and/or Promotion label fields, is what your frontend App users would see under the side menu item. For example, under the possible discounts in a customer Basket flow. Therefore, it would be nice to be as much elaborative as possible. That way it's easier for a store employee to know what it is that needs to be done in order for the customer to actually obtain the discount.
Here is a simple marketing description example: "Get 10% off on order values above €100". This makes it clear for a store employee (frontend App users) that in order for the customer to get a 10% off, the order value needs to be above €100.
Campaigns
Additionally, we can attach the discount to a Campaign
Compliancy rule
This feature requires a bit more digging. Will keep you updated via the drop notes once it's good to go.
A dropdown list, with a default empty value. The possible values are:
- None: Implies the discount is not an employee one.
- EmployeeDiscountTaxExclusion: Implies that the discount is an employee discount.
Selecting EmployeeDiscountTaxExclusion will prompt a check on the corresponding country compliance related auditing provider, and in specific the value of the setting Auditing:CalculateEmployeeDiscountExTax to determine whether the discount will include or exclude taxes when performing the necessary discount calculation. A value true for this setting would instruct the promotion engine to perform the discount calculation on the due amount excluding taxes, while a false value would include taxes.
Custom fields
Discount custom fields are used to display custom information related to a specific discount on, for example, your website. The dropdown lists all existing custom fields of type discount. You can create, add, edit, and delete custom fields of type discount via the Custom fields chapter of the Promotions module.
Refer to the Custom fields documentation for more information.
Active period
As the name implies, you can specify the validity of the discount by date, time, or even days of the week.
To use the days of the week feature, use the toggle Active on all week days. This of course will still be confined to the broader Start date and End date specified.
- A toggle On implies that the discount will be active 7 days a week.
- A toggle Off will list the week days for you, where you can then check the desired ones. The checked days will be the days the discount is active and vice versa.
In this sample screenshot, the discount will be active on Monday to Friday, and inactive on Saturday and Sunday within the period 01 Jan 2023 to 30 Jun 2023.
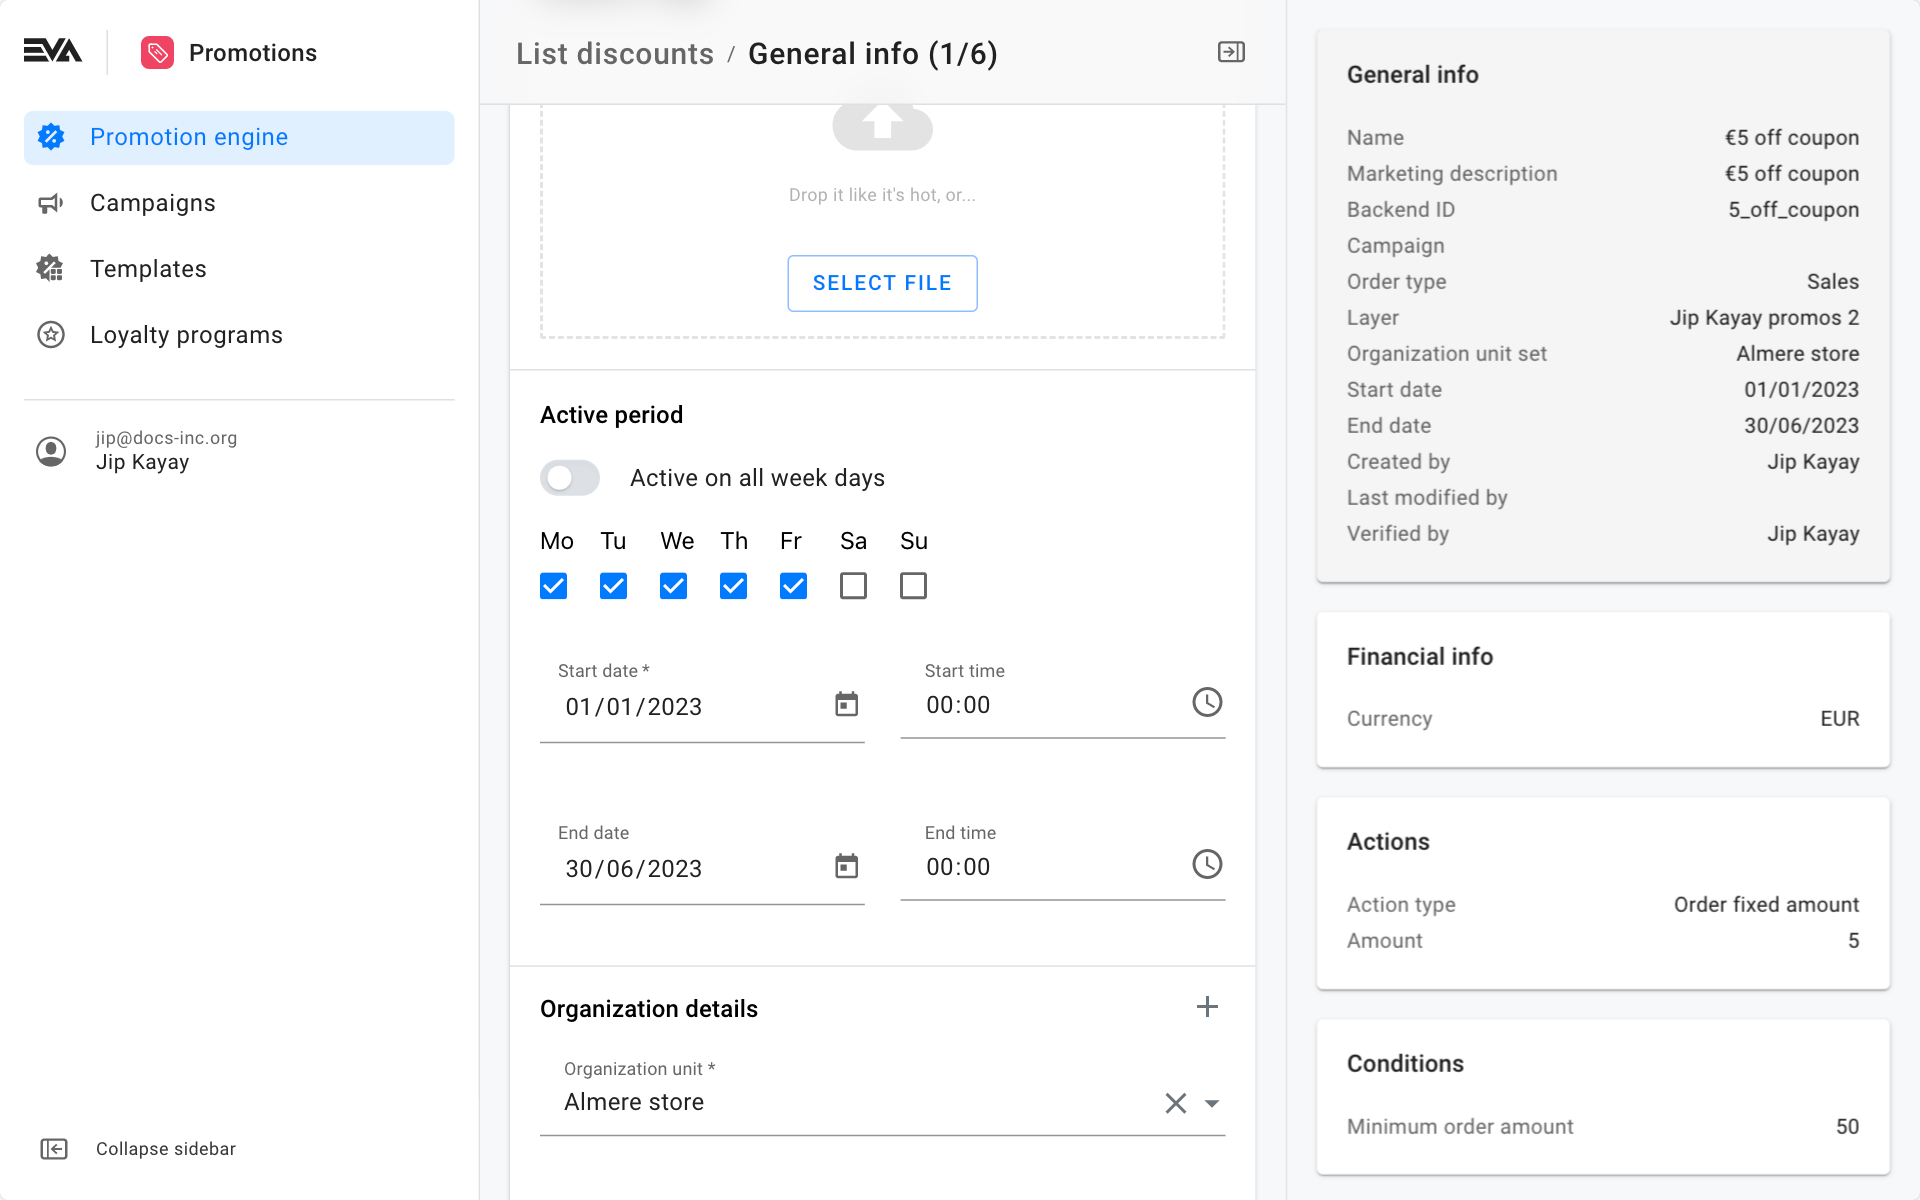
The Promotions chapter overview Filters of Active discounts and Inactive discounts react to the values provided in the Start date and End date fields. This means that any implications coming from use of the Active on all week days toggle will not impact such filtering. In our sample screenshot above, the discount will still filter as an Active discount even if an Admin Suite user views it on a Saturday or Sunday. This is as long as we're still within the broader time frame of Start date 01 Jan 2023 and End date 30 Jun 2023.
Time zone
The applied would auto adjust based on the tagged organization unit or organization set chosen for this promotion. In other words, if you've set the start time to 09:00, and you've chosen an organization set which includes stores (organization units) in The Netherlands and in Portugal, where there is usually an hour time difference. The promo engine will automatically set the start time to 09:00 in the respective country.
Organization details
Using this section you can control which organization unit(s) this discount would be tagged to.
Example: Selecting New York store as organization unit implies that the discount could only originate from there.
If you wish to create a custom list of organization units where the promotion would apply, click the '+' icon and specify the desired organization units.
Financial information
The second step is specifying financial information. Before we jump into it, note how the side pane shows information on the steps we have already gone through.

Of all financial information, only Currency is mandatory. Additionally, you can set a maximum usage per order, per customer or a maximum usage in overall.
Restitution claim company
The field Restitution claim company, is where you can add a third party to incur some an orders due amount. An example here would be the amount covered by a health insurance company. Keep in mind that a restitution organization unit needs to be created in order to tag it here, and for this to work (the restitution tick in organization type needs to be ticked when creating). The implication of this setup is that the order using this discount would now create two orders in the order overview. The first would include the invoice made for the customer, and accordingly showing the restitution amount as a discount, while the invoice attached to the other order would serve as a request for payment to that tagged restitution organization unit (an invoice with an open amount). The latter invoice can then be sent to the restitution organization unit for reimbursement. Proper financial booking configurations can be made to conclude the financial implications of such a scenario.
Return orders that initially included restitution organization units at time of sale would also create two order flows.
Recurring benefits
The recurring benefits fields are optional, here you can specify some behavior when it comes to your discounts (recurring) financially impacting aspects.
The following describes what each field implies:
User balance limit
Is where you specify the monetary value of the discounts recurring benefit (example: €50.00).
The field expects a monetary value only, thus when it comes to discount actions Product sets, Get a product, Pick a product, or an action where a percentage is the discounts benefit, would in turn deduct the equivalent monetary amount (of the granted product or the monetary value of the percentage) from the specified user balance limit.
User balance limit custom field
Is where you specify the custom field that would need to apply in order for the user to be able to avail the benefit. Only type 3 (OrderLine) custom fields appear here.
You can either use the User balance limit or the User balance limit custom field, both cannot be used simultaneously.
User reload strategy
Is where you specify the interval after which the discount benefit would be reinstated (example: the €50.00 user balance limit would be reinstated quarterly).
The user reload strategy field (within its context) impacts any discount action. A no input means "No reload" i.e. Default from the list of available options.
Example: Assume you had a Maximum usage per user of "1", and your user reload strategy is left Blank/Default, this implies that the respective discount action is not reloaded once the discount recipient has used it once.
The available options are:
- Default
- Start of year
- Yearly
- Start of quarter
- Quarterly
- Start of month
- Monthly
Discount actions
The initially selected trigger type determines the discount actions available for selection in the drop-down menu.
Now for the good stuff: Actions! Bear with us, we have a ton of actions, and even more conditions. Actions is the actual benefit a discount gives. Some discount conditions are only available for certain discount actions, some work the other way around, it can get pretty complicated. What you eventually get in return, is an awesome discount engine.
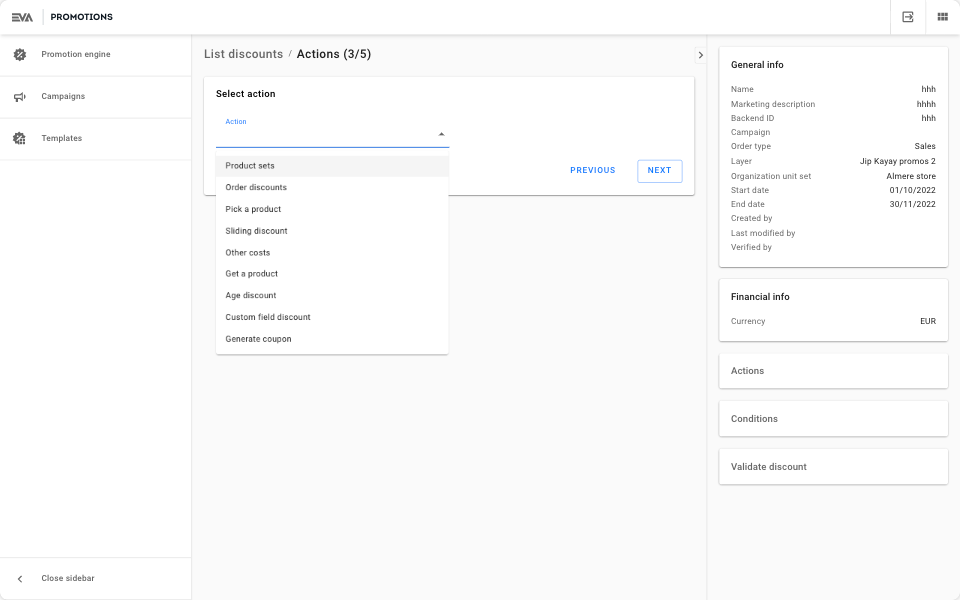
Based on the action(s) selected from the drop-down menu, the rest of the page will populate. Cards will be added for each discount action selected. Below we cover the various actions.
Product sets
Not applicable if initial trigger type selected was Manual.
We kick off this action with the Discount type field under Set Discount values card. A few options are available for you to choose from:
- Discount amount: A fixed discount amount would be applied.
- Discount percentage: A fixed discount percentage would be applied. Further, choosing this option will prompt an additional field called Maximum discount amount. The purpose of this field is described under the order discounts action.
- Discount unit price: A discounted unit price would be applied.
- Set fixed price: A product price would be overridden with the specified fixed price.
- Free product: A product from the specified set can be chosen as a free product.
- Don't allow picking checkbox: If marked, this would imply that picking a product from the set specified is not allowed and that the product mentioned in the Default product would be the one automatically chosen as the free product. The setting
Discounts:PickProductAction:FilterOptionsOnStockAvailabilityif set to true would imply that default product would not be a viable option if out-of-stock and that the product would be replaced with the next first available product from the set specified. If all products from the specified list were out of stock, no options will be returned. This is similar behavior to what this setting does when using the Pick a product action.
- Don't allow picking checkbox: If marked, this would imply that picking a product from the set specified is not allowed and that the product mentioned in the Default product would be the one automatically chosen as the free product. The setting
Financial distribution for free products
This section covers the financial dispersion behavior that applies to the impacted product sets and free product. Setting this to your preference is quite handy, especially in return order scenarios that originally involved a product sets discount action with a 'Free product'.
Expand to read more
To avoid scenarios where a customer returns product(s) that were originally the reason for triggering a product sets discount action with a 'Free product' and hence benefits from the received free product essentially through a loophole, this financial dispersion configuration comes into action.
- Products to consider: Specify here which products will be considered when performing the financial calculations.
- Distribution type: Specify here the way the financial implication of the discount will be distributed among the considered products.
Using a script (checkbox)
The script would, for example, disperse the financial value of the free product among the other products of that same order rather than on the free product itself, with the latter being the default behavior. Doing so and based on the script, only a partial refund could be triggered on the return product to accommodate for the free product already in the customer's possession. The financial dispersion behavior would be based on what is defined in the tagged Discount financial implication script.
The script would, for example, disperse the financial value of the free product among the other products of that same order rather than on the free product itself. By doing so, and based on the script, only a partial refund could be triggered on the returned product to accommodate for the free product already in the customer's possession. The financial dispersion behavior would be based on what is defined in the tagged Discount financial implication script.
Here is a sample script:
extend DiscountFinancialDispersion

set financialDispersion to DefaultProductSetFinancialDispersion
set productDispersion to DefaultFinancialDispersion
set customFieldValue to User.CustomFields.QA_DiscountFinancialDispersion

if customFieldValue = '0' then
  set financialDispersion to 0
  set productDispersion to 0
else
if customFieldValue = '1' then
  set financialDispersion to 1
  set productDispersion to 1
else
if customFieldValue = '2' then
  set financialDispersion to 2
  set productDispersion to 2
else
if customFieldValue = '3' then
  set financialDispersion to 3
  set productDispersion to 3
else
if customFieldValue = '4' then
  set financialDispersion to 4
  set productDispersion to 4
end

output financialDispersion, productDispersion
After that comes the Product sets card, clicking the '+' icon will present four options:
Add product search
This option enables you to add a preconfigured product set.
Add products
This option enables you to add individual products from your product catalog.
Add custom product set
This option allows to create a product specifically for this discount. One that you would then create using filter products. :::
Filter products
The filter is used to specify which products are part of your custom product set. The ones that would accordingly apply to this discount. Once you click the corresponding '+' icon to add products, you'll be presented with two options:
- Add products in bulk: prompts a notepad like modal where you can specify a Product property and input the corresponding values (use commas to separate between values).
- Add product filter: works the same as described here.
Afterwards, you can click the boxed magnifying glass icon on the filter products card to Show selected products in one view.
Add personalized promotion
More on this option can be found here.
Order discounts
Not applicable if initial trigger type selected was Manual. These are very straight forward, percentage or fixed amount discounts. Simply, a percentage or an amount that will be deducted from the total due payment amount on an order.
If percentage is your preferred choice for this action, utilize the Maximum discount amount field. Leaving it empty would imply no maximum. Here's a few examples:
| Discount percentage | Maximum discount amount | Order value | Discount given |
|---|---|---|---|
| 20% | not specified | $100 | $20 |
| 20% | $10 | $100 | $10 |
| 20% | $50 | $100 | $20 |
Pick a product
Not applicable if initial trigger type selected was Manual. This action works same as Get a product, except for the fact that you can specify multiple product for the customer to choose from. You can also distribute the options across tiers, so for each tier you can specify a minimum order amount that is required before the customer can pick one of the products from that tier. Further, you can specify a default product selection (optional).
If multiple products are applicable for the customer to choose from, we recommended a maximum limit of 15 products.
There are two settings that would influence the behavior in scenarios of an out-of-stock default product:
| Setting | Value | Description |
|---|---|---|
Discounts:PickProductAction:FilterOptionsOnStockAvailability | true | This would imply that the front end user would not get the default product as an option if the product is out-of-stock. If there was a list and all options were out of stock, no options will be returned. |
Discounts:PickProductAction:ForceDefaultProductWhenOutOffStock | true | This would imply that if the default product is out-of-stock, and the next/most expensive in stock product from the specified product list (a default behavior assuming a list exists) is also out-of-stock/cannot be determined, then the initial out-of-stock product would anyway be added to the order and the front end user would be prompted with an out-of-stock notification. |
Sliding discount
Not applicable if initial trigger type selected was Manual. A sliding discount is a simple order discount, but the discount amount depends on one of two things:
- total order amount
- quantity of products in the order
Example: you can set the discount to be 10% when there is only one product on the order, and then set it to 20% if there are two products. You can add as many steps as you would like.
If a percentage config was your choice for this discount action, a field called Maximum discount amount will appear. The purpose of this field is described under the order discounts action.
Other costs
This discount action allows you to set a discount on gift wrapping or shipping costs. This discount is a simple percentage or amount.
If a percentage config was your choice for this discount action, a field called Maximum discount amount will appear. The purpose of this field is described under the order discounts action.
Get a product
Not applicable if initial trigger type selected was Manual. In this action, you can specify a product to be given to the customer. You can specify a quantity of the product to be given to the customer. Additionally, you can set a unit price that would for example be discounted that the units original price or set to 0.00 to give the product away for free.
Setting the unit price to "0.00" will automatically check the Give away product box, and the Unit price field will disappear since it becomes invalid in such scenario. The Give away product checkbox implies that the product being given as action to this discount is totally "Free".
Age discount
Using this discount action, you can set an amount or percentage discount based on the customer's age. You can either let the customer's age be the actual discount amount or percentage, or create age tiers with the amount/percentage attached.
If a percentage config was your choice for this discount action, a field called Maximum discount amount will appear. The purpose of this field is described under the order discounts action.
Custom field discount
Not applicable if initial trigger type selected was Manual. The custom field action allows you to create a discount based on a custom field. This one is a little complicated and warrants some extra explanation. So make sure to check out how Custom fields are created. Further, select it then specify your discount type (percentage or amount).
If a percentage config was your choice for this discount action, a field called Maximum discount amount will appear. The purpose of this field is described under the order discounts action.
Sliding points
This directly links with Loyalty Programs. More on this action can be found here.
If a percentage config was your choice for this discount action, a field called Maximum discount amount will appear. The purpose of this field is described under the order discounts action.
Fixed amount (Trigger type manual or loyalty)
This action will only be visible if trigger type manual or loyalty was initially chosen. It can be set to a fixed amount or a maximum amount, where the actual amount has to be specified when applying the discount to an order. This is possible since this will already be a manual process during checkout. Additionally, you can set the discount to apply either on the whole order or on specific order line(s).
Percentage (Trigger type manual or loyalty)
This action will only be visible if trigger type manual or loyalty was initially chosen. The action behaves similar to the fixed amount one, except it uses percentages instead of amounts.
Employee discount (Trigger type manual only)
This action will only be visible if trigger type manual was initially chosen. The action is a simple percentage discount that can be given to employees.
Generate coupon (Trigger type price rule only)
This action requires you to have a DiscountCouponEmail Stencil be set up.
This action will only be visible if trigger type price rule was initially chosen. Further, you'll first need to create a discount with trigger type Generated coupons or Coupon in order for this to work, as it needs to be linked here.
A coupon code is generated and e-mailed to the orders attached customer as a result of this action. The coupon code can then be used on future orders to avail the discount action that was specified in the Target discount ID.
Target discount ID field: This is a dropdown list that displays all discounts with a trigger type Generated coupon or Coupon. You'll need to link the related one here.
The Target discount ID dropdown filters out discounts that are non-coupon generating i.e. ones that have the CouponsGeneratedByOtherDiscount bool as true.
Store generated coupon on user checkbox: Ticking the box will bind the generated coupon to the coupons receiving customer only (customer attached to an order at the time coupon was granted). This means that the customer who initially received the coupon, would be the only one who can actually use the coupon on future orders. POS users would also be notified of any bound customer coupons during order checkouts, and can then easily apply it.
Here is how a bound customer coupon would look on POS. You can see a €10 coupon bound to this customer on the right pane. Tapping Apply would simply apply it to the order:
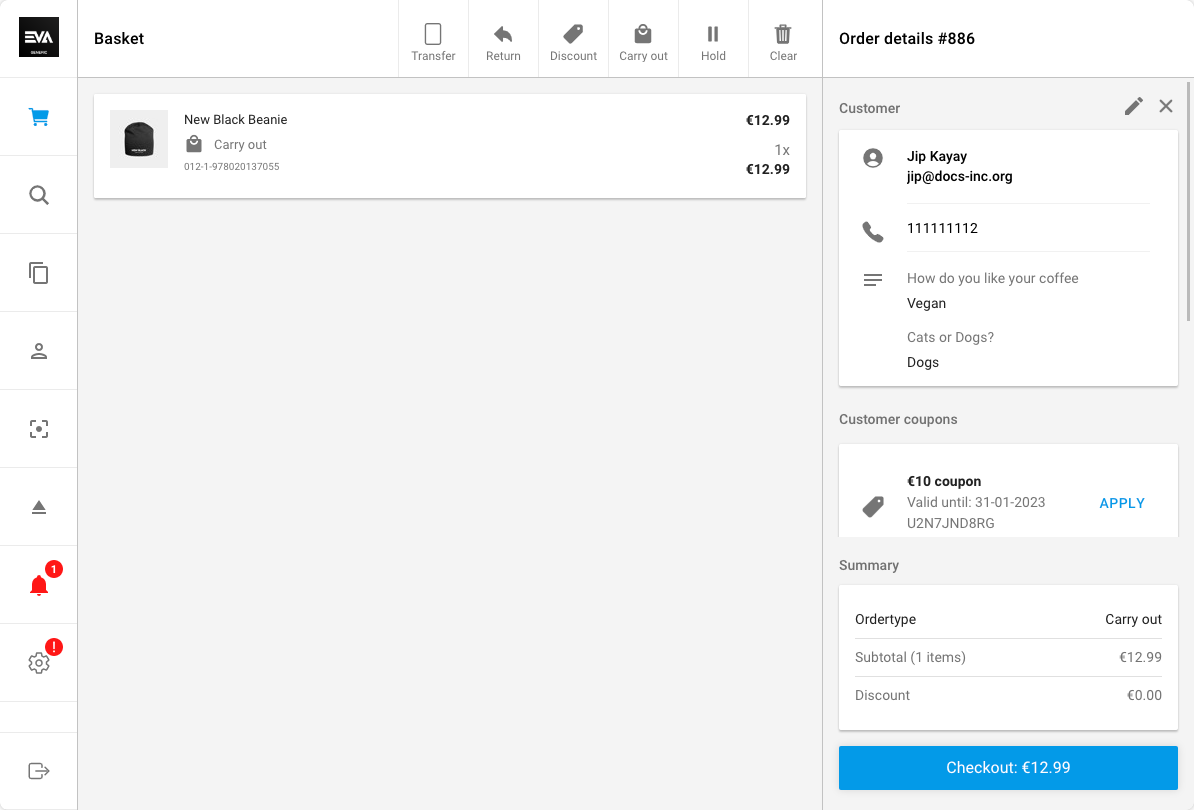
Check the coupon use case sample.
Original order discount (Trigger type generated coupons only)
This action will only be visible if trigger type Generated coupon was initially chosen. Using this action, you can set a discount to be an amount, which will be calculated based on the total amount of the order in which the coupon you're using was generated. Optionally, you can set the amount to only be calculated based on a certain set of products.
Discount conditions
This is where you configure certain conditions for your orders, that have to be met before the discount can apply or be applied.
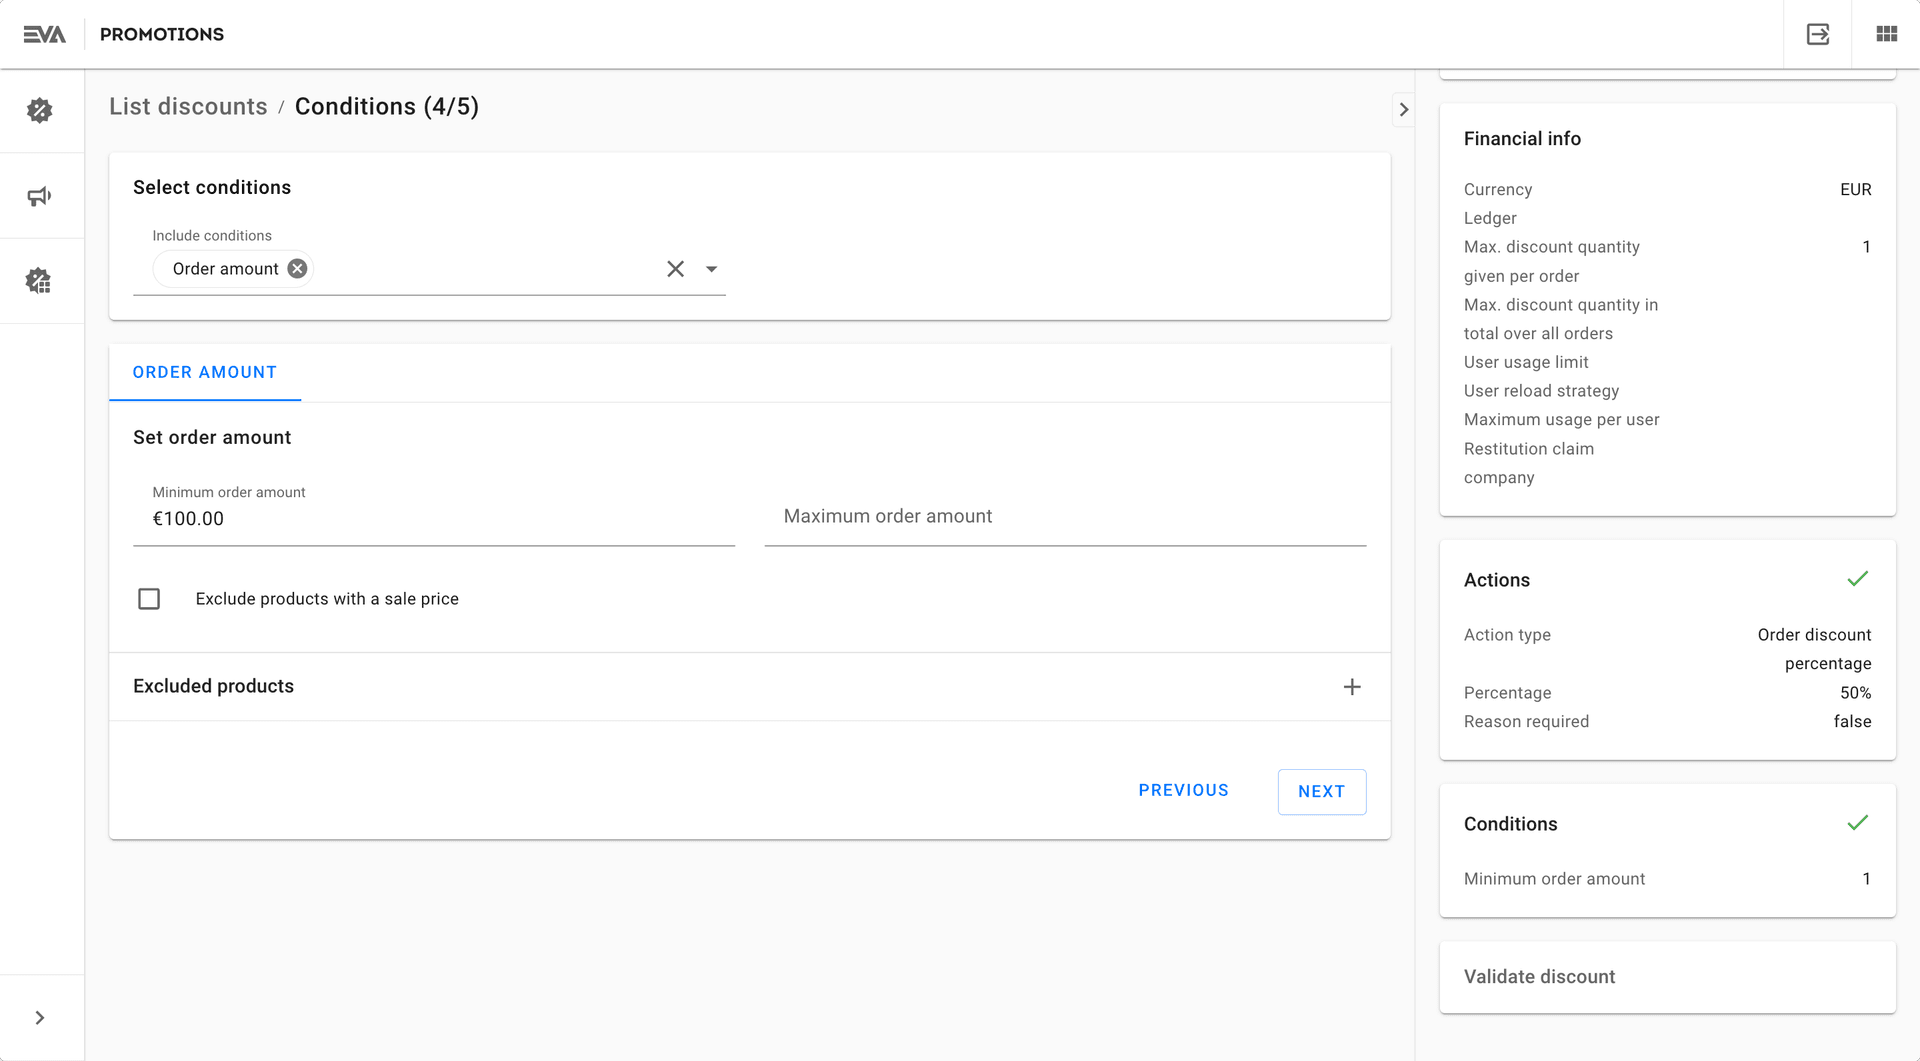
Order amount
This condition can be used to require an order to be of a certain amount before the discount can be applied. A maximum amount can also be set.
Products
This condition can be used to set some product related rules as to when this discount would trigger. Conditions like exclude products with a sale price, identical products only, or exclude product sets are possibilities on how you can use this condition.
Using the product sets, you can further configure the discount in a way so that the discount only triggers if for example a certain quantity from among certain products are included in a customer order/basket or if a certain amount is spent on products from a certain set.
Use the '+' icon under the Product sets card to start identifying those product sets. This works in the same way as described under the product sets action.
Customer
The Customer condition can be used to create a discount for a specific customer or set of customers.
- Customers can be specified using Email addresses or Customer IDs.
For example: Your input could look something like "jip@newblack.io, mark@gmail.com, sandra@hotmail.com" for email addresses, and something like "554785, 784145, 987454" for Customer IDs. This would mean that the discount would only apply to those specified.
- Customer fields can be used to specify a broader group. Compared to Email addresses and Customer IDs, this one is more generic since the possible configurations are somewhat more inclusive of a larger group.
For example: You want to give a discount to all customers who have a certain domain name in their email address. An input of @newblack.io would give all customers with such a domain email address the underlying discount and not just jip@newblack.io, just saying.
- Subscriptions is a dropdown and thus, requires having an existing subscription. Selecting one would imply that only customers who adhere to the requirement of that subscription would be able to avail the discount.
For example: You have a subscription called receive newsletter that prompts on your front ends for customers to tick. If that subscription requirement is met, then the discount would apply to that group of customers only.
Customer age
Is used to specify an age (Exact or Range) of the customer.
For example: An input of 30 in the Exact age field would imply that the discount would only apply to customers of age "30".
Age is just a number.
Stock label
It is possible to in- or exclude certain stock labels from being eligible for a discount using the Stock label condition.
User role
User roles can also be included with the discount using the User role condition. This condition can be set on the logged-in user or the customer. When setting it on the customer, user roles can also be excluded.
User custom fields
It is possible to require that at least one or all user custom fields are met in order for a discount action to apply. Any custom user field can be configured via the People module and thus, used here.
User custom field includes both UserType Employee and Customer.
Order custom fields
It is possible to require that at least one or all order custom fields are met in order for a discount action to apply. Any custom order field can be configured via the Orders module and thus, used here.
Orderline custom fields
It is possible to require that at least one or all order line custom fields are met in order for a discount action to apply. At the moment, a front end is under development where a custom field on order line level (type 3) can be created. Till then, if you wish to use this condition, please use the service CreateCustomField and specify your TypeID as 3. Check Custom field developer documentation if you'd like to find out more about the available services.
Order type
To include specific order types only in your discount. Using this condition you can choose to have a discount apply on CarryOut, Delivery or Reservation orders only.
Order properties
To apply a discount only to specific order properties. Using this condition, you can choose to have a discount apply only on orders that, for example, involve a Repair and/or are B2B.
See list of all available order properties
- Require all: Multiple order properties can be selected. Ticking this box will apply the discount only if all specified order properties apply.
- Is excluding: Ticking this box will exclude orders that include the specified order properity(ies) from receiving this discount.
Possible checkbox scenarios
| Require all | Is excluding | Description |
|---|---|---|
| ✅ | ✅ | The non-selected order properties must all apply to the order for the discount to apply. |
| ✅ | ❌ | The selected order properties must all apply to the order for the discount to apply. |
| ❌ | ✅ | At least one of the non-selected order properties must apply to the order for the discount to apply. |
| ❌ | ❌ | At least one of the selected order properties must apply to the order for the discount to apply. |
Product requirement
Using this condition, you can set up your discount in a way where it would only kick-in if a certain product custom requirement applies.
Example: You offer your customers a unique personal touch by allowing them to specify custom text to be printed on one of your products. Let's assume they're a pair of jeans where initials can be printed on the back pocket. Such product requirement can then be attached as a discount condition, but only when specific values apply (a value in this context would be the requested custom print). Let's again assume you've specified 'NB' as a value here. With such setup, this means that the discount will only kick-in if the customer requests to have 'NB' as their custom print to this product requirement as time of order placement.
Multiple product requirements can be added, and the same product requirement can be added multiple times.
Points
This directly links with Loyalty Programs. More on this action can be found here.
User type (Trigger type manual only)
This condition will only be visible if trigger type manual was initially chosen. On manual discounts, it is possible to in- or exclude certain user types.
Coupon validity (Trigger type Coupon and Generated coupons only)
This condition will only be visible if trigger type Generated coupon was initially chosen. The condition can be used to crystallize a coupon's validity and consists of two cards (Start date and End date):
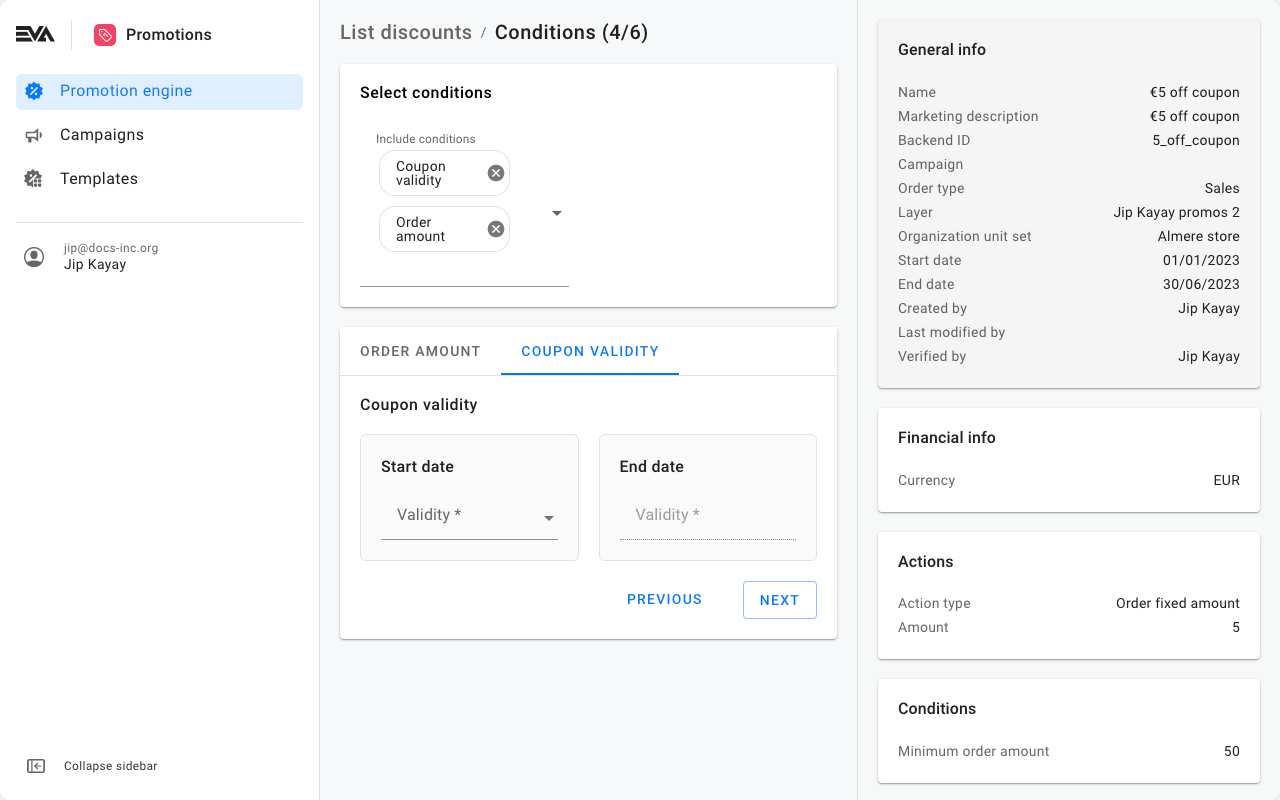
Start date
As the name already implies, this card impacts the start date a coupon becomes valid/usable.
There are a few options that can be used to determine the start date:
- Requested date on original order: The coupon becomes valid starting from the original order date. In instances where an order includes several order lines and multiple order line dates, you can then specify to Use closest or Use furthest order line date as your start date.
Example: Assume a mixed order that is partially carry out (fulfilled on March 1st), and partially endless aisle (fulfilled 2 days later on March 3rd). Use Closest would imply a coupon validity start date of March 1st, while Use furthest would imply a start date of March 3rd.
- X days after order date: The coupon becomes valid starting X number days after the order date. The same concept of Use closest or Use furthest order line date applies as explained in the above example.
- Coupon creation date: The coupon becomes valid instantly at time of issuance.
- X days after coupon creation date: The coupon becomes valid after X number days from the date of its issuance.
- Specific start date: A specific start date from where the coupon becomes valid (cannot be more straight forward than this).
- From first usage coupon: The validity of the coupon will start counting from the date of customers first usage.
End date
As the name already implies, this card impacts the end date a coupon becomes invalid (expires).
There are a few options that can be used to determine the end date:
- Same as start date: Basically, this option implies that the coupon will be valid for just a day since it'll expire same day as your chosen start date.
- Specific end date: A hard end date where the coupon would then expire.
- X days after start date: The coupon expires X number of days after your chosen start date.
Originating OU (Trigger type Generated coupons only)
This condition will only be visible if trigger type Generated coupon was initially chosen. Using this condition, you can limit a coupon to only be used in the OU on which it was originally generated.
Discount validation
After configuring your condition(s), we move into discount validation. A user with the functionality DiscountSelfVerification would need to verify the discount for it to go-live.

At this point, the discount engine will do some complicated magic behind the scenes, like super complex. You're probably wondering what we're talking about - you've never seen the discount engine think. Well, it's extremely fast okay. You won't even notice.
If all rows have a green checkmark, you're good to go, and we are proud of you. Save your discount and go get yourself a brownie. You deserve it.
Using the setting Discounts:RequireVerification with a value false would skip the verification step i.e. no verification would be required, and vice versa if the value of the setting is true.
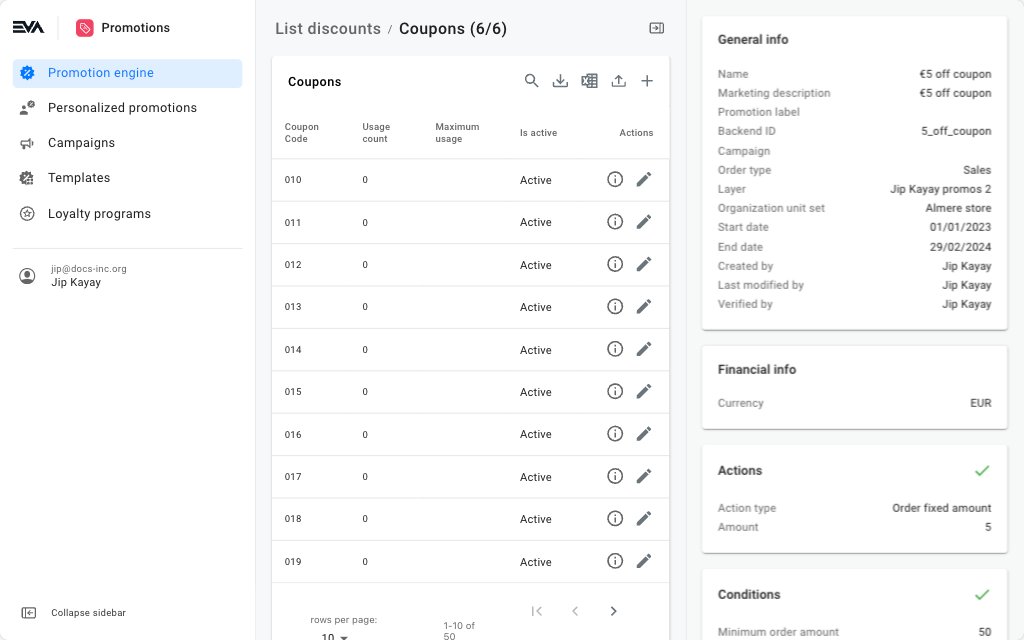
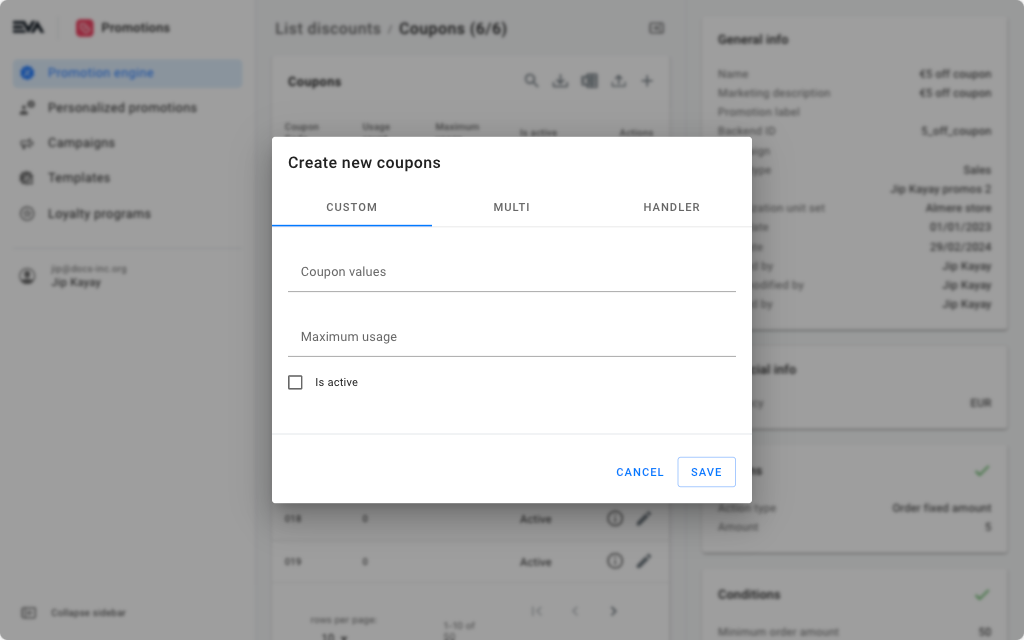
Coupons (Trigger type Coupon only)
This step would be available on the right pane after the "Validate discount" card only if your initially chosen trigger type was Coupon.
Apart from having this paginated overview of your coupons, a few things can be done here: Add, Download, or Search.
Adding coupon codes
There are several routes you can take in order to perform this step, the first route is clicking the '+' icon. You'll be presented with the following options:
- Custom: Manually add your own (custom) coupon codes.
- Multi: EVA randomly generates a bunch of codes. After saving, refresh the page to see your coupon codes. The coupon codes will also be sent to the user that generated them in an e-mail.
- Handler: Based on your coupon handler settings.
Another route is the Excel upload. Steps as follows:
Step 1
Download the template by clicking the 'Download coupon excel template' icon.
To avoid errors, it is recommended to download the Excel template each time you are about to use the 'Upload as Excel' option, and not a pre-saved older version on your device.
Step 2
Fill in the respective rows as desired. The Excel sheet consists of the following columns:
- CouponCode: A required field used to identify the coupon. Excel can only contain unique coupon codes, otherwise the file will be rejected.
- IsActive: An optional boolean field that indicates whether the coupon should be active or not. If no value is given, the coupon will be made active if it’s a new one. If it's an existing one, then it will retain its current value.
- MaximumUsage: An optional integer field that indicates the allowed maximum times a coupon can be used by your customer. If no value is given, the coupon will default to a maximum usage value of 1. If it's an existing one, then it will retain its current value.
- UsageCount: An integer field that indicates the number of times a coupon has been used.
Setting the Maximum Usage to 2 would mean that the Usage Count would never exceed 2. If a maximum usage was not set, the usage count can be used to track how many times a coupon has been used. So basically, if an order uses a discount (order status: completed), a +1 would be added to the usage count of that discount. The maximum usage can then be used to put a ceiling to that value.
- First usage: Determines the start date on which the card becomes usable (expected date format is DD/MM/YYYY as in 01/12/2023).
- Last usage: Determines the last date after which the card expires (expected date format is DD/MM/YYYY as in 01/12/2026).
Leaving the first and last usage dates empty implies that the coupon is usable for an infinite period of time and will only expire once depleted.
Step 3
Once the fields are filled in and your Excel is ready, click the 'Upload as Excel' icon, select your file, or a drag and drop would get the job done.
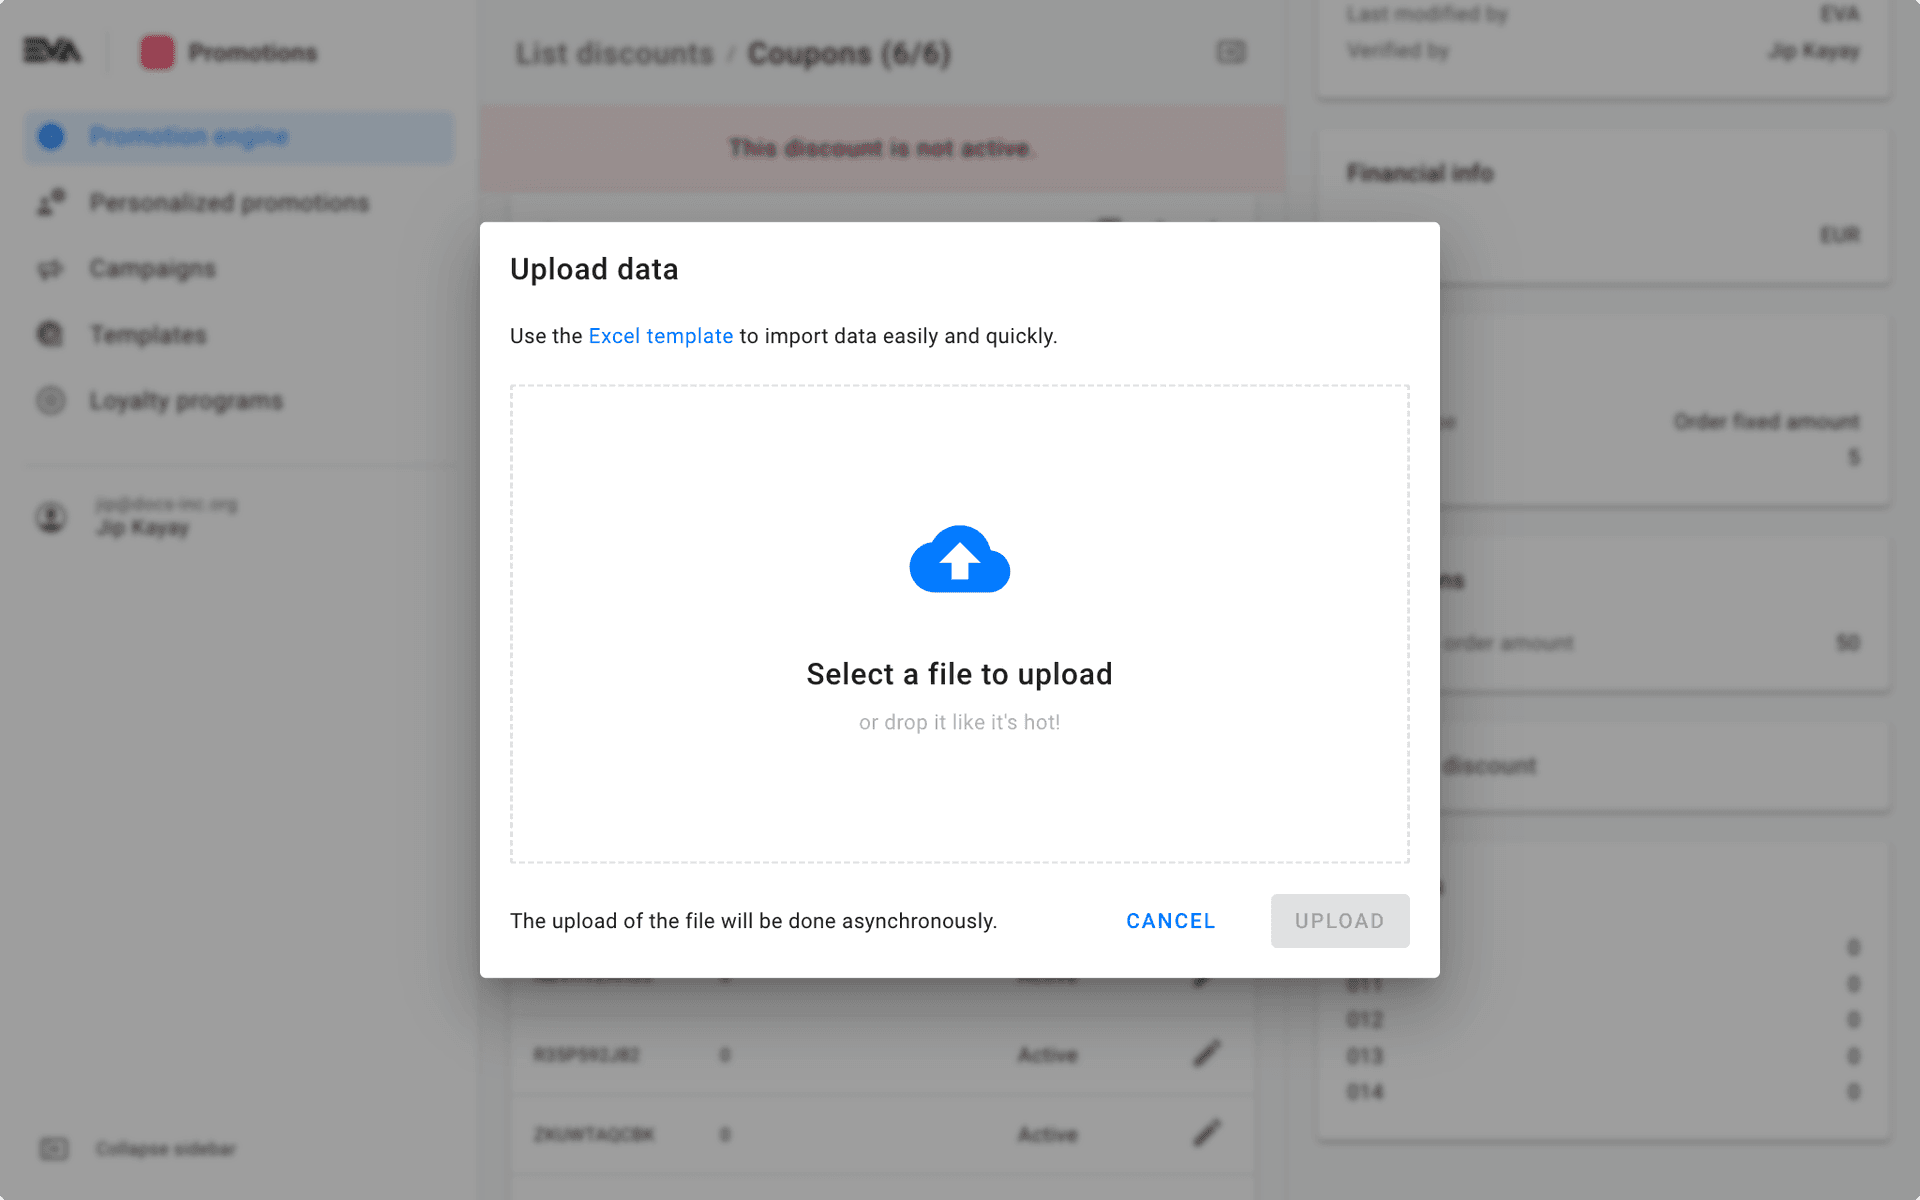
A toaster stating "We will process your request asap. Would you like an email when we're done?" will be prompted, and the option Yes or No to select from.
Afterwards, a different toaster stating "Working on it. Click here to monitor progress and see the result". Clicking the hyperlinked "here" text would direct you to the Async requests chapter where you can do just that.
Download coupons
The download option provides you with an overview of all coupons in an Excel file format, this includes: codes, active or not, maximum usage, usage count, first usage, and last usage (a description of each field can be found here).
Click the 'Download as Excel' icon, and shortly after you'll receive an email from us to download the file.
The email is sent to the logged-in users email address.
To monitor the progress or to download the file again, head over to the Async requests chapter. Your download request can be viewed from there, and will be categorized under the type called 'DownloadCouponExcel'.
The Excel download is limited to 1,000,000 records. If your discount includes more than a million coupons, let us know.
Search coupons
Make use of the 'looking glass' icon to search through your coupon codes. The filtered result will only show exact matches.
Coupon code suffix
Using the setting Discount:PseudoCouponCodeSuffix you can combine 2 discounts in one. However, one of the 2 must be of trigger type Coupon. For example, if you have a coupon discount called coupon10% and the value of the setting Discount:PseudoCouponCodeSuffix is freeshipping, the discount engine will then automatically attach the freeshipping discount to an order where a coupon discount was triggered. In this example, it would mean that the customer would avail both a 10% discount triggered by the coupon, and a further free shipping discount.