Receive goods
There are multiple ways of receiving goods in EVA. You might use your Companion or App Suite in stores to scan a packing slip when physically receiving a shipment, you can receive directly via API or you can use its dedicated chapter in Admin Suite - which can be used either standalone or in combination with the Tasks App.
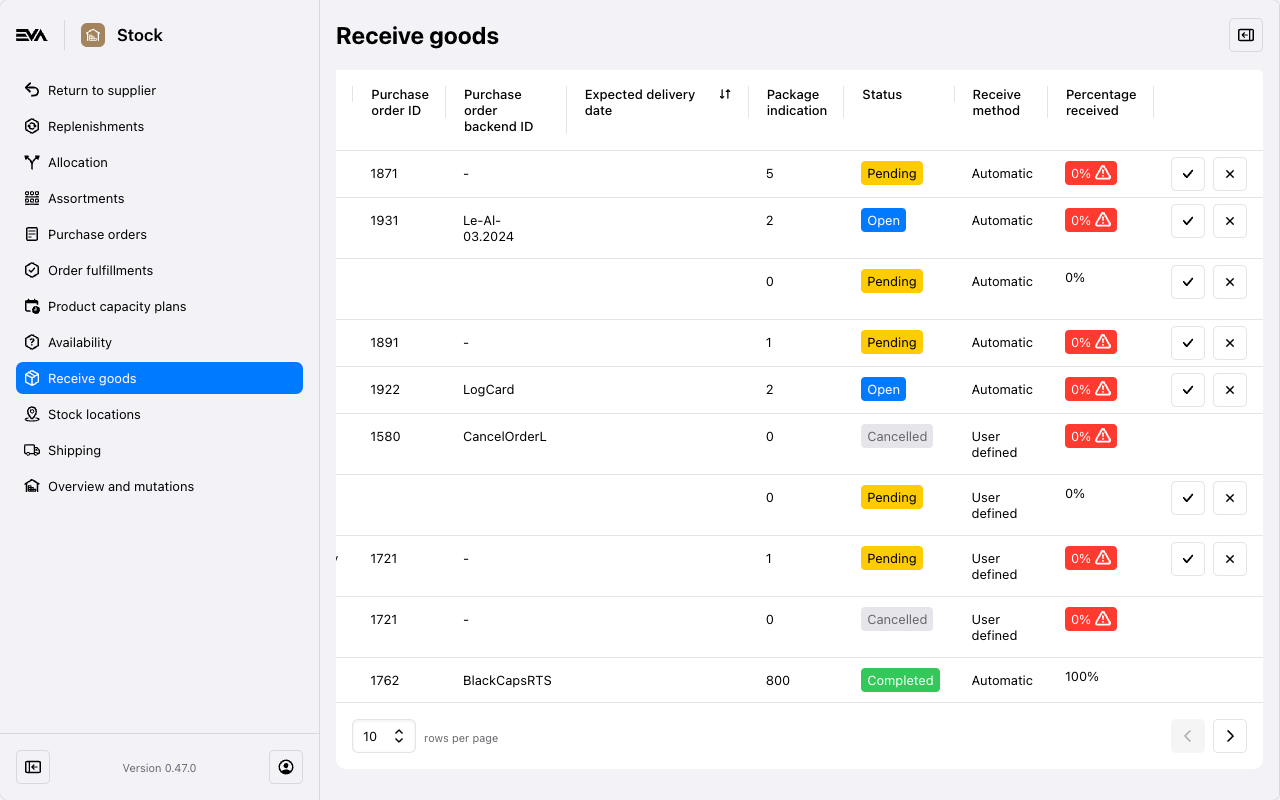
The Receive goods chapter in Admin Suite opens up with an overview of all purchase orders which are Confirmed AND have a shipment attached, regardless of the shipment's status.
The overview is by default displayed with the Filters sidebar to allow for easy searching. The top-level OU is selected by default, so you may want to start by selecting the OU you are interested in.

The filter options make it easy to check which goods have and haven't been properly received, by allowing you to filter on Status and/or Has deviations.
The overview itself is very informative, allowing for a quick check of all the incoming shipments' states. The following states are possible:
- Pending: the shipment has been created in the purchase order, but shipment itself is not done yet. Only the Receive method is editable in this status.
- Open: once a shipment is on its way, the status turns to Open and it will be ready to be received. While in this state, you can edit the Receive method as well as the Received amounts.
- Completed: Once completed, you can check but no longer interact with the shipment.
Although not visible on the following image, the very last column allows you to quickly mark the entire shipment as either Fully received or Fully unreceived.
By clicking an Open shipment you'll get an overview of all of the purchase order/shipment order's details. Not only does this include all products and their quantity, which you can edit directly here, but it also comes with a QR-code.

By scanning this QR with your Tasks App you will open the corresponding Receive goods task straightaway on the App. Any quantities changed in the Products card of Admin Suite will then be reflected in the task. Note that the quantities cannot be changed in the Receive goods task itself.
After you have ensured all quantities are correct, you can complete the receipt via the task in the Tasks App or by clicking Complete in the Admin Suite.
There are two ways by which you can receive shipments: detailed inspection or automatic. Although you can always change this, you can set a default by means of the PurchaseOrder:ReceiveMethod setting.
This setting accepts the following values:
- Manual (0) - this translates to the (time-consuming) inspection
- Automatic (1) - the automatic confirmation of all products in the shipment (this is the default value)
- UserDefined (2) - the Proceed button (in Tasks App) is available to fully receive the shipment without scanning, while the detailed inspection link is available in case you want to count the shipment