Tasks
Tasks
The tasks section contains various user tasks that can be completed based on your user role. If you select a task that has already been started by another user, you will either receive a warning, or the task will be duplicated and assigned to you. The latter depends on the settings for the specific task. You might also assign tasks to specific employees, but you can still take over if the (urgent) tasks are not performed timely.
A distinction is made between regular user tasks and urgent user tasks. Urgent user tasks are marked red and can be found at the top of the list in the User task overview. By default, only the top 5 urgent tasks are shown, but you can view the complete list by clicking Show more at the top right.
Some tasks have to be completed before a day can be closed, while some can be ignored. This is partly configurable. You can read more about real deadlines and indicative ones here: User task deadlines.
The scanner is enabled on the 'Tasks' page by clicking the 'expand' symbol at the top right. You can use the scanner for tasks which require scanning, such as 'Ship From Store' or 'Full Stock Count' tasks on the current Organization Unit.
Cycle Counts
Cycle counts are created daily to ensure an accurate stock level. The cycle count tasks and corresponding zones can be created in their respective chapters in the Admin Suite. The tasks in the Companion are twofold:
- Count + zone: this is the primary task where the user can count the stock in a zone. You can either scan the product barcode or manually type the counted quantity.
- Count confirmation: this is a secondary task to actually process the counted stock. This task can only be confirmed when 100% of the zones are counted. Depending on your role, a user (usually store manager) can also deviate from the counted stock, or request a recount.
Reservation
The Reservation task is related to the order type 'Reserve' and will automatically be created after completing a Reserve order. You can use the filter in the Tasks tab and check the Task type 'Reservation' to see the open reservation(s).
To complete the reservation task you can either scan the products or swipe left on the product line and tap either the green 'Reserve' or red 'Cancel'. If enabled, it's possible that you also have the option to 'Order' which would mean the warehouse will deliver stock to the store for that reservation.
Scanning is highly recommended as it is less prone to user errors. After processing all the products in the reservation task, the action button 'Complete task' is activated, which will complete the reservation task. On the next screen you will be able to choose if a reservation receipt should be printed. If yes, select the station from which you would like to print the reservation receipt. Besides this receipt, an email can be automatically sent to the customer to provide an update about the reservation regarding the collection of the order in the store. This, however, depends on the implementation of emailing.
Reservation cleanup
Products in the stock location 'Reserved' are not included in the available stock. When reservations are cancelled on the order, it's likely that the actual products in the store are still on a different shelf. As a reminder to place the items back at their normal locations, this task asks you to confirm this action.
The reservation might also have expired. In most cases this will mean the customer did not pick up the order, sparking an automatic cancellation. This type of cleanup has two flows: either every item is returned, or not. If the cleanup is done only partially, or nothing was returned at all, you will be able to confirm per unreturned order line how to handle it with the following two options:
- Cancel the line (and trigger a refund for the customer). This is useful if you for example dropped and broke the items.
- State that you accidentally shipped those orders already (without going through the proper release flows). This will prevent a refund to the customer.
Reservation deviation
This task only occurs when there is a mismatch in orders with products on reserved and the actual quantity on that stock location. In most cases this happens when a cycle count is done for products that are on reserved, but are not counted on the correct label Reserved. The best way to resolve this deviation is to create a new cycle count and correct the mistake by counting the right quantity for the Reserved stock label.
This particular task is not currently supported in the Companion and will show up in a popup as an 'Unsupported task'.
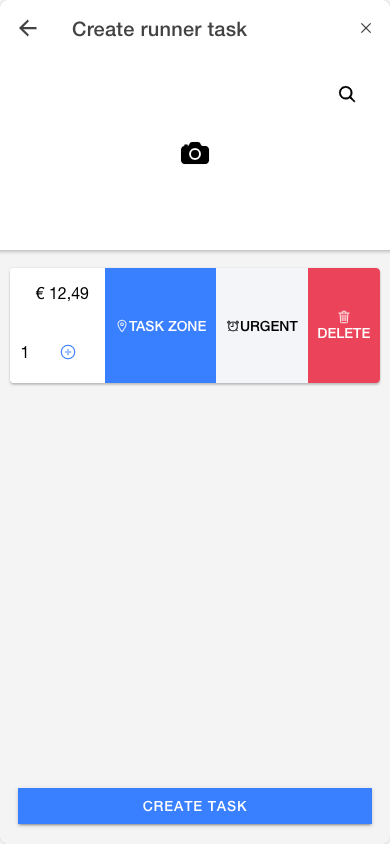
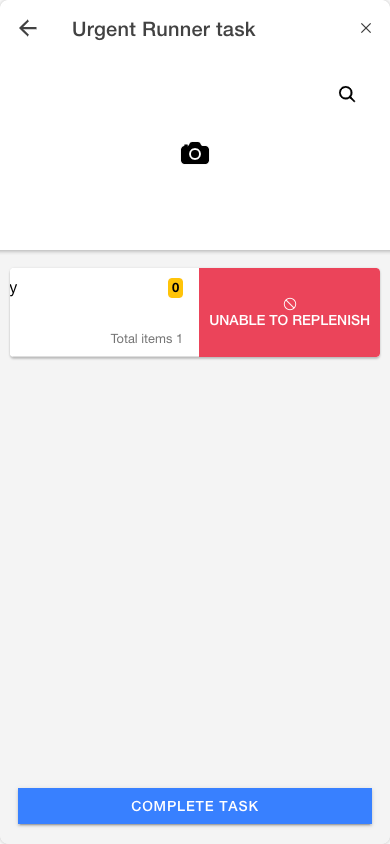
Runner task
Runner tasks can be created by tapping the + icon at the top right in the Tasks module overview.
You can add products to the runner task by scanning a barcode, typing its barcode manually, or a name search. Once the product is added, you can swipe it to the left to display some extra options: 'Delete', 'Urgent' and 'Task zone'. The urgent option will make this runner task popup in the Urgent tasks section of the module overview, while delete simply removes the item from the task.
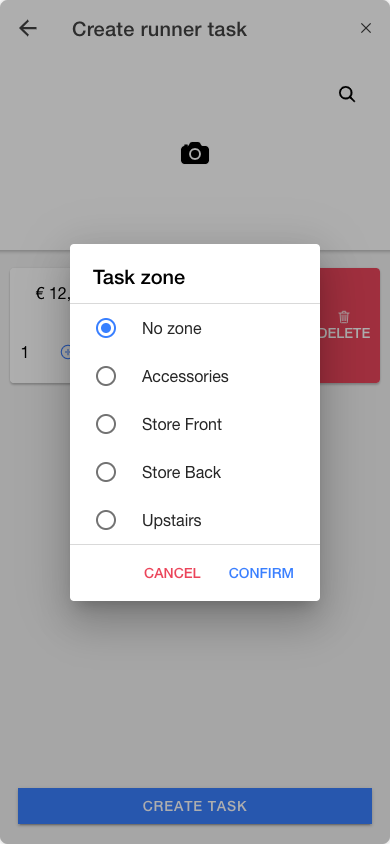
If you have multiple zones enabled in your store, you will also see a third option: 'Task zone'. This allows you to choose a zone where this specific item can be found, easing the task for the person performing it. Just make sure you add the StockReplenishmentTasks:Zones setting for this to work, and in the value field, fill in as you deem fit (so, as per your own organization unit zone naming). The values you input here will then be the list of zone options presented to the user to pick from. In our example screenshot, the inputted values for the setting were "Accessories, Store Front, Store Back, Upstairs". Note the commas here when inputting your own zones/values.
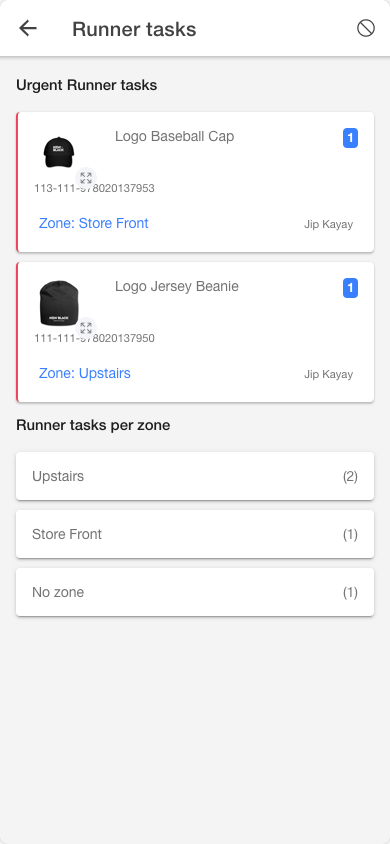
The person performing the task will see runner tasks sorted by urgency and zone:
If you're performing a task, but find that there is no available stock, swipe the product line to the left, tap 'Unable to replenish', and then 'Disable Replenishment' as confirmation:
Receive goods
This task is shown to remind the employees that there are still shipments to be received. The task is shipment specific and will indicate the unique number alongside its due date displayed in hours/minutes format. Scanning this will redirect to the regular process to receive goods.
Whether or not all goods have to be scanned in your receive goods task, depends on the value set in PurchaseOrder:ReceiveMethod: this setting accepts Manual (0), which translates to the (time-consuming) inspection; Automatic (1) which is the automatic confirmation of all products in the shipment; UserDefined (2) which lets the user pick one of both for the shipment. By default the setting picks Automatic (1).
Stock movement
When a purchase order is created, the stock can be directly allocated to a specific stock location (e.g. 'Demo'). When an employee receives the accompanying shipment, the stock will be allocated directly to the specific stock location chosen on the purchase order ('Demo'). However, after the shipment is received by the employee, the stock is not physically moved to the new location yet. That is where the 'Confirm movement' task on the Tasks page comes in to remember the employee in the store to physically move the stock from the current location to the assigned location. Within the Confirm movement task, the employee has several options to process the task:
- Complete the task: this results in an administrative note of the fact that the stock was physically moved by Employee 'X' at 'Y' location.
- Cancel/Deny the task: this results in removal of the task and the stock will be moved back to the 'Moved from' location.
- Partially complete the task: this results in a combination of the aforementioned two options. The administrative note of the fact that part of the stock was physically moved by Employee 'X' at 'Y' and the non-moved stock will be moved back to the 'Moved from' location.
Full Stock Count
The Full Stock Count can be used to generate an overview of all items in your store (including stockroom and/or external stockroom). To ensure an accurate representation of the inventory stock levels, the count should be done outside of usual opening hours. This ensures that no items are counted twice, or even sold after they have been counted.
While the Full Stock Count is in progress, all other features/pages of the Companion App as well as POS will be unavailable unless you use a setting called FullStockCount:AutoStartFullStockCountOnCreate which controls the initial locking behavior once a Full Stock Count task is initiated. Here is a description of the different values for this setting:
A Full Stock Count can also be created from within the Admin Suite.
How to create a Full Stock Count
A Full Stock Count can be created by anyone with an account that has the un-scoped functionality 'FullStockCount'. The Full Stock Count can be created in the Companion from the Tasks page by tapping the top right '+' icon or via Admin Suite Stock Module. Here we will cover Companion App.
Tapping the top right '+' will show an overlay at the bottom of the page. Tap the Full Stock Count option in order to navigate to the Create Full Stock Count page. Make sure to read the information provided on this page, concerning what is and isn't allowed during an FSC.
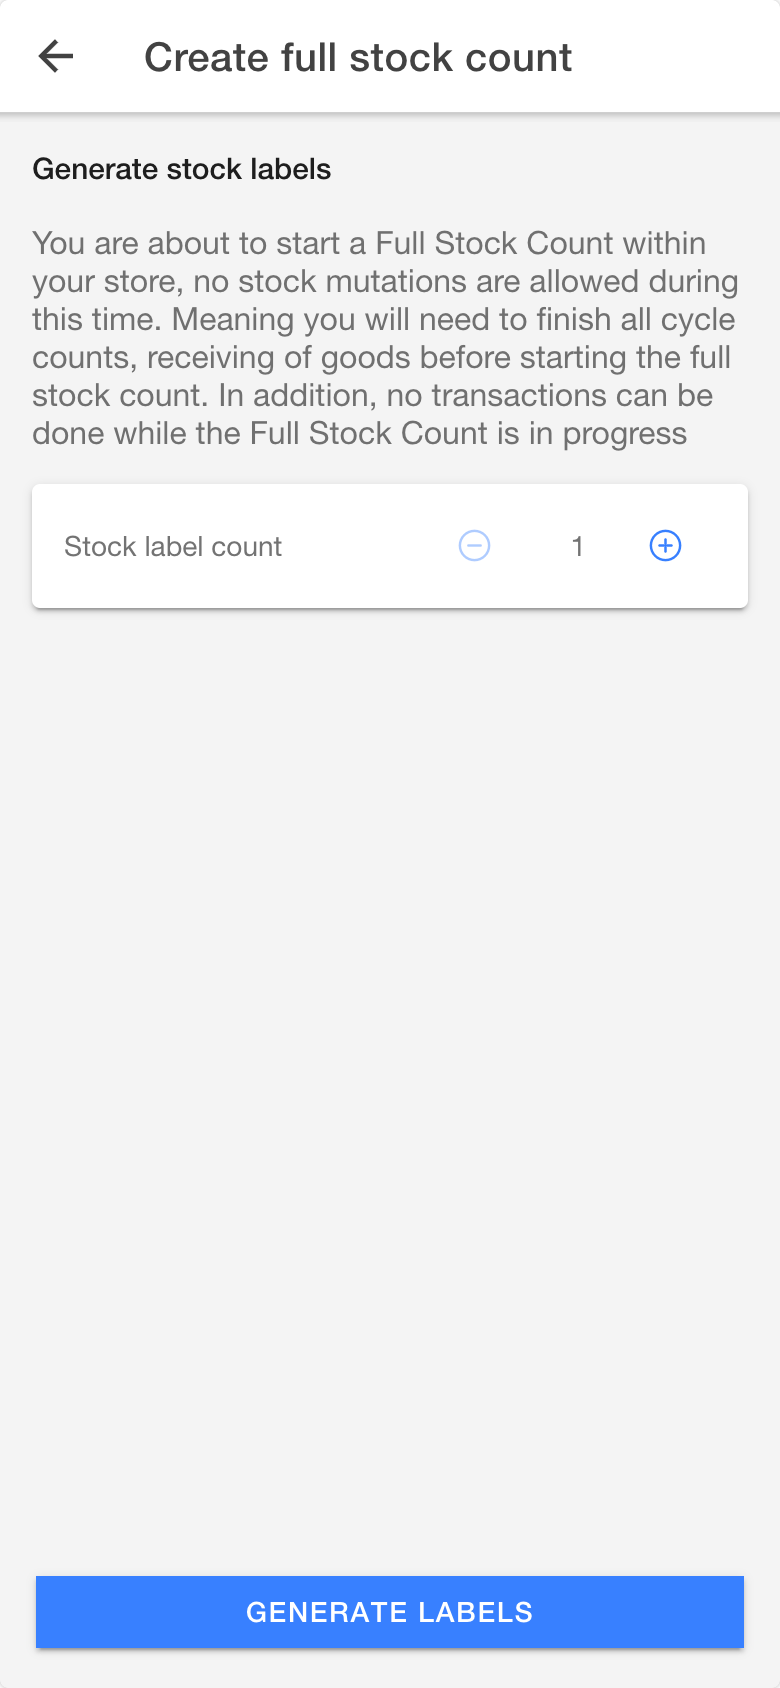
The quantity selector can be used to insert the stock label count. Click Generate labels to proceed to the wizard that will help with creating the Full Stock Count labels.
Generate stock labels
The wizard will help generate the Full Stock Count labels. Each label has two fields: an optional name (e.g. 'Left wardrobe') and a mandatory stock label (e.g. 'Sellable'). Click Next label to progress to the next stock label. Repeat until you reach the final label to complete the generation of stock labels by clicking Next. After creating all the labels, the last step is to print the labels from the app to start the Full Stock Count. After printing the labels, you will be navigated back to the 'Tasks' page. The printed labels contain the label name, label ID and a QR code.
Tasks
Our flow here was conducted with the setting FullStockCount:AutoStartFullStockCountOnCreate value set to false.
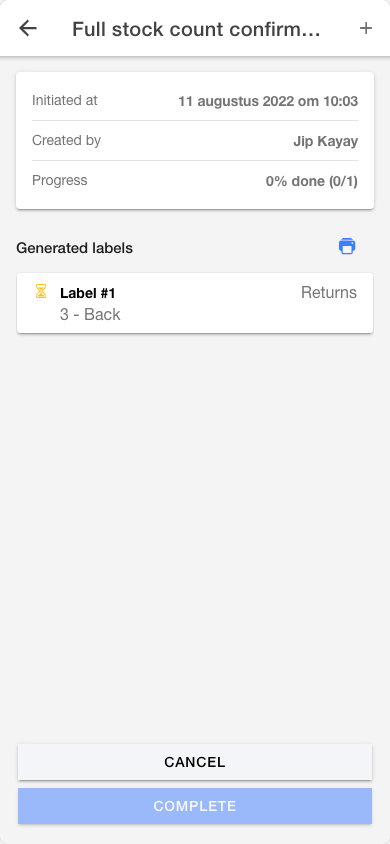
Once you are done with generating the stock labels (above steps) you will notice two new tasks on your 'Tasks' page under the Full stock count tasks. The tasks within are called Full stock count confirmation and Full stock count label

Full stock count confirmation task
At this stage the purpose of the Full stock count confirmation task would be to:
StartFullStockCOuntby tapping the Start full stock count button- Add more labels to your full stock count by using the '+' icon.
Once you've tapped the Start full stock count button both Companion App and POS App will be locked, and the only possible actions would be:
- Reprint the label(s) if needed. This can be done by tapping the Printer icon and selecting a station where the labels would be printed.
- Add more labels to the Full Stock Count.
- Actually perform the Full Stock Count task using the other task named Full stock count label.
You notice here that at this stage the Complete button is un-tappable. Later, after completing the Full stock count label task you'll be able to use it.
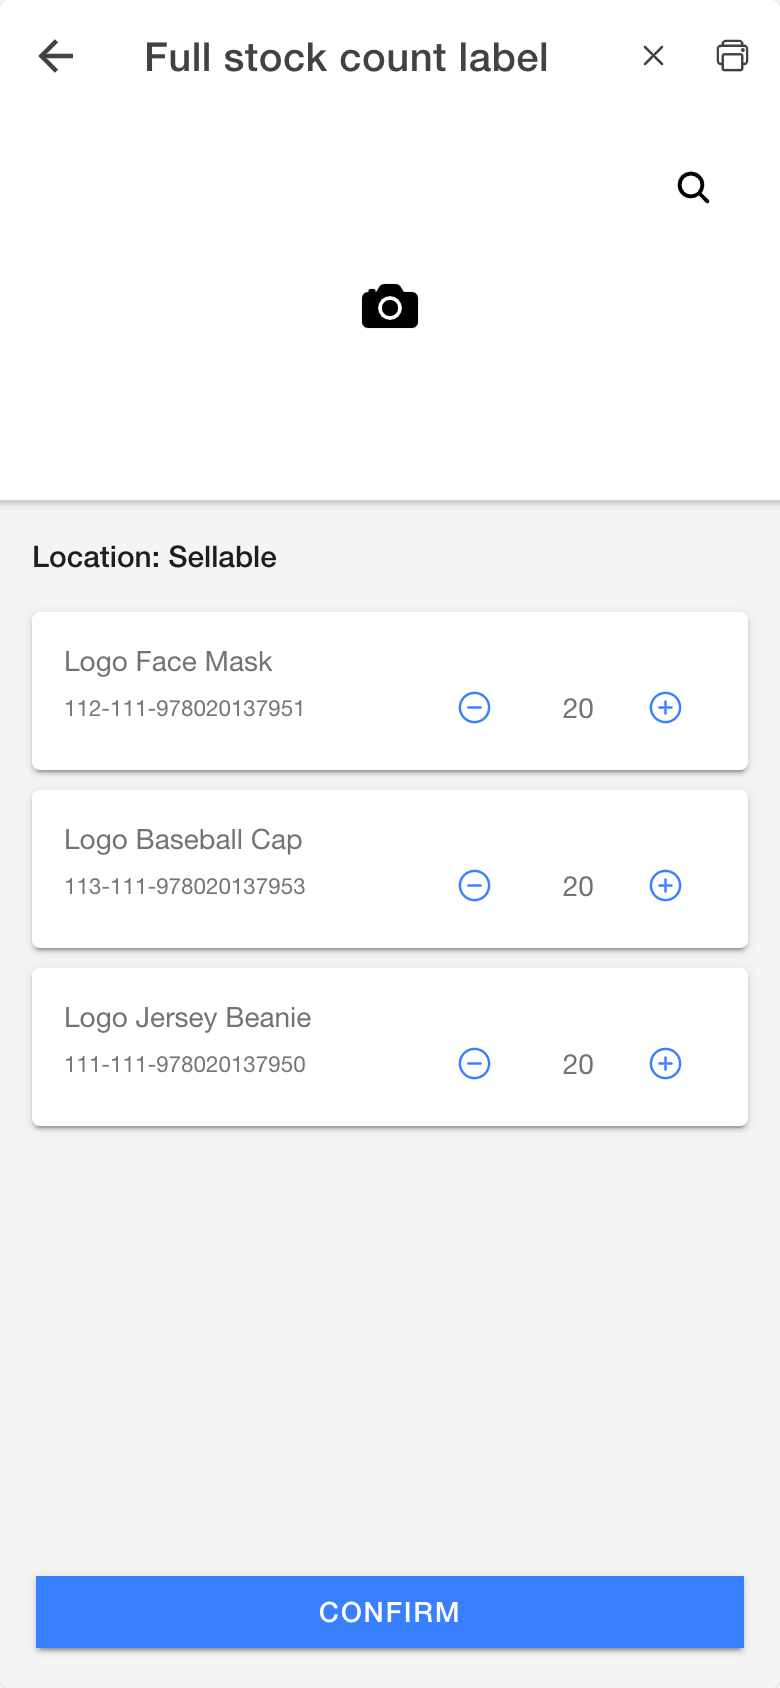
Full stock count label task
The Full stock count label task is where the scanning work begins. The user can start scanning the respective QR code(s) which was printed during the last step of the 'Generate stock labels' flow (reprinting is possible). The task will have the scanner enabled by default. Scanning a product will add the product card to the label as a counted product. The product card contains the following elements:
- Quantity control: this allows manual numeric input (in case you know the specific amount available)
- Product name
- Custom ID
The task will contain zero or more products which the user can add by scanning. The task can be completed by tapping the Confirm button once done.
Whenever a label is modified, it will move to the top of the list among the labels. This makes it easier to keep track of the label you were working on.
How to complete a Full Stock Count
Once you complete the Full stock count label tasks by tapping the button Confirm. You can then complete the full stock count via the Full stock count confirmation task by tapping the Complete button which was initially un-tappable.
Full Stock Count Confirmation
The 'Full Stock Count Confirmation' user task contains information regarding the Full Stock Count:
- Creation date
- Creator of the task
- Overall progress.
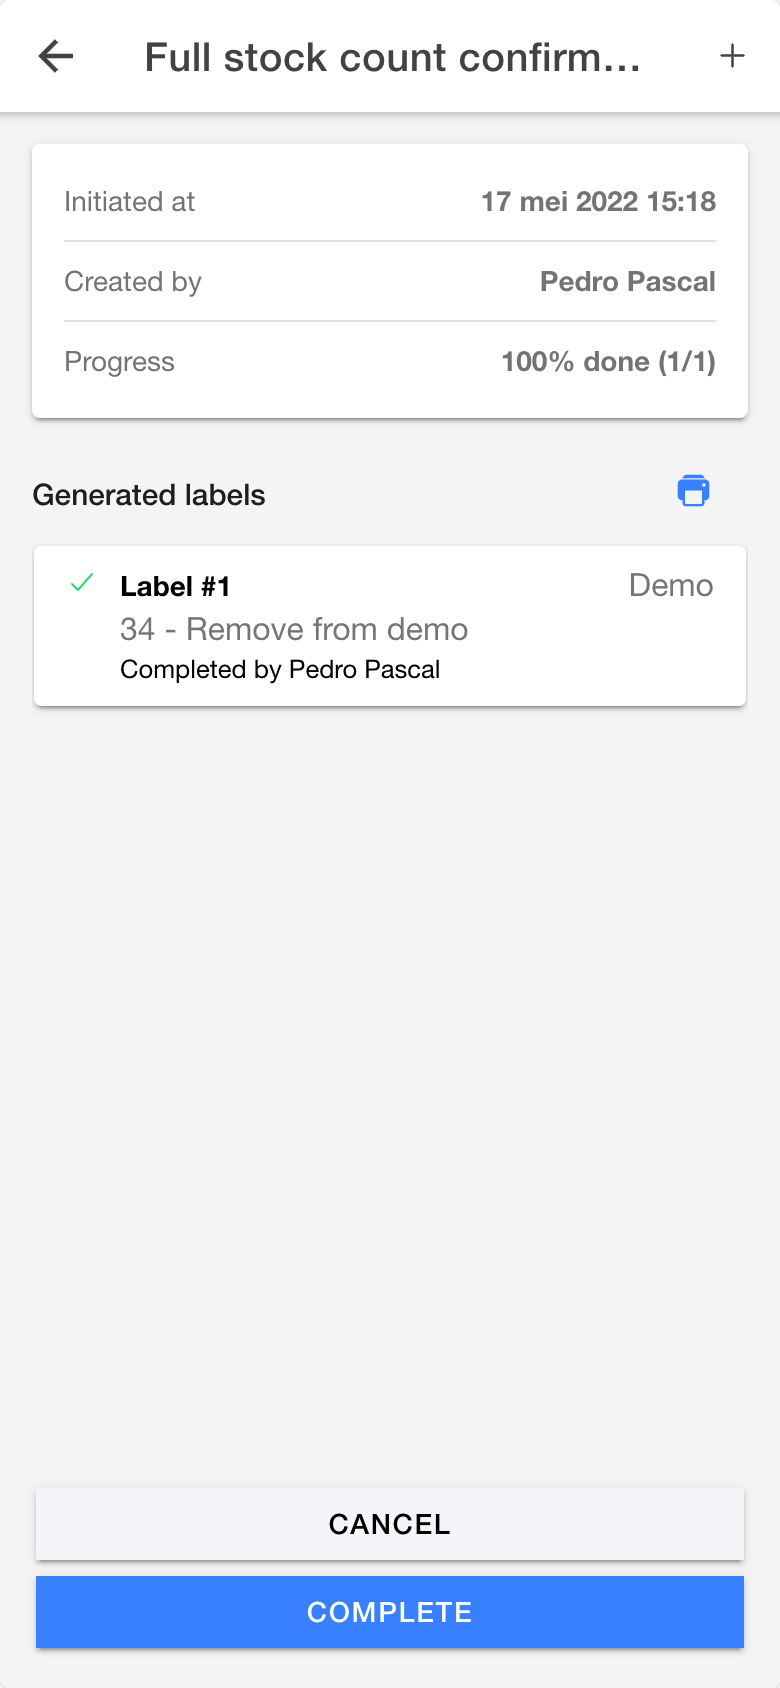
The section 'Generated labels' provides an overview of the labels with additional information like: label ID, label name, stock location, and indicators whether the label is completed or not and if so, by whom. If all labels have been counted, the button Complete will be enabled. By clicking it, the 'Full Stock Count Confirmation' user task will be completed and the app navigates to the 'Deviation overview page'.
If there are deviations as result of the Full Stock Count, the 'Deviation overview page' displays a list of all deviations found during the full stock count. The product card provides general information such as: product name (including Custom ID), expected quantity, actual quantity and a checkbox to create a cycle count.
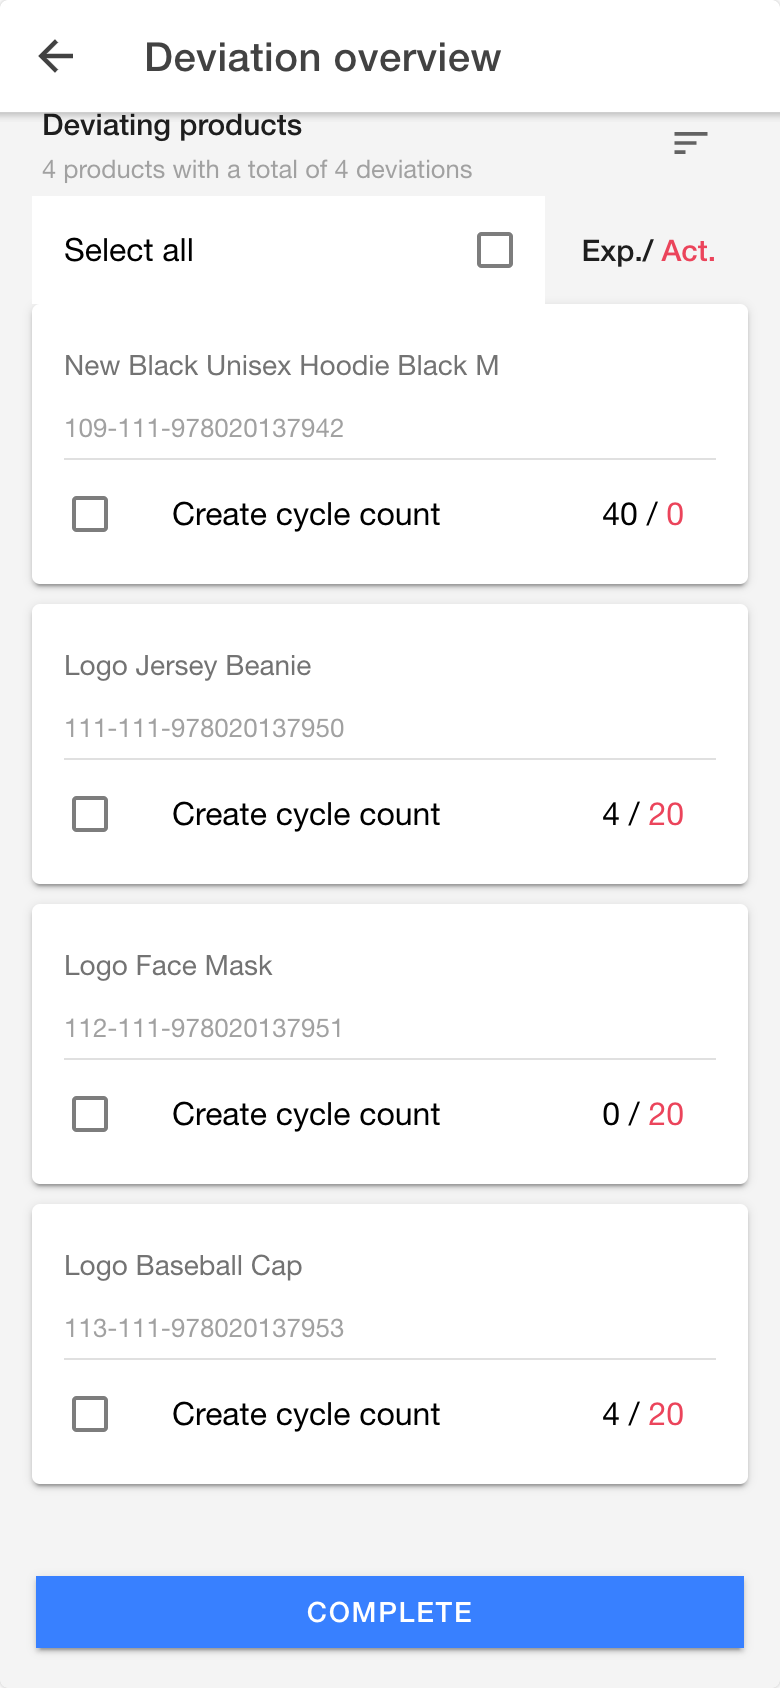
The expected quantity is displayed in black, while the actively counted ones are displayed in red.
The selected checkbox will trigger a cycle count for the product after the Full Stock Count is completed. The default value of the checkbox is unselected. Quick control actions are available for (de-)selecting all product count deviations by toggling the 'list' icon or using the 'sort' icon to quickly sort the quantity of deviations in ascending or descending order.
After clicking Complete, the possible cycle counts are created, the store will be unlocked, and all features/pages become available again. You will be navigated back to the Tasks page.
Full Stock Count Recount
There is always a margin of error when performing a Full Stock Count. To double-check your initial count, EVA can automatically trigger a recount. To prevent having to recount your entire store again, you can define a percentage of SKUs to be recounted. If enabled, a separate task will be created before confirmation of the Full Stock Count.
Tip: when first performing Full Stock Counts with EVA, pick a higher recount percentage, to ensure accuracy.
Example: if you set the recount percentage to 50%, EVA will automatically create tasks to recount 50% of all your initially counted SKUs. So if you scanned 600 SKUs in your initial Full Stock Count, there will be 300 Recount Tasks created.
A 'Full Stock Count Recount' user task is a normal Full Stock Count Label task, except it is directly related to a previous Full Stock Count Label product (a previously counted result for a product).
When only one person is counting the store, no recounts can be performed because another EVA user must execute the recount tasks.
Upon opening of the Recount task, there is a slightly different UI compared to the Label task: the camera is enabled by default, the related label is shown (name if available, otherwise the label ID), stock locations are shown, as well as the guiding text: "Please scan the following product: {Productname}". If a different product is scanned, a toaster message is shown to inform you the incorrect product was scanned.
The product card is displayed by default, along with the following elements:
- Product name
- Scanned quantity (not the expected quantity)
- Quantity selector controls
After the user has scanned/counted all items of the recount product, the Recount task can be completed by clicking Confirm. This action can result in two scenarios:
- Successful recount: this means the recount quantity is equal to the initial counted quantity. The user will be navigated to the 'Tasks' page and a toaster is shown indicating the recount was successful.
- Unsuccessful recount: this means the recount quantity is not equal to the initial counted quantity. A warning toaster is shown to inform the user the recounted quantity does not match the expected quantity. The recount quantity is consequently reset, and you will have to start over again in the initial recount state.
You might come across the input field 'Recount percentage', which will show you what percentage of the quantity must be recounted. This is only shown however if it has been configured for the current store.
How to cancel/abort a Full Stock Count
If the Full Stock Count needs to be cancelled, go to the Full Stock Confirmation task, tap the Cancel button followed by Cancel Task or via Admin Suite Stock Module.
Return to Supply task
When products have to be returned to the supplier for some reason, for example due to a product recall, an RMA order has to be created. The creation of an RMA order will lead to a new user task, which concerns the actual scanning and packing of the goods.
For all information regarding relevant settings and roles for RMA, see RMA/RTS Settings and roles.
Order validation
If your RMA order does not generate the expected RTS user task, it can mean two things.
- Your organization is using an older RMA flow. In this older flow your RMA order is not created until it has been approved by the Finance Department of your organization.
- OrderValidation has been enabled in your (new) RMA order flow.
In the second case, RMA orders are put on hold until a user with the appropriate role has verified them. This can be done by finding the RMA order among the orders and open it. In the order details a new option will then be available: Confirm order. Clicking this will verify the order for RMA and consequently the RTS user task will be created.
Picking up the RTS user task
The Tasks section may hold several available user tasks: look for the 'Stock movement tasks'. Once in there, the relevant task is named 'Return to supplier'.
- After you have started a Return to Supplier task, others might also pick up this user task. Whether this is allowed or not, depends on your RTS settings. If allowed, EVA will create a duplicate of the parent task and assign this duplicate to the other user. This task only shows the remaining order lines that are not yet picked.
- After starting the RTS user task, you might be prompted to scan a shipping label. This depends on your RMA settings.
Once in the RTS task, you will see all the products which have to be picked along with their quantities. You can do so by either scanning the products (a single scan will instantly pick all remaining quantities on that order line), or by selecting the product cards.
Selecting product cards either includes them, or excludes them from the shipment. This is dependent on the 'ExcludePolicy' settings for your organization. When your organization uses the include version of the settings, it is expected that you will scan and/or select each product that has to be included in the shipment to the supplier. The Exclude task then naturally assumes every product mentioned in the product recall will be sent back to the supplier, except for the products you scan and/or select. When inside the user task, you can also see which stock label these products belong to.
When there are multiple products to be returned to a supplier, for example due to a product recall, then you can see the amount of products required displayed in an amount of boxes and/or products. If for example 81 products have to be returned to the supplier, and 1 box of products contains 8 items, then you can also scan 10 full boxes and 1 single product, instead of 81 products/or clicking the + button over and over.
Any items added to the shipment, or excluded from the shipment, before finishing the shipment, can be found by clicking the 'box' icon in the top right of the screen. A number next to this box will show the amount of items currently included or excluded.
Shipping in the RTS user task
You are allowed to "undership". If for example 5 products were required, you are allowed to add only 4 to the shipment and finish the task.
While scanning the products for the shipment, you can at any time decide to ship the batch of products you've scanned so far. Simultaneously you can determine that was all of the products to ship and end the task. In that case you end up with fewer products scanned and shipped than expected (undership). Or you can continue scanning, but with another shipment. You can thus have multiple shipments for the same RTS task.
For every completed RTS user task, a unique shipment is created. If you are able to pick items, but are unable to actually finish the complete task, it means you do not have the required role to do so.
If you scan products or quantities that don't match the RMA order, a notification will appear. When you have added all required products, complete the process by tapping Ship order' A toaster message will then show up to indicate if the shipment is created successfully.
The shipment in this task will be automatically be setup with the relevant store or warehouse as the destination OU.
After finishing the entire task, you can select a station to print a shipment receipt from.
Ship-from-Store tasks
To fully commit to Unified Commerce, your organization may have Ship-from-Store (SFS) enabled. This functionality makes your stores part of your supply chain. This functionality however only works in combination with Order orchestration.
To give a practical example: if a customer orders a product online, and there's a store close by to the customer's location which carries the product, the order may be routed to the store. The store will then get this SFS task, to pick, pack and ship the order to the customer. Whether or not such an order would be routed through the store, depends on several variables.
Whether or not an order would be routed through a specific store, is determined in the Order orchestration sheets. All settings related to SFS (and much more general information about it) can be found in the Ship from Store documentation.
Once an order is pushed to a store, the following SFS tasks can become available in the user tasks:
- Pick
- Pack
- Ship
Depending on the settings, these tasks may be grouped under a single task.
After having picked your products and clicking Next, a popup screen will give you an overview of all picked products and the question whether or not you want to ship right now, or later. A new packing or shipping task will be created, and opened for you right away if you click Ship now.
It also depends on the settings whether or not you are allowed to selectively pick products from the ones listed in the SFS task. Any order lines not picked will consequently not be carried over to the Pack/Shipping tasks. Additionally, the next best possible path for these unpicked items will be recalculated by the Order orchestration, so the customer will receive his products regardless.
In the Shipping task, you will either be able to choose the shipping method for the shipment, or you will see the default shipping method (if there is but a single method available). If you haven't selected the packaging yet, you can do so from within the shipment overview. Furthermore, to ensure the shipment reaches its proper destination, the details of the receiving OU are displayed in the SFS tasks, instead of the customer's details.
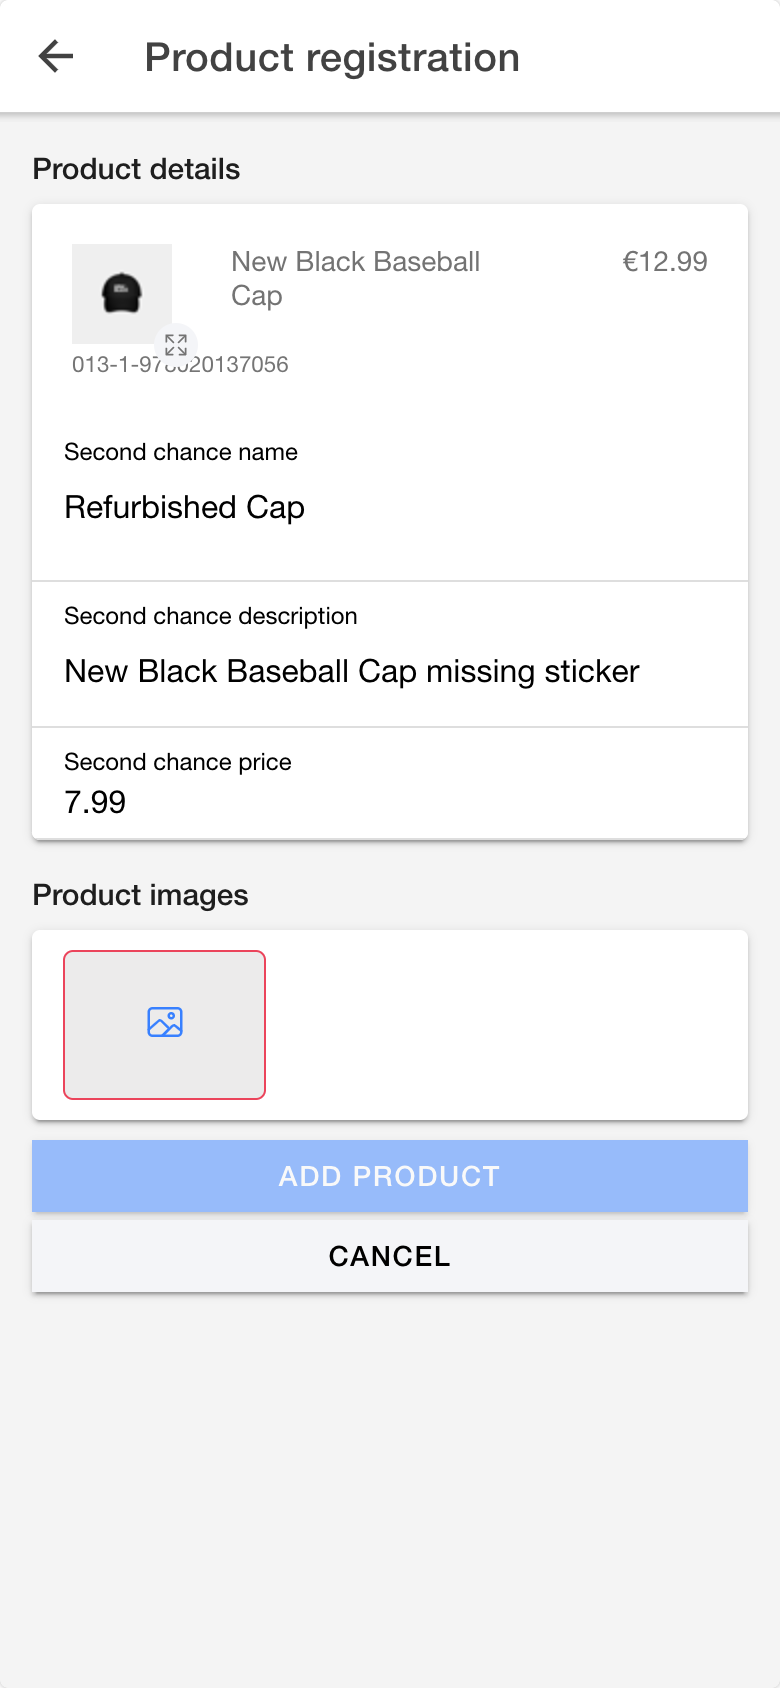
Second chance products
To facilitate the sale of (slightly) damaged goods at lower prices, we've got the second chance products flow. This flow, which is performed in the Companion in its entirety, is quick and easy.
This flow needs to be enabled by setting SecondChanceProductRegistration:Enable to true.
Afterwards, any time you either move a product from any label to Damaged in the PDP, or add products to Damaged directly, a new user task will be created.
The specific user task can be found in the Operational tasks section of user tasks.
Open up the task to find which product it relates to and add all the necessary data, including a picture. Click Add product to complete the flow: the normal product will be copied and its new product type will be SecondChance.