Day open/close walk-through
Day open/close walk-through
An in-store walk-through to financial periodsAudience: Store employees
Apps used:POS & Admin suite for settings
Before we go into a detailed walk-through let's clarify some terminology from EVA's perspective. A financial period within EVA, is a span of time (specified by an opening and closing moment) where all financial events occurring within that time span are recorded. This is done for financial reporting purposes (bookkeeping, auditing, etc…), thus mainly for the sake of traceability.
From a store operational perspective, a financial period can be matched to your store working hours or with employee shift changes. For example, it can be once a day with the opening and closing of your store, or twice a day, once at opening and another with the night shift employee change. The period can be specified as deemed fit to your operations.
So what should I do to ensure I properly open and close financial periods? What steps should I follow? How is this handled in EVA? What settings are available to tailor certain steps within the flow?
In this walk-through, we put an end to those questions by putting ourselves in the shoes of an in-store employee. We'll walk through a typical in-store employees day within the context of handling a financial period using nothing but our POS App.
The walk-through follows a sequence of operations as depicted below:
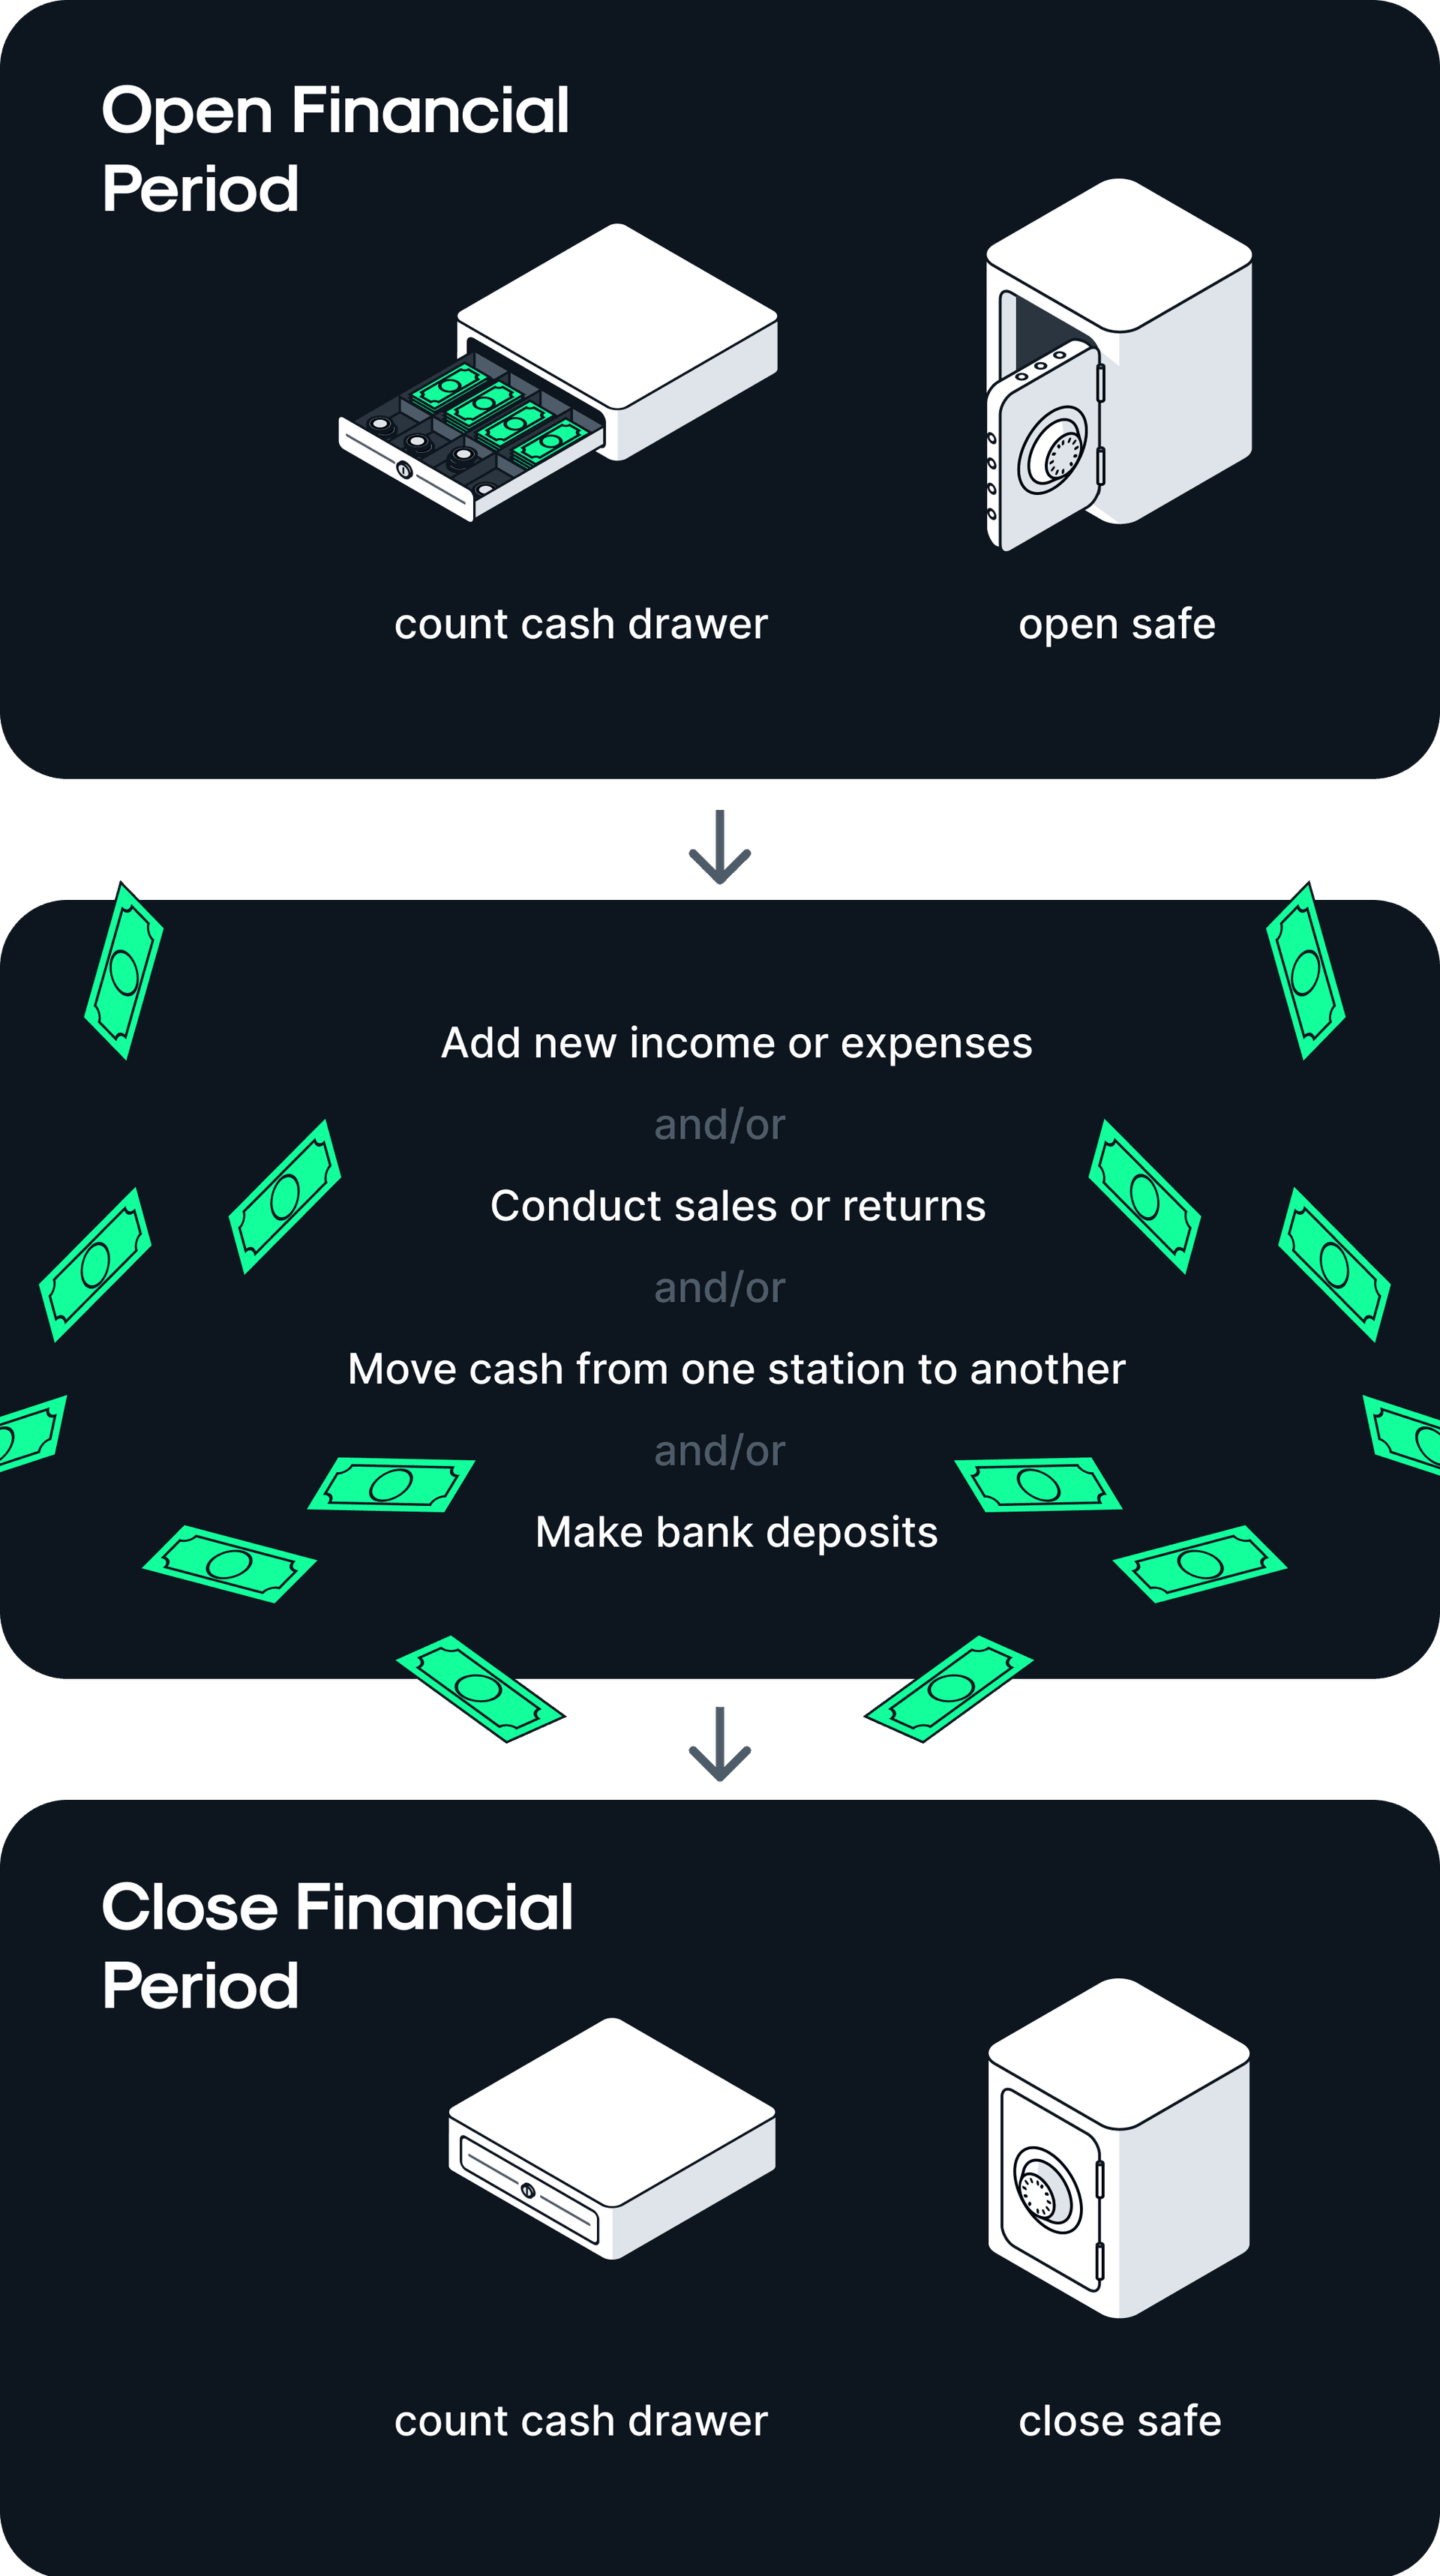
Before we go into this step-by-step walk-through, we first have to make an assumption when it comes to the way our store operates, and accordingly the way we want financial periods to behave. We will assume that financial periods in our store are opened and closed just once a day, aligning with our stores working hours rather than shifts.
The working hours assumption is made only for the sake of presenting this walk-through. Please adjust based on your own way of operations and the way you'd like financial periods to be handled within EVA.
Open financial period
Your first order of business would be to open your financial period, we assume no surprised faces here. This can be done from the More options tab on your POS App. Once the Open financial period button is tapped you will be prompted with a message that the financial period has been opened, and a request to count the content of your cash drawer. At this point, you'll still not be able to perform sales or any other cash impacting transactions.
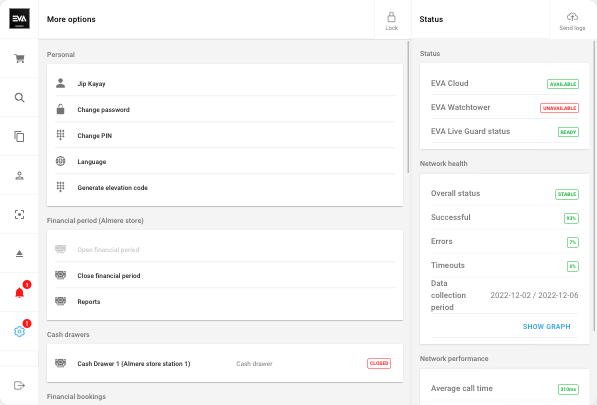
You will notice that your period is indeed now open, but cash drawer is still displaying a Closed status. This is due to the fact that a manual cash count is needed, and that takes us to the next step Cash drawers.
Useful links:
Cash drawers
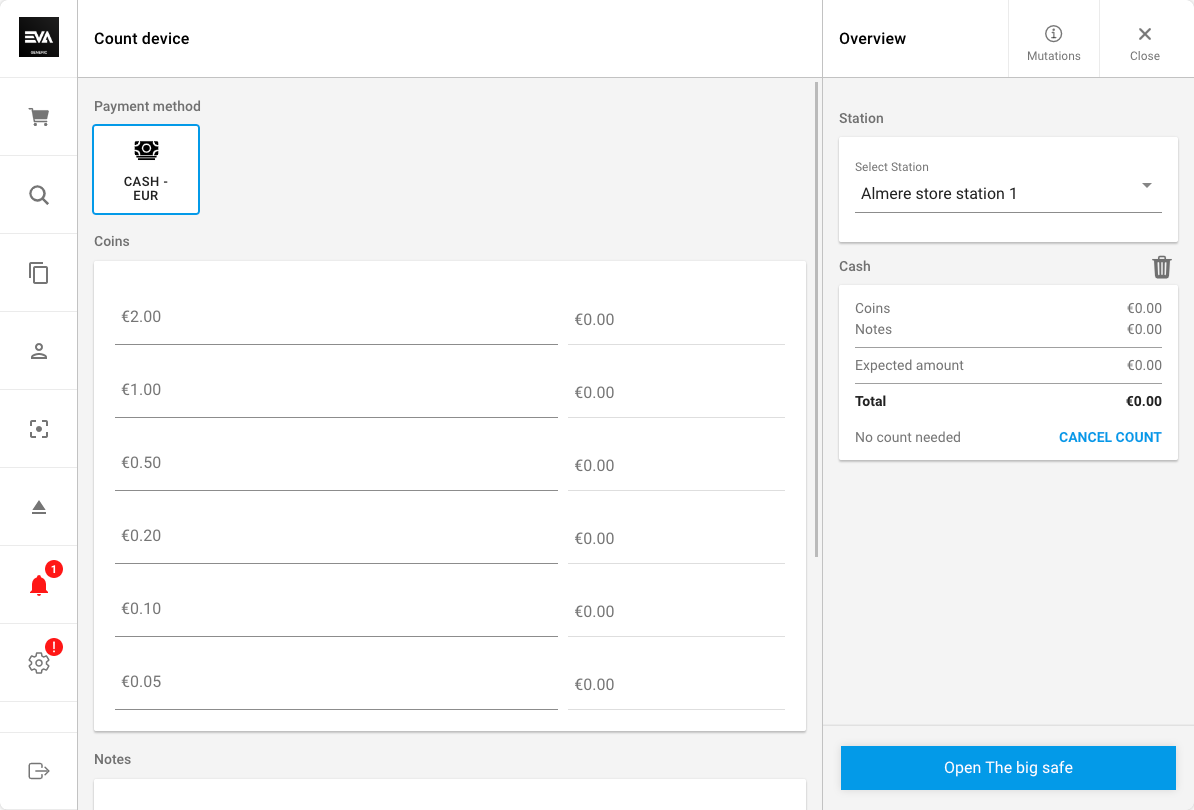
From the More options tab on your POS App, tapping the Cash drawer will prompt a Count device action. The count will include coins and notes however, will vary based on the organization units currency configurations.

A cash count result that is different from the expected amount would require a correction reason.
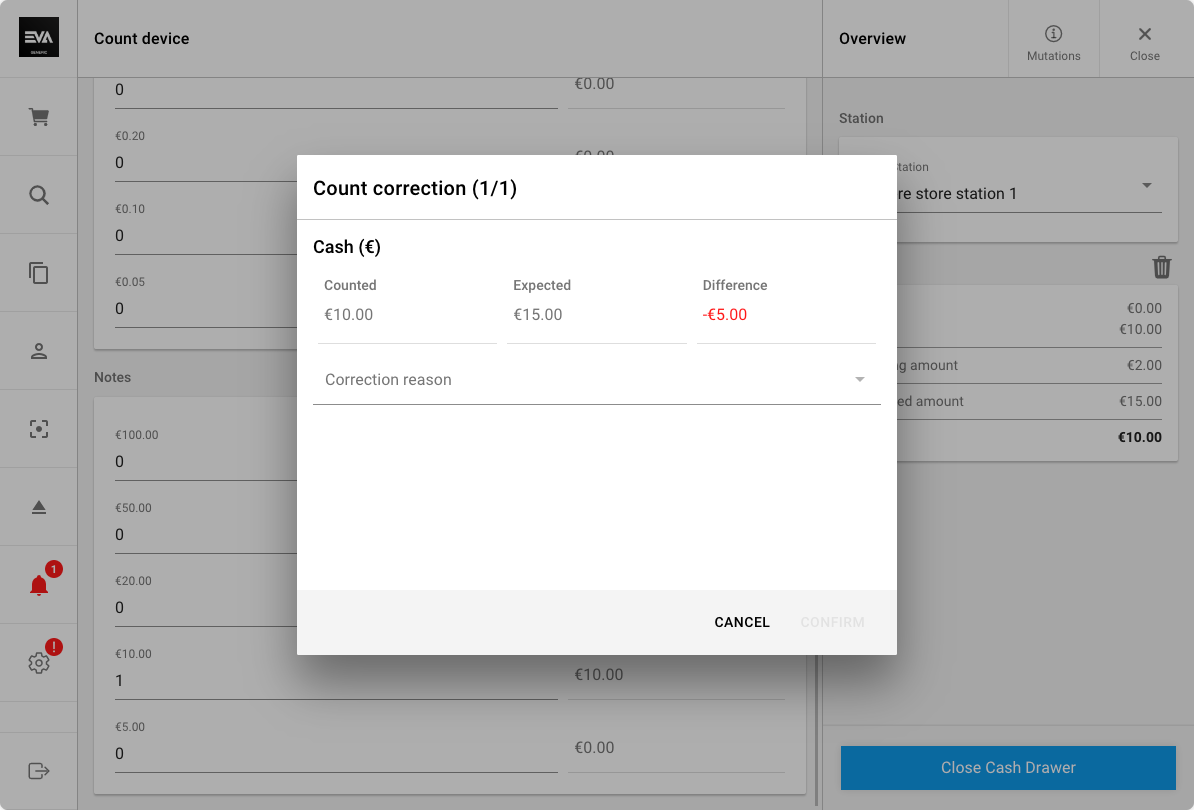
If a difference exists and there are no cash correction reasons configured, the user will be prompted with a description field to provide a manual input. To close a cash journal with a difference, a configured reason is required. If not available, a description must be provided. Further, there are a few setting that impact acceptable deviations stated in the impacting cash drawer settings below.
Impacting cash drawer settings:
| Setting | Description | Value expected | Default value |
|---|---|---|---|
App:CashJournal:ShowExpectedAmount | Displaying the expected amount that should be in your cash drawer when the amount counted is incorrect. | true or false | false |
App:Pos:DisplayExpectedAmountOnCashJournal | Displaying the expected amount that should be in your cash drawer when counting the cash drawer. | true or false | false |
App:CashJournal:RequestRecount | Request a recount popup display (non-blocking) before being prompted to add a correction reason in instances where the actual and expected amount do not match. | true or false | false |
App:CashJournal:AllowManualCorrections | Controls whether a cash journal can be closed with a difference or not. | true or false | true |
App:CashDrawer:OpenReason | Whether there should be a reason added to instances of opening cash drawer without an underlying sales transaction or not. It is possible to pre-define reasons. | 0 (hide), 1 (show), 2 (required) | 0 |
| Set cash drawer limit from "Financials module - Organizations chapter" (Check the useful links below) | Set your cash drawer limit on organization unit level. | Integer | N/A |
CashJournal:MinimalAllowedDeviation | An acceptable deviation amount under the expected amount. Example: The expected amount should be $1,010. The physical count resulted in an amount of $1,008. The setting is set with a value -2. This would mean that no cash correction reason would be triggered since the deviation falls withing the minimum allowed deviation specified in the setting of -2*. | A negative integer | 0 |
CashJournal:MaximalAllowedDeviation | An acceptable deviation amount above the expected amount. Example: The expected amount should be $1,010. The physical count resulted in an amount of $1,012. The setting is set with a value 2. This would mean that no cash correction reason would be triggered since the deviation falls withing the maximum allowed deviation specified in the setting of 2*. | An integer | 0 |
Useful links:
- POS Manual - Cash drawers
- Setting up Cash correction reasons
- Pre-defined cash drawer opening reasons
- Finance module - Organizations chapter
Safes
Based on Admin configurations and infrastructure setups, safes may or may not exist within your store. In the scenario a safe does exist, it can be used to move cash from and to the cash drawer, to maintain limits, or to make bank deposits.
From the More options tab on your POS App, tapping Safes will prompt a Count device action same as what happened when opening a Cash drawer. The count will include coins and notes however, this will also vary based on the organization units currency configurations.
If the safes cash count result is different from the expected amount, a correction reason would be required.

Impacting safes settings:
| Subject | Description | Value expected | Default value |
|---|---|---|---|
| Safe cash limit from Financials module - Organizations chapter | Set your safe cash limit on organization unit level. | Integer | N/A |
| Safe ignore counting from Infrastruture setup | Ignore counting a safe when closing a safe. | N/A | N/A |
Useful links:
- POS Manual - Safes (POS manual) /documentation/documentation/manuals/pos/more-options#safes
- Setting up Cash correction reasons
- Finance module - Organizations chapter
- Safe ignore counting setting
Income and expenses
This is the place where in-store income and expenses that fall out of the ordinary store activities should be recorded. Think of things like a daily lunch allowance or unexpected maintenance work where on-the-spot payments were made.
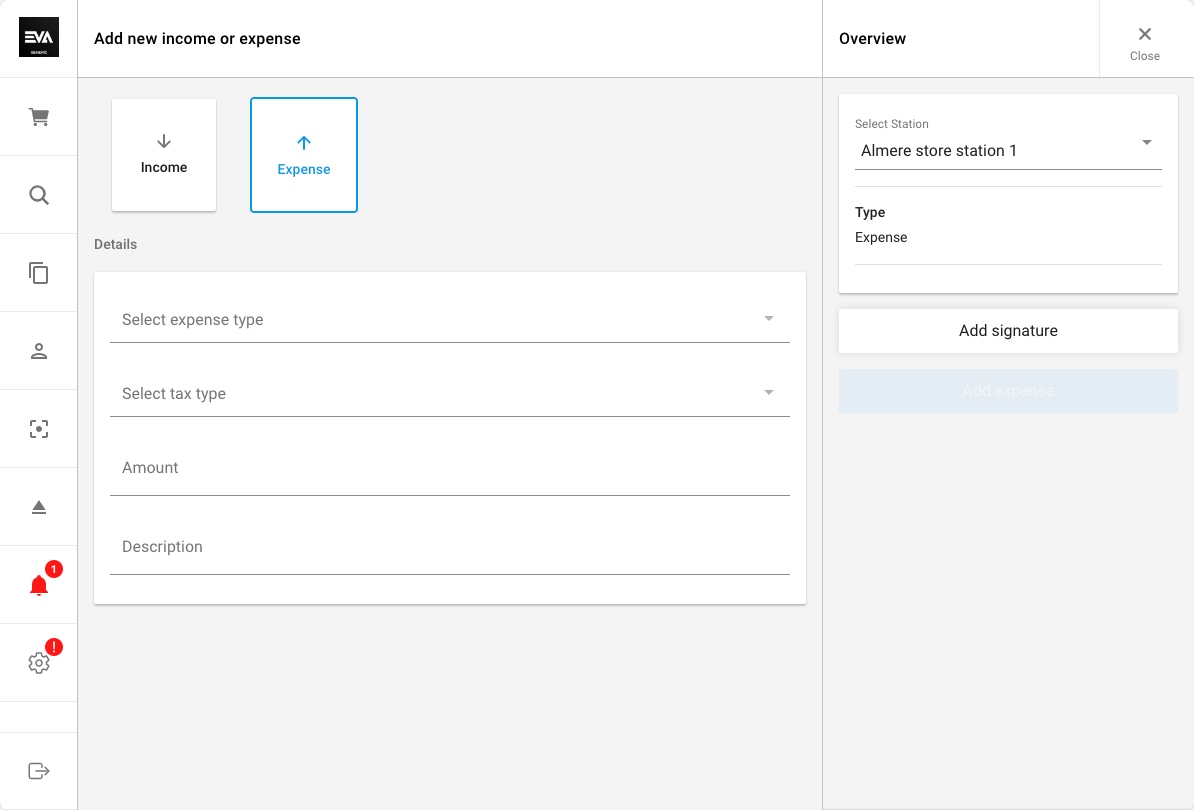
From the More options tab on your POS App, tapping Income and expenses under Financial bookings will give you the option to add a new income or expense.
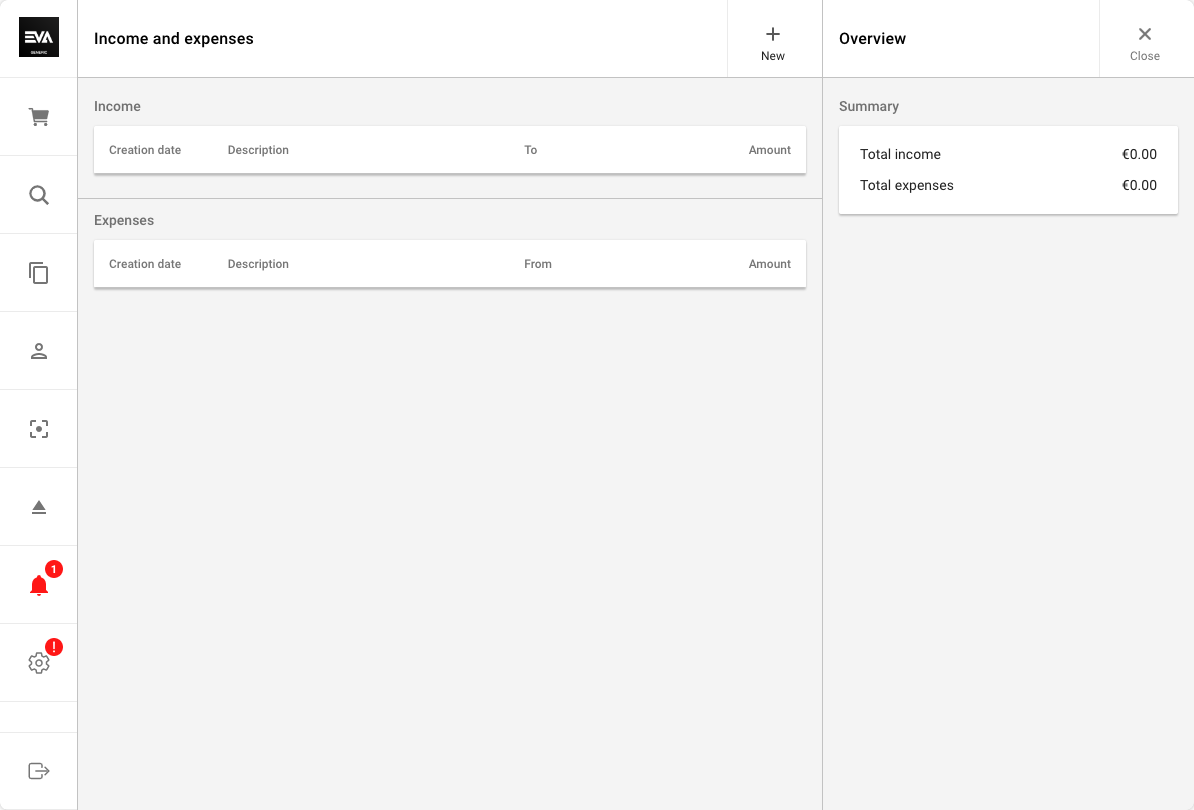
You will then be prompted to fill in some details and will be prompted to upload an image if appropriate settings are configured.
Impacting income and expenses settings:
| Setting | Description | Value expected | Default value |
|---|---|---|---|
App:CashExpense:Image:Enforced | Enforce stores to always include a receipt photo when App users add an expense. | false or true | false |
App:CashExpense:Image:Enabled | Allows App users to attach an image when adding an expense. This becomes mandatory if the above setting is set to true. | false or true | false |
App:CashExpense:WarningThreshold | Defines a threshold for the maximum cash expense amount (in the currency of the organization) before a warning should be raised, to prevent mistakes. Defaults to null, which means no warning should be raised. | Real numbers (decimals allowed) | N/A |
Useful links:
- POS Manual Income and expenses
- Adding Income and expense types
- Tax configuration type
Move cash
From the More options tab on your POS App, tapping Move cash under Financial bookings will give you the option to move cash between stations should such need arise. For example, sending small notes from station 1 to station 2 for change availability.
Useful links:
- POS Manual Moving cash
- Stations
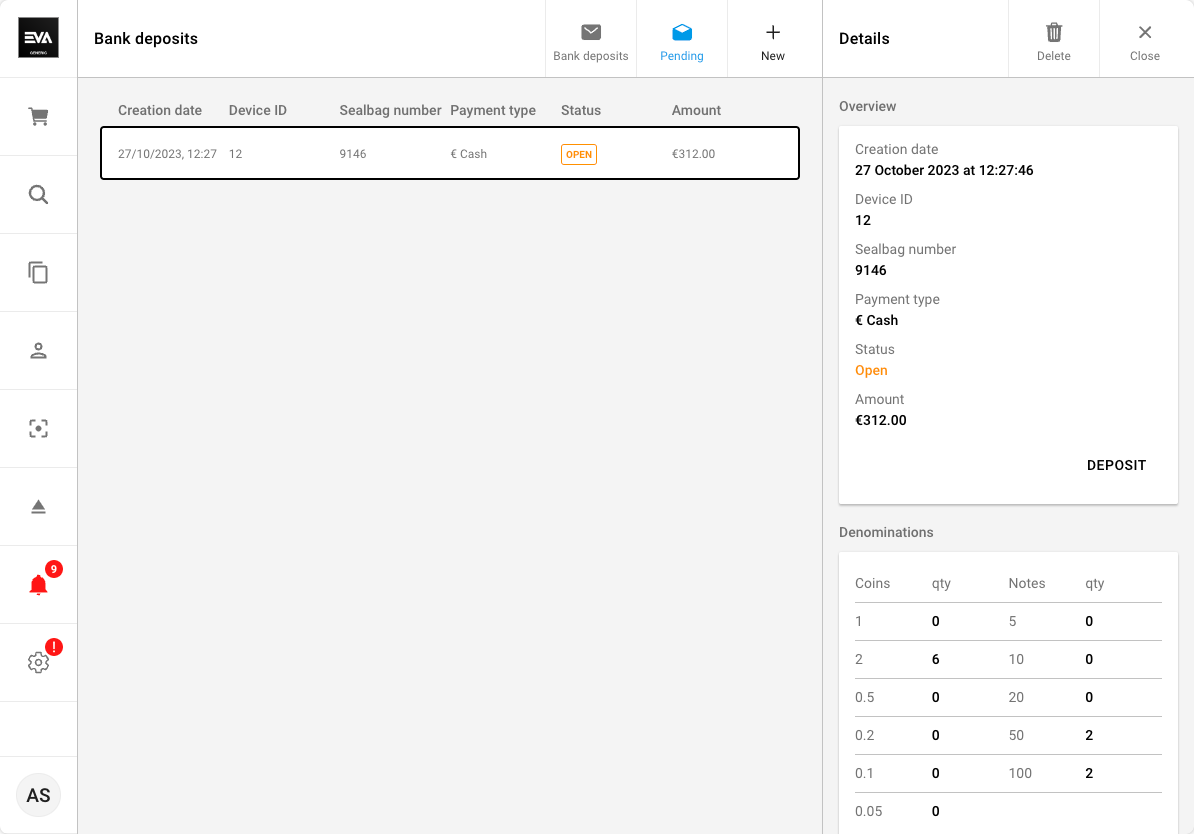
Bank deposits
From the More options tab on your POS App, tapping Bank deposits under Financial bookings will give you the option to initiate a bank deposit flow. This will not directly hit your bank account at whichever bank that is, so we say that just in case. This flow is nothing but a record creation where you inform EVA that cash is moving out, and headed to the bank. You can input a seal bag number (if provided by your bank for the sake of matching records), and to specify the contents pertaining to the cash deposit of course (coins & notes) in order to derive a total amount.
Mark as Pending checkbox: This checkbox is used to indicate that a deposit has been prepared but not yet completed.
This can be used in situations where cash has been counted and set aside for deposit, but the deposit has not yet been physically taken to the bank.
With the
App:BankDeposits:DefaultPendingsetting set to true, the Mark as Pending box for cash deposits is checked by default, reducing the likelihood of human errors.
You can use the Delete button on the sidepane to delete pending bank deposits. This useful in scenarios where the pick-up transportation has been canceled.
You can hide the Mark as Pending checkbox by adding a new setting, App:HidePendingBankDeposits.
A deposit marked as pending will still appear in the list of deposits of a financial period however, it'll be clearly marked as Pending. This allows for accurate tracking of cash flows, even in such scenarios where the time of preparing and completing a deposit did not coincide. Once the deposit is completed, unchecking the Mark as Pending checkbox will indicate that the deposit process is complete, and will in turn update the deposit status within the corresponding financial period to Completed.
Users need the CashDeposit permission in order to enable the Bank deposits feature. Permissions are managed from the Roles and rights chapter namely, from the functionalities card of a users role.
Impacting bank deposits settings:
| Setting | Description | Value expected | Default value |
|---|---|---|---|
CashDeposit:ValidateSafeBalance | This is useful when a user is attempting to deposit more money than your safe has available (a non-blocking popup alert). | false or true | false |
Adding a bank deposit is only possible if status of at least one safe is open.
Useful links:
- POS Manual Bank deposits
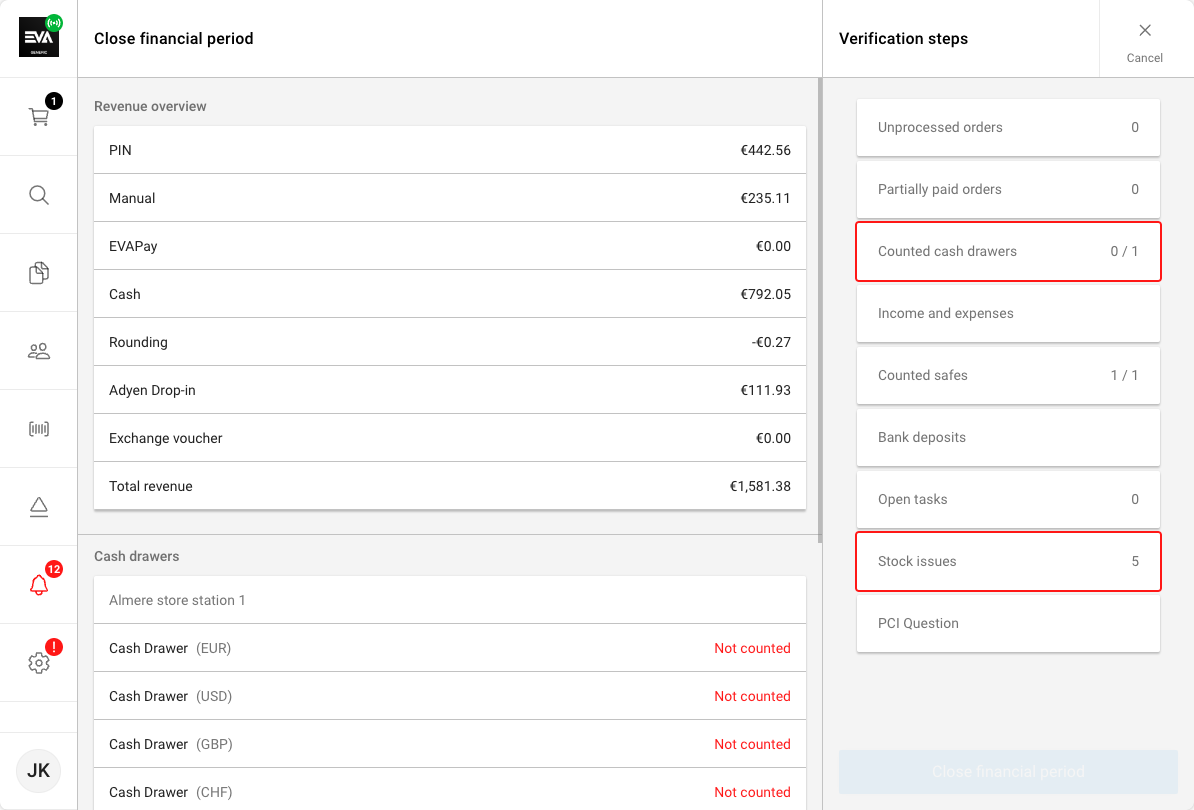
Close financial period
Concluding a financial period can be done from the More options tab on your POS App. Once the Close financial period is tapped, you’ll be prompted with a few verification steps. The verification steps will vary based on your configuration (for example, a safe exists or not), and the financial events that took place in the time span from opening the financial period until that moment of closure.
This marks the end of your financial period journey, and keep in mind that if needed you can always come back to check the financial period records via reports.
Impacting close financial period settings:
| Setting | Description | Value expected | Default value |
|---|---|---|---|
App:Pos:DisplayEndOfDayQuestion | Indicates whether to display the end of day question on the POS user interface or not (a non-blocking popup alert). | false or true | false |
Useful links:
- POS Manual - Financial periods
Reports
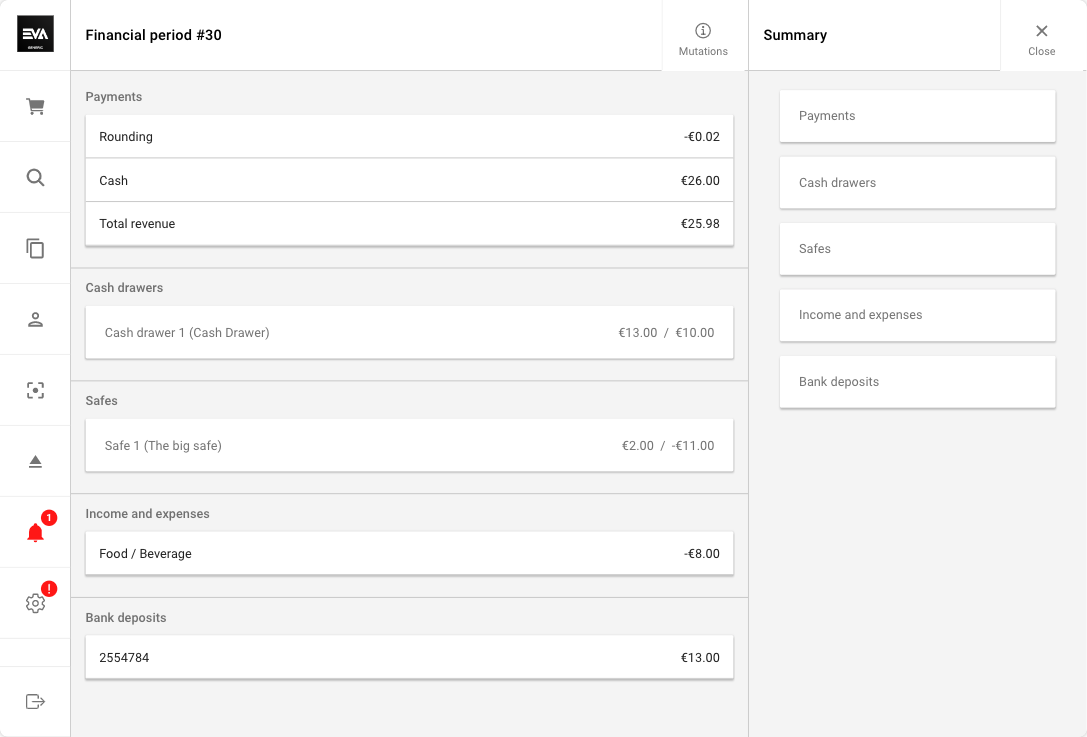
From the More options tab on your POS App, tapping Reports under Financial period (Organization unit name) will display your list of historically closed financial periods as well as the currently open one.
By tapping any of the closed financial periods or the currently open one, you will be presented with the respective summary. The summary would include 5 categories:
- Payments, which depicts the totals of all sales conducted transaction in cash.
- Cash drawers, which depicts the opening and closing balance.
- Safes, which would also depict the opening and closing balance.
- Income and expenses, which depicts any recorded income or expense transactions.
- Bank deposits, which depicts any bank deposits made.
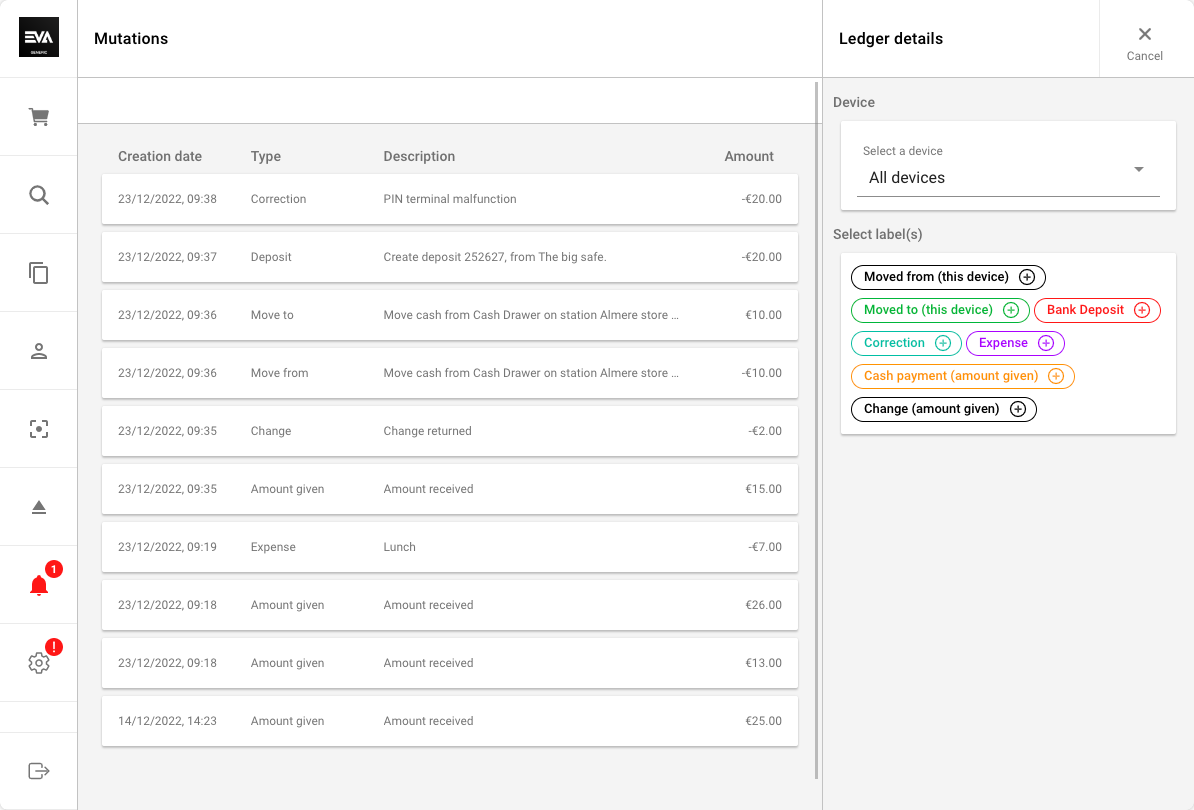
Mutations
Tapping Mutations in the top right corner will prompt a list view display of all financial impacting transactions that took place on POS within that financial period. Each cash impacting transaction made results in a CashTransactionLedger record. So cash payments made, expenses, moving cash between stations/devices, etc... would all create a CashTransactionLedger.
Using the right pane Ledger details you can refine the list of displayed cash transaction ledgers by the respective used device. For example: a specific cash drawer, safe, or all. Further, you can refine the list by what we call "Label(s)" and that is basically the type/nature of the underlying CashTransactionLedger. The service being called here is ListCashTransactionLedger where amount given has to do with sales transactions made and returned cash change (if any). While the label Correction has to do with any cash count differences during the final closing/count of a cash drawer or safe.
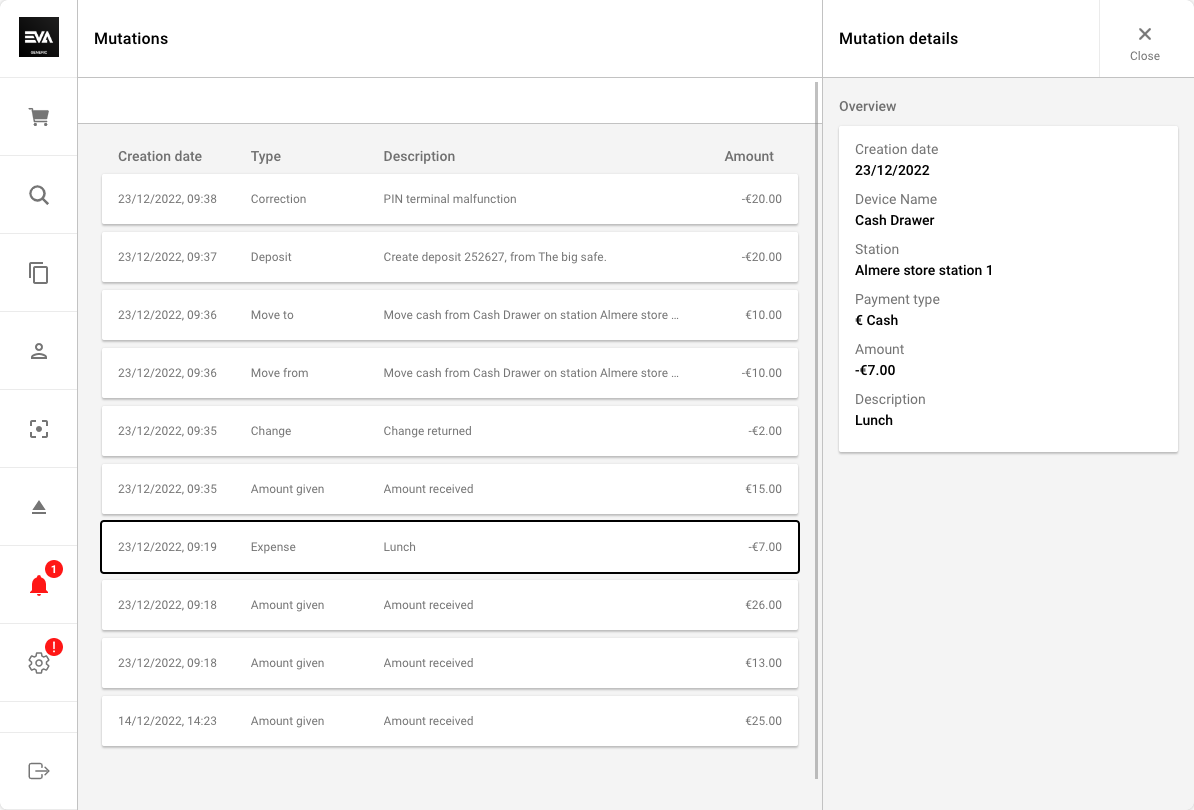
Tapping any of the listed transactions will display more details in the right pane. Replacing the filter option Ledger details with Mutation details, providing a bit more insight on the nature of that transaction.
Useful links:
- POS Manual - Financial periods