🇬🇧 United Kingdom
United Kingdom
A configuration guide to being compliant in the United KingdomThis document provides a step-by-step configuration guide for a compliant setup in the United Kingdom.
Compliance in the United Kingdom at a glance
Which flows are affected?
Which type of fiscalization is required?
Who needs certification?
Introduction
When it comes to real-time sales posting, there are no mandatory software integration or hardware requirements in this country. Nevertheless, businesses are obliged to provide their transactions and invoices to authorities and auditors upon request. Therefore, the settings and configurations enlisted here will ensure that the correct docs are generated at the right time with proper invoice sequencing.
Special considerations
A few considerations need to be taken into account when it comes to the UK compliancy configurations, as follows:
Local mode support
Local mode is currently not supported by EVA in the United Kingdom. Activating local mode is done at your own discretion and risk. We strongly recommend conducting thorough testing of local mode before going live to ensure it aligns with your expectations.
If you require support for local mode, please submit a JIRA development ticket, namely a request for change.
Unreferenced returns
Unreferenced returned orders are permitted (a return that is not linked to an original order sold via EVA).
However, when creating an unreferenced return, EVA will require you to enter the order number and sales date of the original sale to which this return will reference. If you are migrating from an old POS system, you can enter the order number and date from the receipt of the original sales order. This data is necessary to demonstrate to authorities that you are not simply returning items, which could be perceived as a sign of tax evasion.
Anti Money Laundering
Sales transactions exceeding £10,000 must adhere to the anti-money laundering regulations outlined in the Proceeds of Crime Act 2002 (POCA).
Once triggered, customers need to provide the following information through our frontend apps during the customer creation process:
- First Name
- Last Name
- Address 1
- Zip / Postal Code
- City
- Country
- Nationality
- Date of Birth
Additionally, providing a phone number is optional.
Step-by-step configuration
This is a step-by-step guide to configurations that need to be performed within EVA for a compliant setup in the UK. The steps should be followed in the same order as presented hereunder.
Step 1: Setting up a Company on EVA
A company needs to be created in EVA, this can be done via the Admin Suite under the Companies chapter.
Your company in this essence serves as the countries top-level legal entity, which will then house all your stores, creating a hierarchical set-up that would then inherit configurations.
Make sure the following fields are filled in:
- Name
- VAT Number
- Registration Number
- Address (VisitorAddress)
- Street
- HouseNumber
- ZipCode
- City
- CountryID
UK VAT numbers have the prefix "GB" followed by 9 digits. The standard format is: GB123 4567 89. In some cases, especially for branches or divisions of companies, the format might include a three-digit suffix, making it look like this: GB123 4567 89 001.
Step 2: Create your store(s)
Now that you have a company in place, you need to attach it to Organization Unit of type Store.
Creating those can be done via the Admin Suite under the Organization Unit chapter.
Make sure the following fields are filled in:
- Name
- BackendID (store number)
- Address
- Street
- ZipCode
- City
- CountryID
- CompanyID (Make sure to select the company you've created in Step 1)
Additional step for multiple stores
In scenarios where multiple Organization Units/Stores operate in the same country, a grouping should first be done to ease setting inheritance.
The grouping can be done by creating an Organization Unit of type Container. This Organization Unit type can be created in the same way i.e. via the Admin Suite under the Organization Unit chapter but this time, select the Organization unit type as Container & Country.
Once created, attach all your stores (Organization Units of type Store) under the created Container for this country.
Step 3: Create stations
For the Organization Unit(s) of type Store where transactions will be performed, you'll need to create Station(s) for each (if applicable). Adding a station can be done by following the steps here.
When creating the Station(s), make sure the following fields are filled in:
- The underlying Organization Unit where the station will be used i.e. attached to the OU of type Store.
- The station name.
- The box This station is a fiscal station and will be used for transactions needs to be checked.
Step 4: Check payment types
For transaction reporting, EVA groups your payment types into a number of predefined categories (e.g. Cash, Credit, Voucher, Online, etc.). To perform transactions, ensure that all Payment types you offer in this country have a Payment Category defined. Payments are configured via the Admin Suite under the Payment methods chapter -> Payment Types -> Payment Category field.
Step 5: Settings for auditing provider and invoices
The following settings need to be added. This can be done via the Admin Suite under the Settings chapter.
| Setting | Value | Organization unit | Description |
|---|---|---|---|
| Auditing:Provider | GB | GB on store OU's when go-live is in phases or on country level for a big bang go live. | Sets the certified aspects |
| UseInvoiceOutputFacade | true | Root level (store OU) or Container level | Attaches the Certified Invoice PDF when emailing the Invoice from our frontend App. This setting enables the use of the CertifiedInvoice stencil with destination Mail |
| AllowConsumerInvoices | true or false (default: false) | Root level (store OU) or Container level | When set to true, enables automatic generation of PDF invoices for B2C sales. |
| IgnoreConsumerInvoiceFiscalIDRequirement | true or false (default: false) | Root level (store OU) or Container level | When set to true, permits issuing B2C invoices without a fiscal ID, regardless of the invoice amount. |
Settings for e-commerce
Please configure the following setting specifically on your e-commerce OU:
Auditing:Provider- GB
By doing so, EVA will implement the following logic automatically:
- Output documents
- Document sequencing
- Certified Stencils
Step 6 (optional): Auto open close financial period
This is an optional step where you can configure auto open and close of your financial period.
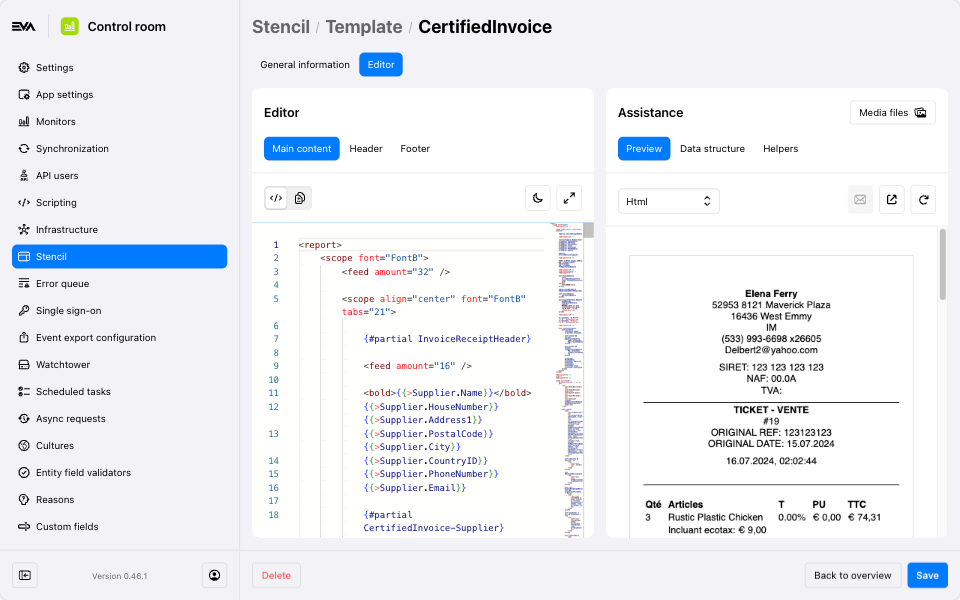
Step 7: Stencils
This step impacts what your certified invoices (thermal & PDF) will look like.
For setup instructions and additional information on Certified Invoices, please visit the Certified Invoices documentation page. To attach a certified invoice to an email, a separate stencil is necessary. You can find the configuration details for this stencil on the same page.
You can generate a preview of your PDF invoice or Thermal Receipt using the Stencil chapter. Remember, the order details in the preview will be substituted with the actual order information. Additionally, we advise printing a real PDF invoice and thermal receipt during your testing, and to not rely solely on this preview feature.
Stencil Preview Feature
Below is an example of the CertifiedInvoice template preview found in the Stencil chapter of Admin Suite.
Step 8: Validation & testing
Now is a good moment to validate and test your setup, as follows:
Validation
Once you're done with all configuration steps. Make sure to use the Validate audit configuration button to check if any compliance-related configurations or data is missing or successfully configured.
Testing
Start placing some orders and check the following:
- Invoice output and numbering
- Thermal receipts output
- PDF invoice output
Step 9: X/Z reports
Reports are essential for daily financial reconciliation, inventory management, and ensuring accuracy in sales tracking and reporting.
In EVA we make the differentiation between two types of reports: X report and Z report.
X report (Middle of Day report): Summary statement of the day's sales totals without any notion of closing or generation of cumulative data.
- X reports can be generated at any time during the day without affecting the ongoing totals.
- It provides a snapshot of sales, VAT collected, breakdown of payment methods, date and time, without resetting counters.
- It is not possible to re-generate a specific X report as they are snapshots of the current state.
- The X report is station specific.
Z report (End of Day report): Definitive summary statement of sales totals associated with a daily closing and the generation of daily cumulative data.
- Z reports are generated by closing of the financial period in EVA, typically at the end of a business day.
- Summaries of certain data, and therefore don’t contain any detailed data at transactions level. The Z total reports and all data supporting the reports will need to be retained.
- It provides a summary of total sales, VAT collected, the breakdown of payment methods, date, time and sequential number
- The Z report is station specific.
How to generate the reports
EVA can generate a daily X and Z reports by closing the Financial Period, or via the terminal report service: GenerateTerminalReport. The Event ledger in EVA will show all the generated reports.
Each report will be tagged with a unique, sequential identification number that follows a chronological order. It maintains a database of these reports for the current year (or financial period) and archives the data from the six preceding years (or financial periods) that have been concluded.
How to set up the Terminal Report stencil
When it comes to X/Z reports, a stencil called TerminalReport is used.
For compliancy purposes, this stencil is only editable by us (New Black).
Here is the stencil content
<report>
    <scope bold="true" align="center" size="1,1">
        {{>Document.Type == 0 ? 'X Report' : 'Z Report'}} #{{>Number}}
    </scope>

    <scope align="center" font="FontB" tabs="21">
        {#partial TerminalReportHeader}
    </scope>

    <feed amount="32"/>

    Date: {{:~date(Document.CreationTime, 'DD.MM.YYYY', 'fr-FR', 'Europe/Paris')}}
      Heure: {{:~date(Document.CreationTime, 'HH:mm:ss', 'fr-FR', 'Europe/Paris')}}

    <feed amount="32"/>

    <grid positions="0, 30">
        <row>
            <col width="20">
                <bold>Changement</bold>
            </col>
            <col>{{:~currency(Document.Change, ~root.CurrencyID)}}</col>
        </row>
        <row>
            <col width="20">
                <bold>Ouverture du tiroir-caisse</bold>
            </col>
            <col>{{>Document.CashDrawerOpenings}}</col>
        </row>

        <row>
            <col width="20">
                <bold>Paiements</bold>
            </col>
            <col>{{: Document.Payments ? Document.Payments.length : 0}}</col>
        </row>

        {{for Document.Payments}}
        <row>
            <col width="20">
                {{>Type.Name}} ({{>Count}})
            </col>
            <col>{{:~currency(Amount, ~root.CurrencyID)}}</col>
        </row>
        {{/for}}

        <row>
            <col width="20">
                <bold>Taxes</bold>
            </col>
            <col>{{: Document.Taxes ? Document.Taxes.length : 0}}</col>
        </row>

        {{for Document.Taxes}}
        <row>
            <col width="20">
                {{>Name}} ({{:~rateToPercentage(Rate)}})
            </col>
            <col>{{:~currency(Amount, ~root.CurrencyID)}}</col>
        </row>
        {{/for}}

        <row>
            <col width="20">
                <bold>Paiements par employé</bold>
            </col>
            <col>{{: Document.PaymentsPerUser ? Document.PaymentsPerUser.length : 0}}</col>
        </row>

        {{if Document.PaymentsPerUser}}
        {{for Document.PaymentsPerUser}}
        <row>
            <col width="20">
                Employé(e) {{>UserID}} ({{>Count}})
            </col>
            <col>{{:~currency(Amount, ~root.CurrencyID)}} ({{>Description}})</col>
        </row>
        {{/for}}
        {{/if}}

        <row>
            <col width="20">
                <bold>Groupes de produits</bold>
            </col>
            <col>{{>Document.ProductGroups.length}}</col>
        </row>

        {{for Document.ProductGroups}}
        <row>
            <col width="20">
                {{>Code}} ({{>Count}})
            </col>
            <col>{{:~currency(Amount, ~root.CurrencyID)}}</col>
        </row>
        {{/for}}

        <row>
            <col width="20">
                <bold>Nomber de remise</bold>
            </col>
            <col>{{>Document.DiscountCount}}</col>
        </row>
        <row>
            <col width="20">
                <bold>Total des remises</bold>
            </col>
            <col>{{:~currency(Document.TotalDiscounts, ~root.CurrencyID)}}</col>
        </row>

        <row>
            <col width="20">
                <bold>Nombre de retours</bold>
            </col>
            <col>{{>Document.ReturnCount}}</col>
        </row>
        <row>
            <col width="20">
                <bold>Total des retours</bold>
            </col>
            <col>{{:~currency(Document.TotalReturnsAmount, ~root.CurrencyID)}}</col>
        </row>

        <row>
            <col width="20">
                <bold>Nomber d'exemplaires</bold>
            </col>
            <col>{{>Document.CopyReceiptsPrinted}}</col>
        </row>
        <row>
            <col width="20">
                <bold>Total d'exemplaires</bold>
            </col>
            <col>{{:~currency(Document.TotalCopyReceiptsAmount, ~root.CurrencyID)}}</col>
        </row>

        {{* Grand totals *}}
        <row>
            <col width="20">
                <bold>Total général (paiement en espèces)</bold>
            </col>
            <col>{{:~currency(Document.GrandTotalCash, ~root.CurrencyID)}}</col>
        </row>
        <row>
            <col width="20">
                <bold>Total général</bold>
            </col>
            <col>{{:~currency(Document.GrandTotal, ~root.CurrencyID)}}</col>
        </row>
        <row>
            <col width="20">
                <bold>Total général (retours)</bold>
            </col>
            <col>{{:~currency(Document.GrandTotalReturns, ~root.CurrencyID)}}</col>
        </row>
        <row>
            <col width="20">
                <bold>Total général (HT)</bold>
            </col>
            <col>{{:~currency(Document.GrandTotalNet, ~root.CurrencyID)}}</col>
        </row>
    </grid>

    <feed amount="32"/>

    Terminal: {{>TerminalCode}}

    <feed amount="16"/>

    <scope align="center">
        <qrcode data="{{:ZippedSignature}}" size="6"/>
    </scope>

    <feed amount="16"/>
</report>
Automated printing Z report(s)
Using a setting called Auditing:PrintTerminalReport and a value true, accompanied by the Terminal Report stencil, an automatic print of the Z report will be made once a financial period is closed. If you have multiple stations in you store, a print of all Z reports pertaining to the station you're logged into when closing your financial period will be printed.
Beware that printer configurations for the respective stations need to exist in order for the Z reports to successfully print.
Step 10: Fiscal archiving & audit files
There are no compulsory regulations set by the British authorities when it comes to creation of Audit files. However, tax registered entites are obligated to maintain comprehensive records. This includes the retention of detailed information regarding all goods and services rendered to taxable parties.
To facilitate swift retrieval of such records for submission to tax Authority (if needed), our white label audit files can be used. The audit file(s) include an overview of underlying tax information/operations readily available upon any requests from the authorities (file is in JSON format).
More on generating Audit files can be found here.
Automate generation of audit files
The CreateFinancialPeriodAuditTask could be configured to trigger generation of audit files at specific date/time. This task will basically do an automated generation of the audit files mentioned above in the start of step 9, which depicts the manual triggering of these audit files.
The following can be configured from the Scheduled tasks chapter, while filling in the fields as follows:
Type: EVA.Auditing.Tasks.CreateFinancialPeriodAuditTask
- Name: Any unique name you want
- Schedule: a cron value example, 0 4 2 * * . Test what you want your cron to look like here, then specify the exact value in this field i.e. the recurring point of time that would trigger this task.
- Settings
- Type: can be left blank
- Organization unit: the ID of the country that this report would pertain to i.e. The UK organization unit type store.
- Email address: In case of task failures the email address you mention here will receive a notification. This is an optional field but quite handy.