Orders Overview
Order Overview
Managing customer ordersYou can consider the order overview as your Admin Suite's main operations base. Being an OMS in the first place, EVA needs to have a powerful overview where you can view, organize and filter orders based on your preferences.
To access this chapter, you need the Orders permission.
The order view uses so-called workspaces. The default workspace looks like this:
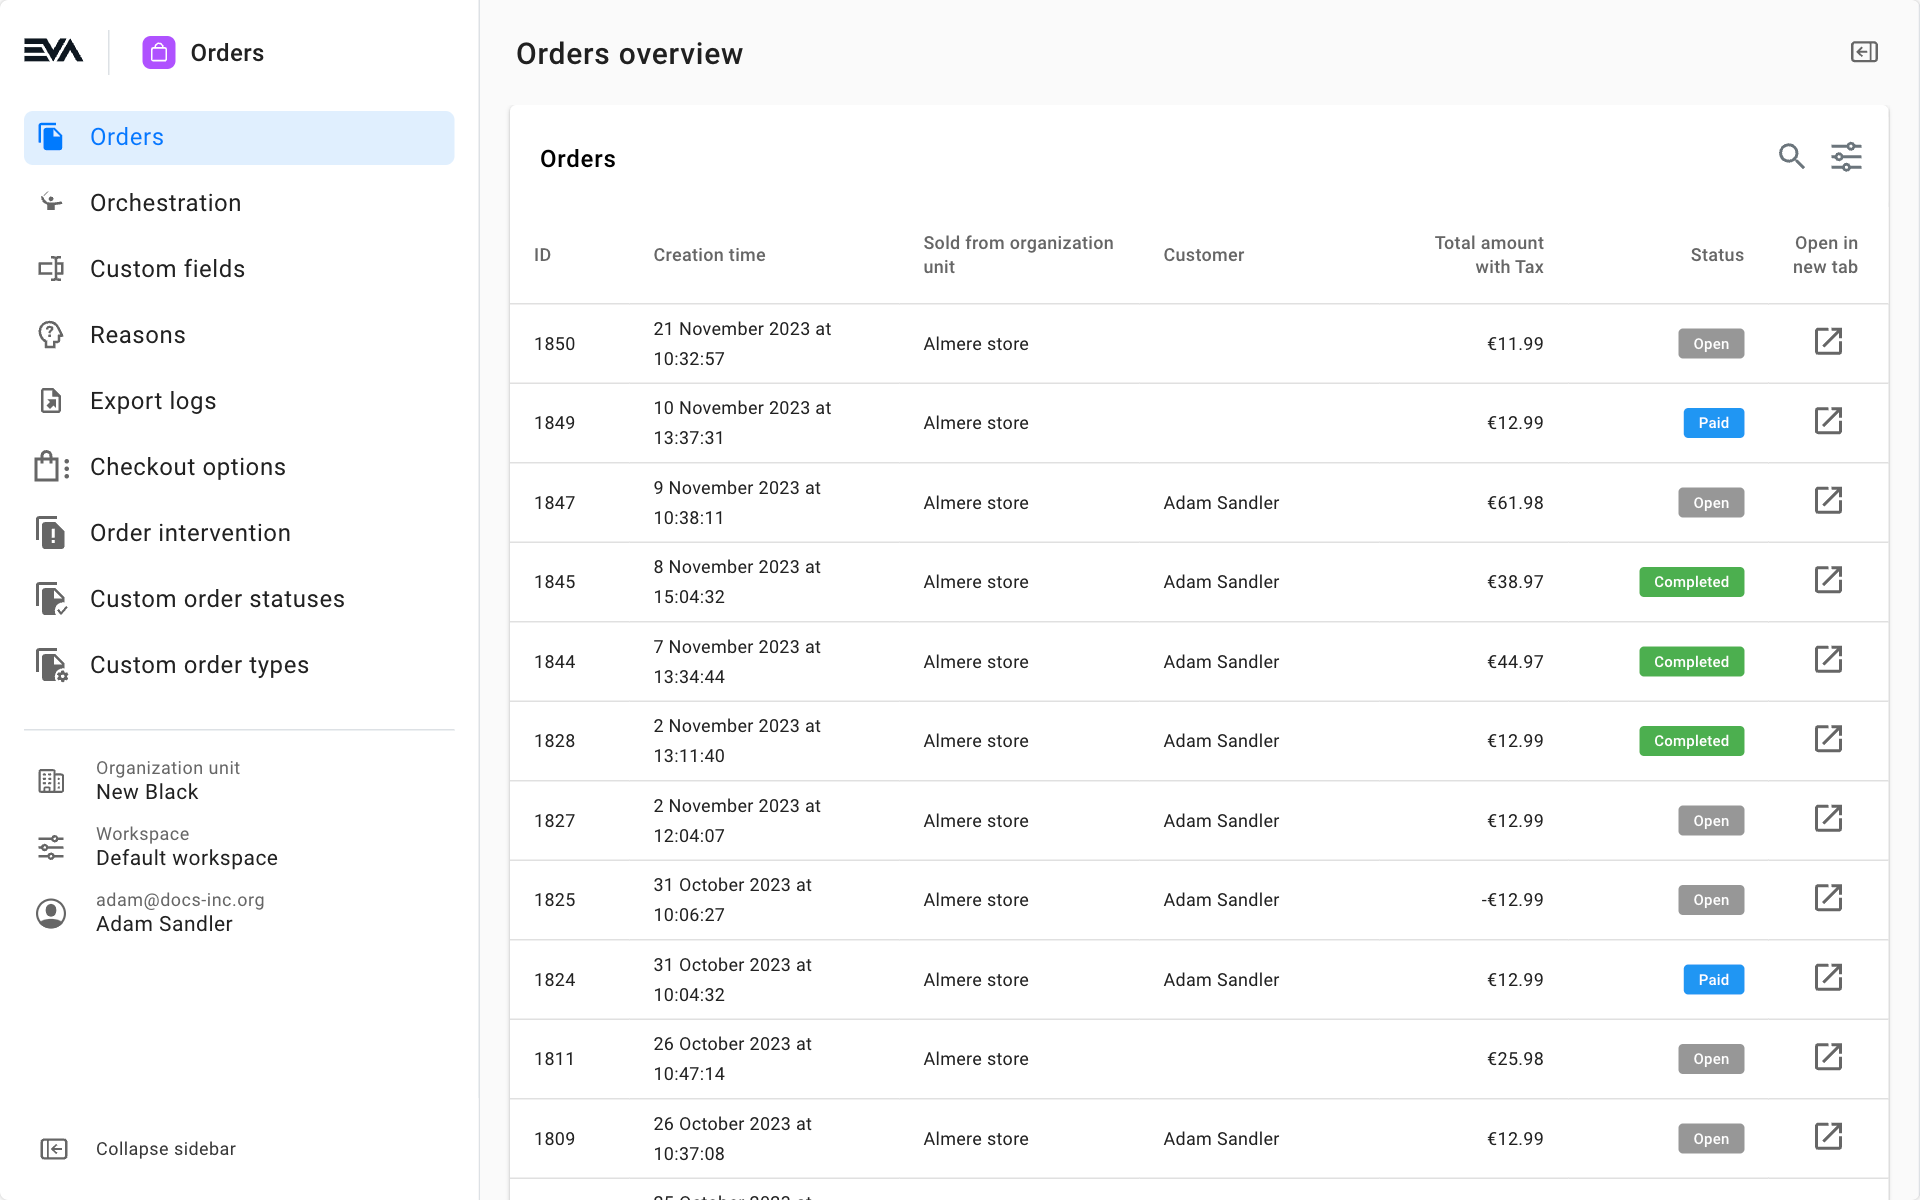
A workspace is split into two main parts: the order list and the filter sidebar. These parts can be customized and stored in a workspace for later use. The filter sidebar can be hidden using the 'arrow' icon on the left side.
Order list
The list shows all orders corresponding to your current filters and offers information based on your column configuration. By default, the list shows the OrderID, creation time, sold from organization unit, customer, the total amount in tax, and order status (open, completed, paid, and shipped).
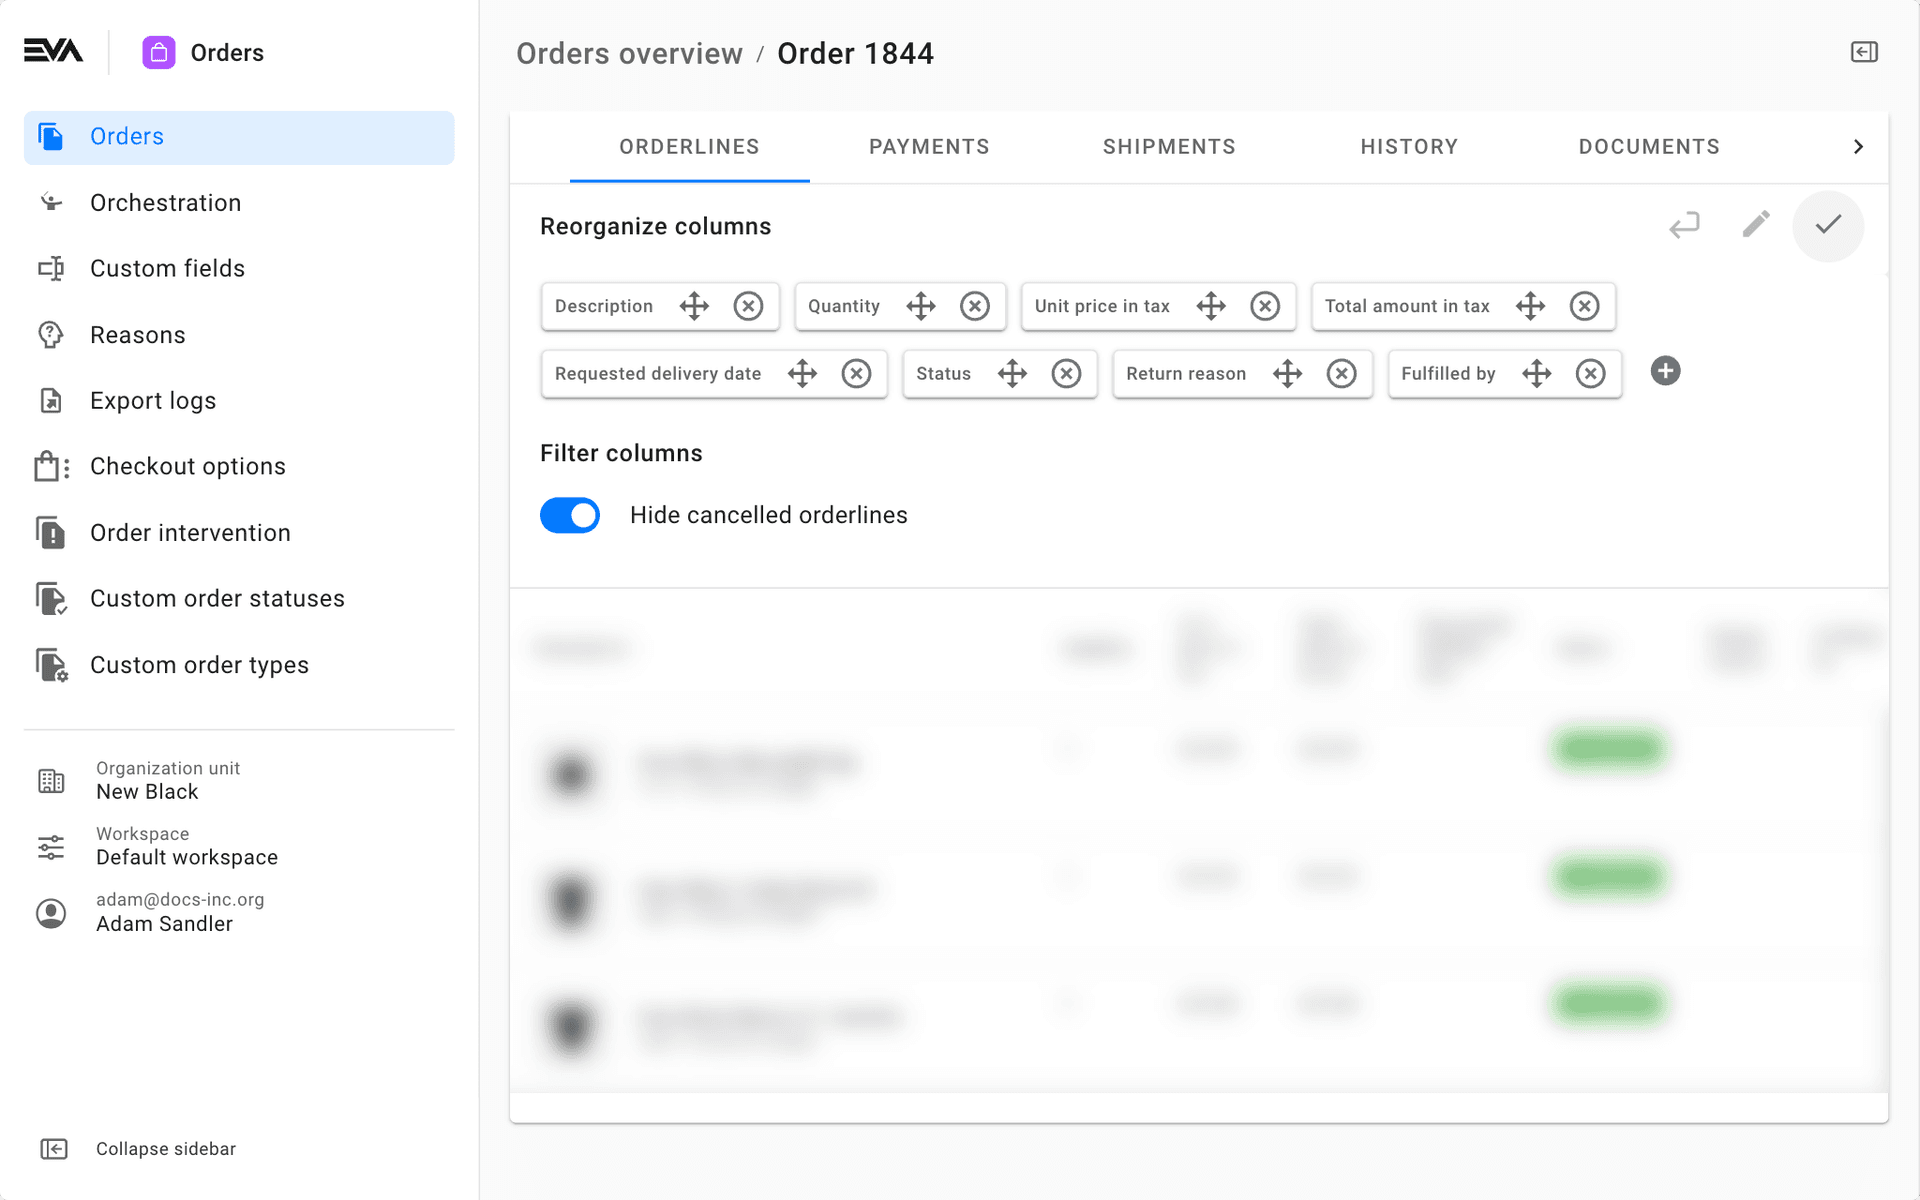
You can organize these columns by clicking the 'Organize columns' icon, in the top-right of the order overview. This will open up the column reorganization menu:
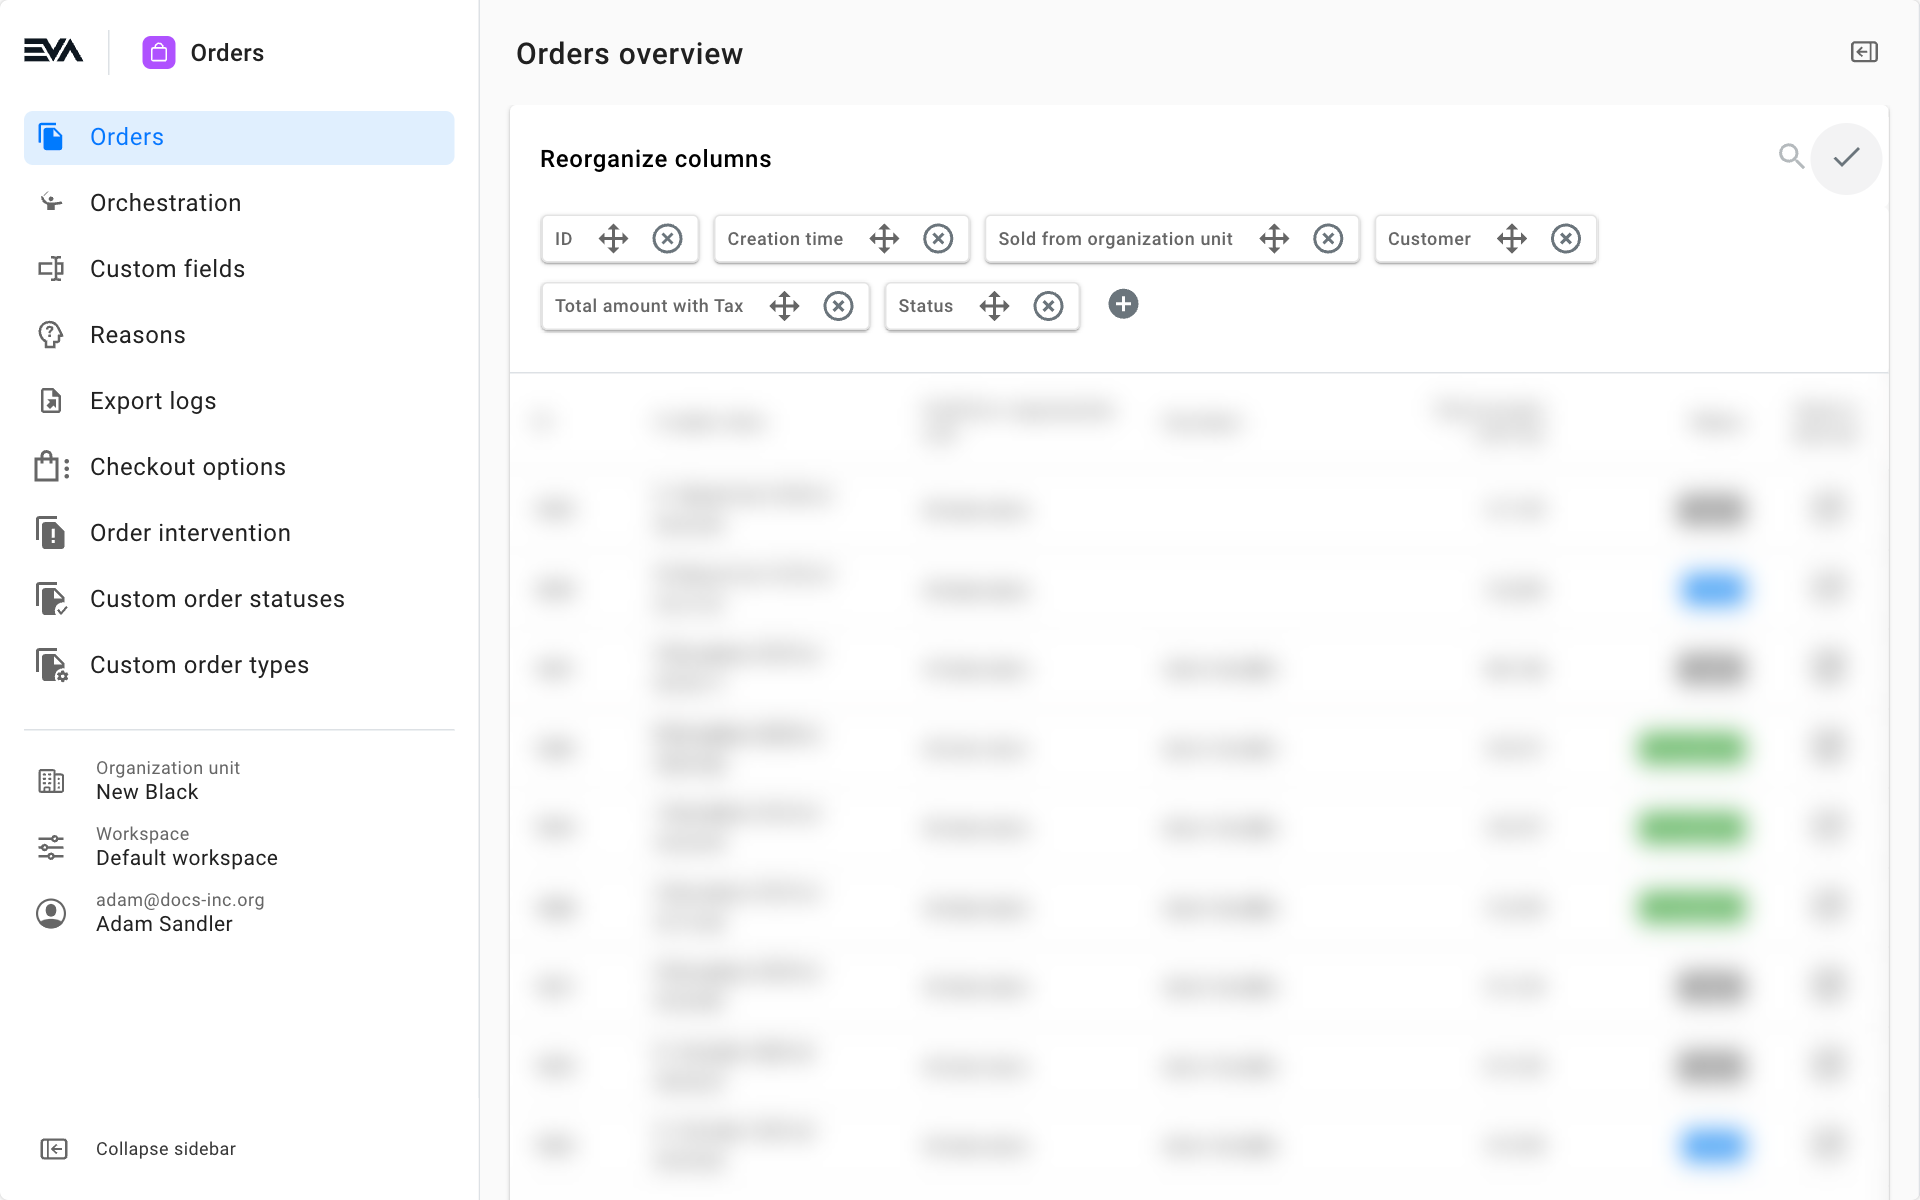
Here, you can change the order in which the columns are shown and add or delete columns, such as order type or product images. After reorganizing your columns, click the checkmark in the top-right corner.
Additionally, you can search for specific orders using the magnifying glass icon next to the column reorganization menu icon.
Filter sidebar
The sidebar shows an enormous list of possible filters. In addition to the possibility of filtering your order list, it is also possible to decide what filters are visible in the sidebar. You can customize the sidebar using the filter reorganization button in the top-right corner. Here you can change the filter sidebar's order of filters and hide or un-hide the individual filters.
You can focus on items actually ordered by filtering out cancelled order lines. This will also hide cancelled lines for discounts, gift wrapping, and products.
Workspaces
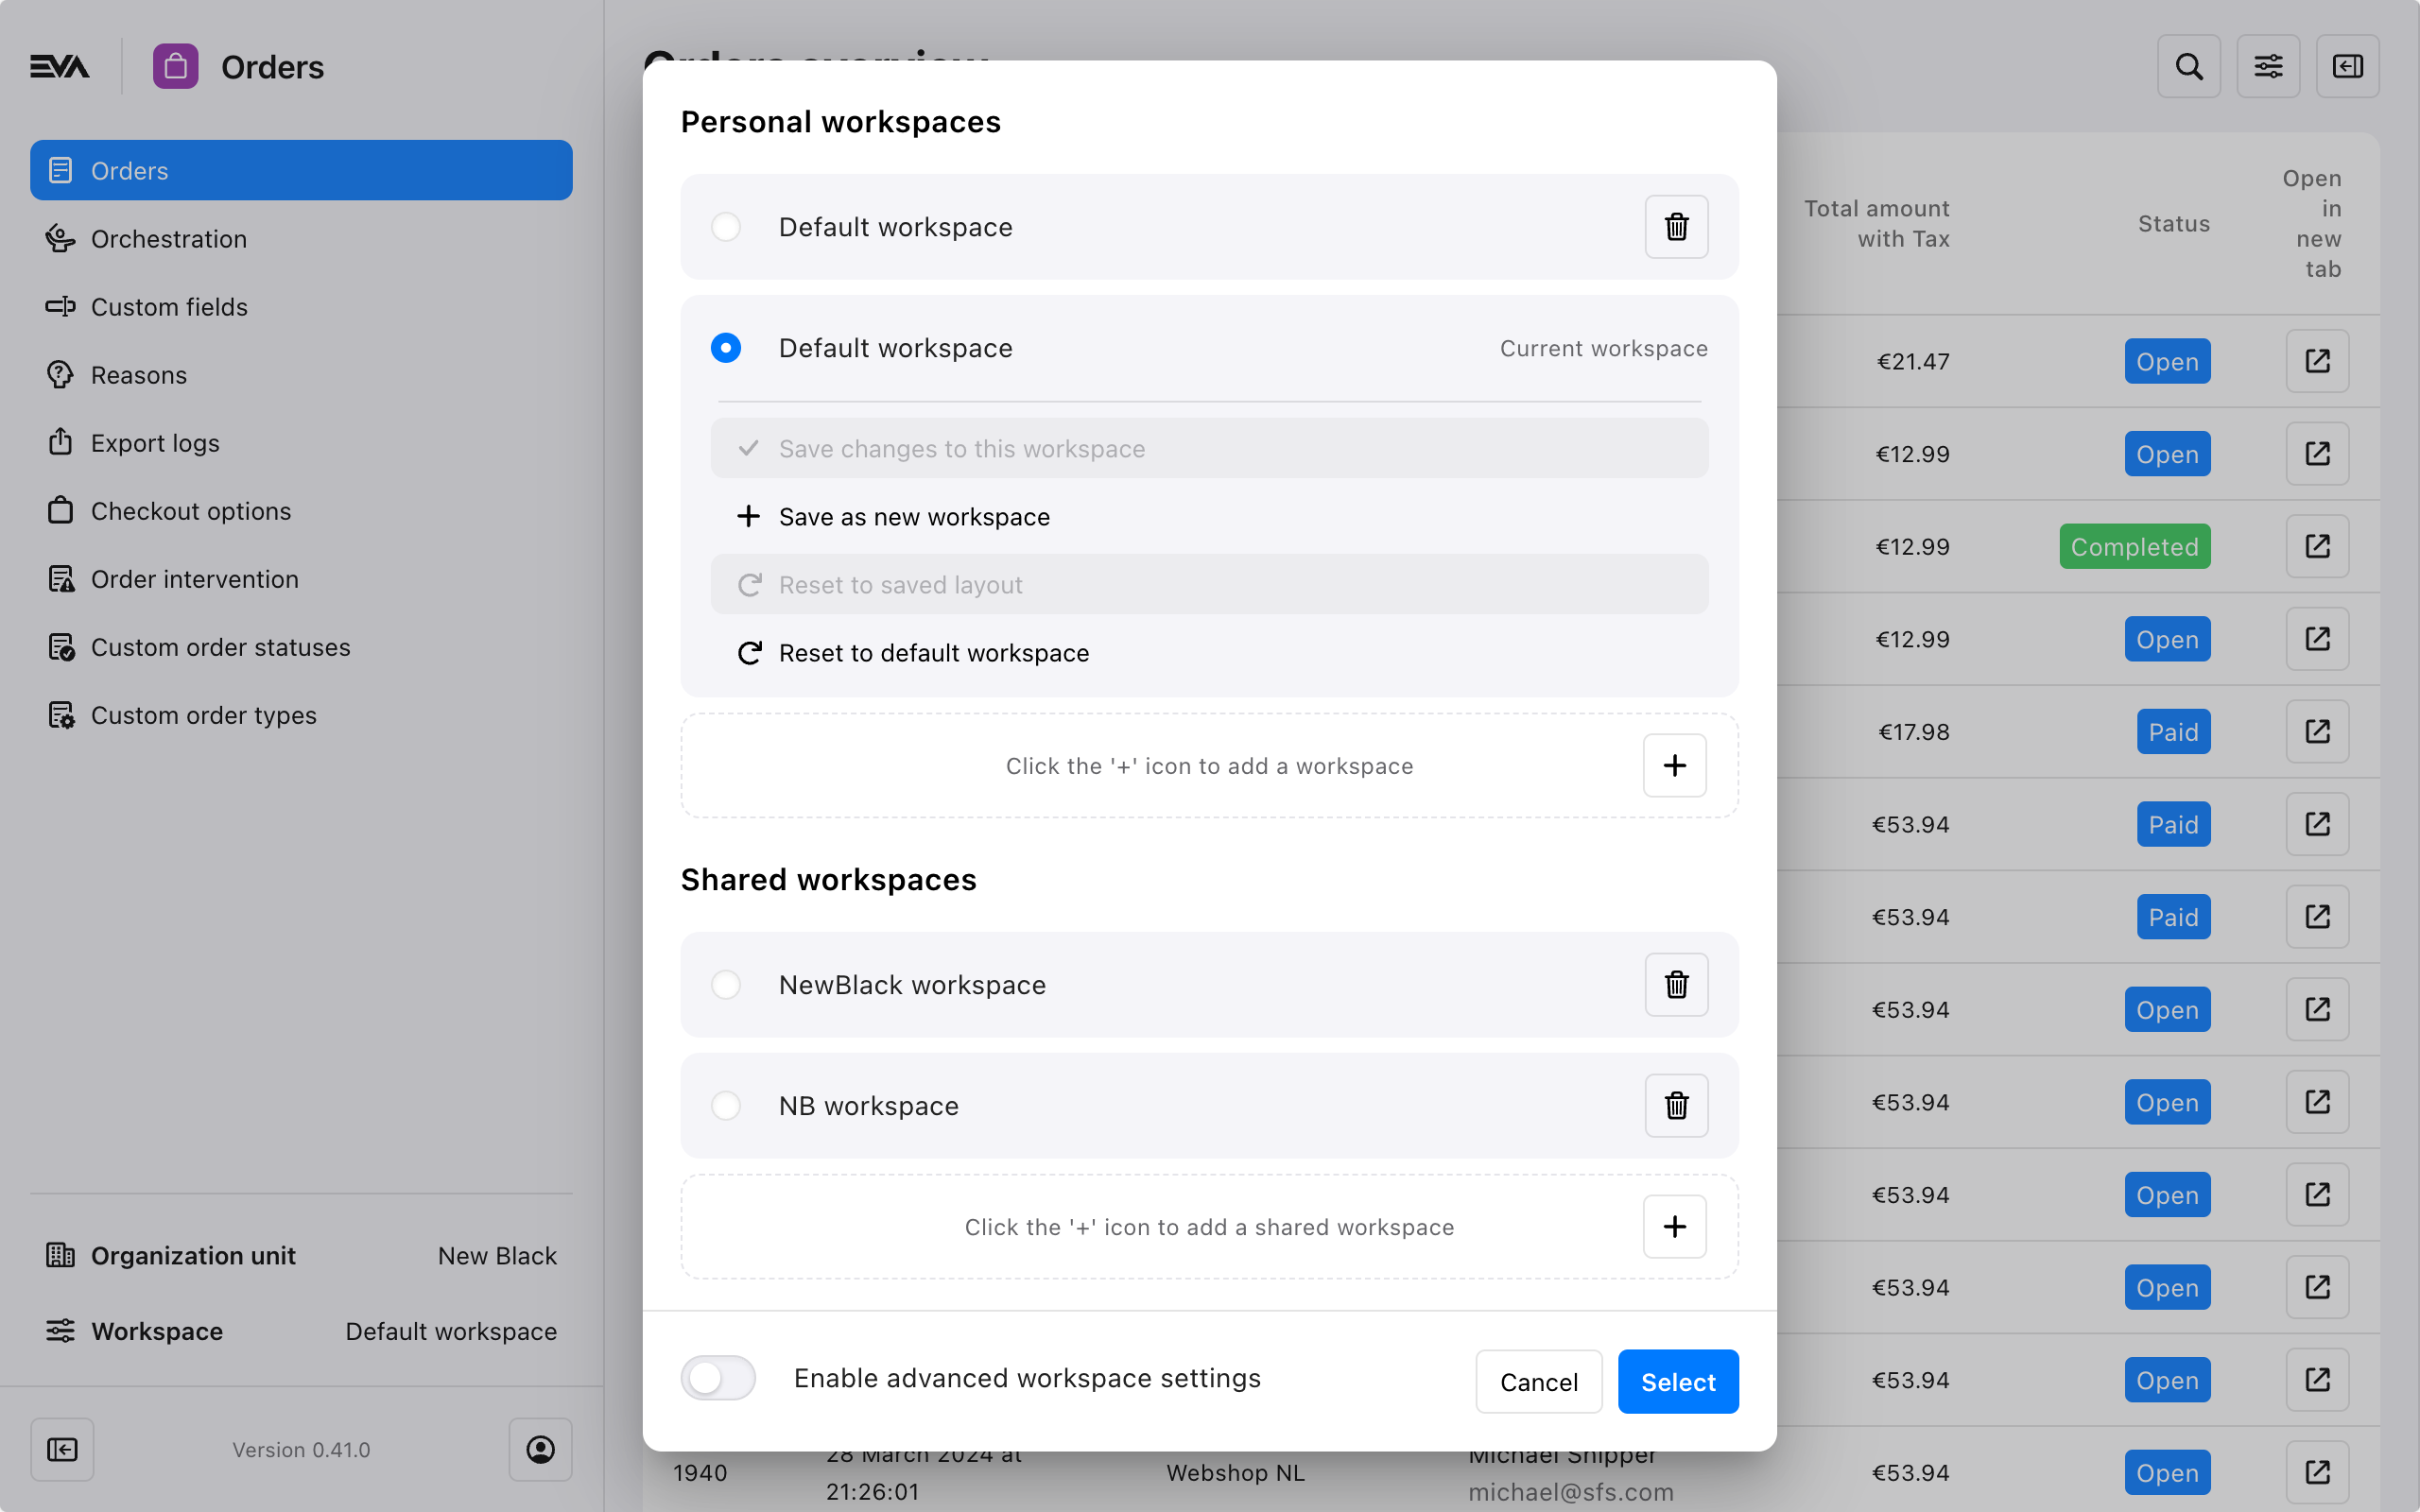
Workspaces can be configured to your liking by clicking the 'Organize columns' buttons in the overview and/or filter sidebar. A customized workspace can be saved for your personal use and even shared across users in the same role. The latter can be done via the Workspace button in the left sidebar.
More on Workspaces here.
Enable advanced workplace settings
In the orders workspace, the feature Enable advanced workplace settings can be used to automatically filter the orders overview based on a certain organization unit when the workspace is used. Here is how to use this feature:
- Step 1: Enable the toggle and click the Select button. This will navigate you back to the Orders overview page.
- Step 2: In the filters right sidebar, scroll down to the Organization filters, select the desired organization unit, then click on the 'Select current user organization unit' icon.
- Step 3: Click once again on the Workspaces button located in the left sidebar, and click on Save changes to this workspace.
By doing so, the order overview of all users who are using this shared workspace will be automatically filtered on the organization unit specified.
Order detail page
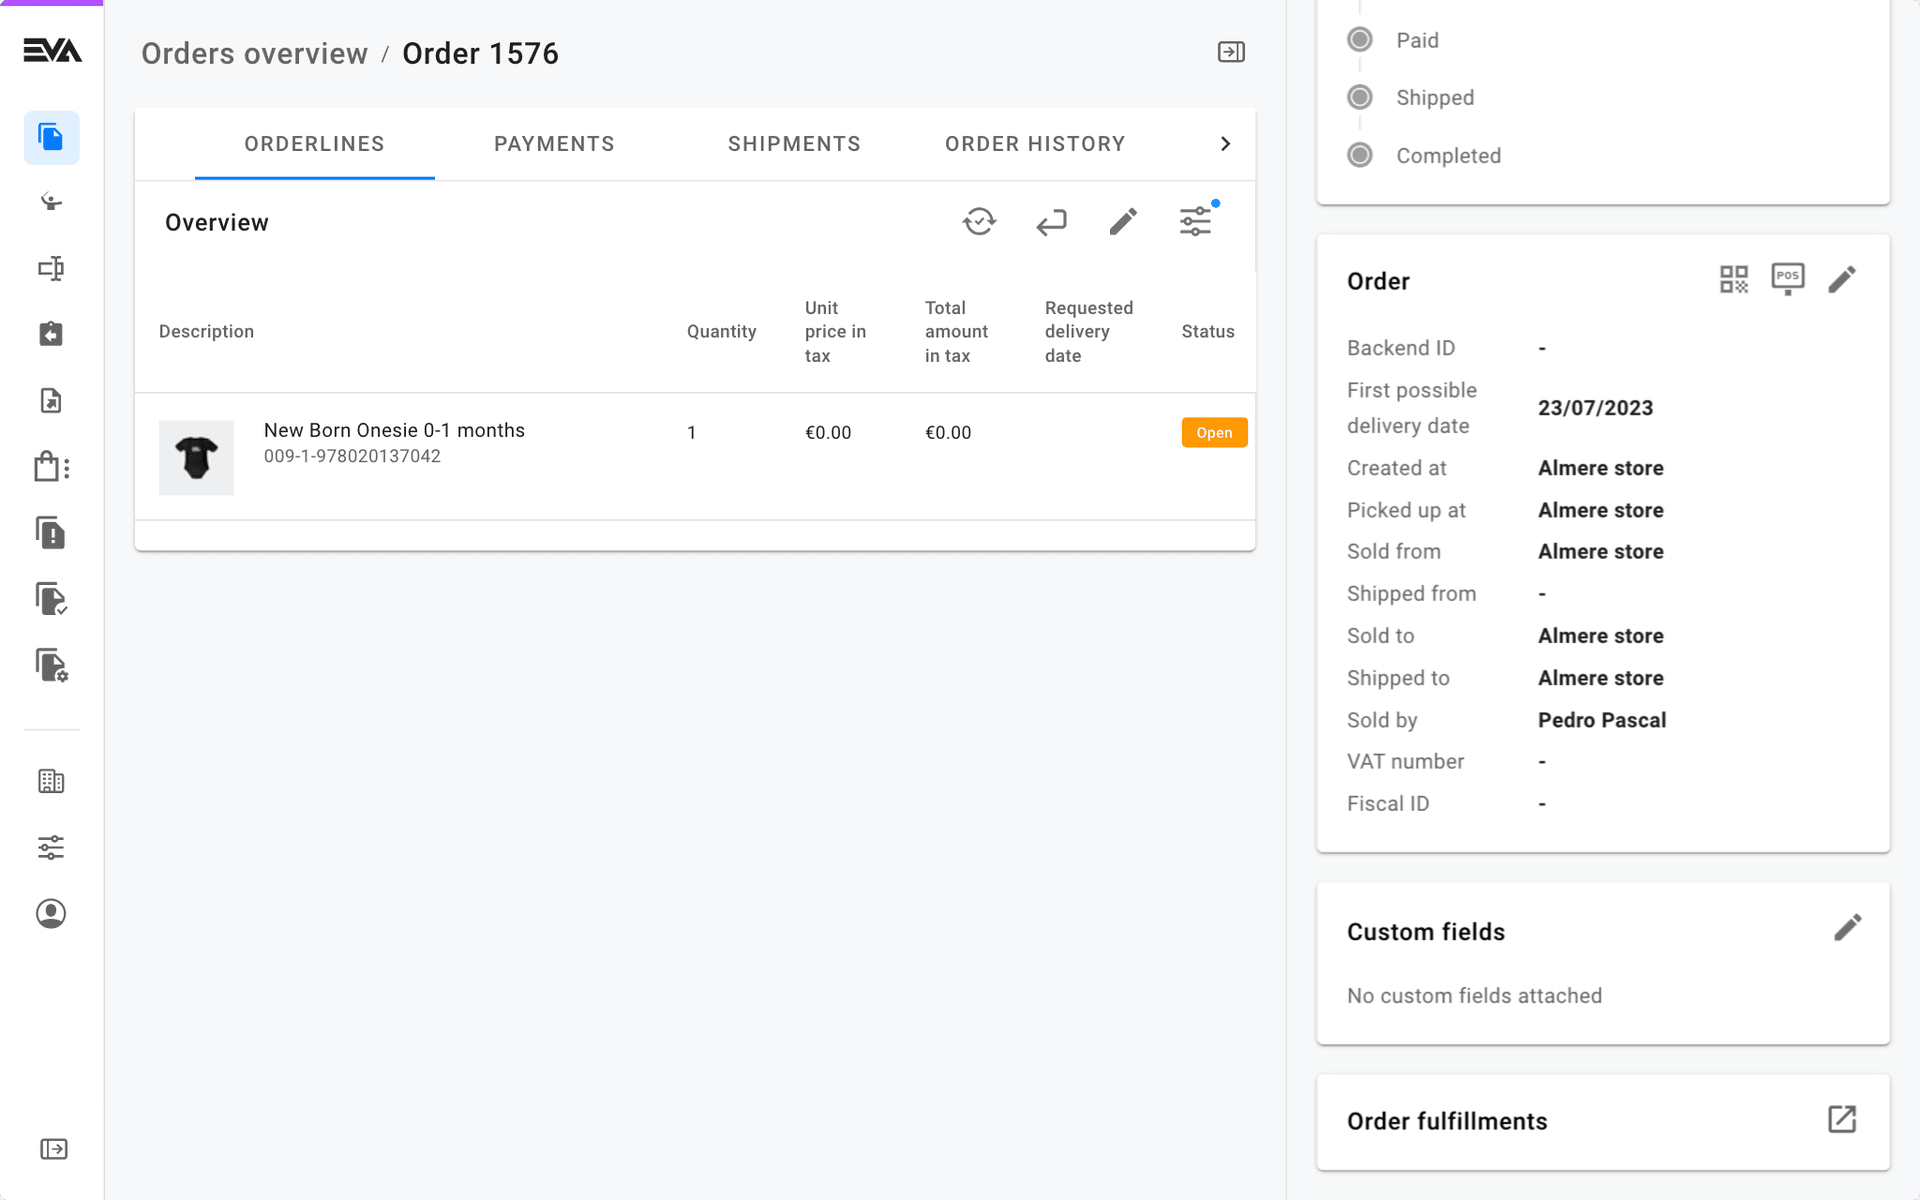
Clicking an order in the order list opens up the order detail page, showing you all lines and further information on that specific order. The main list consists of nine tabs:
You can change what kind of Product ID is displayed.
Keep in mind that any time that is set is done so in UTC, while the manner in which it is displayed in your front end depends on the region you are observing from. Also see Handling dates/times.
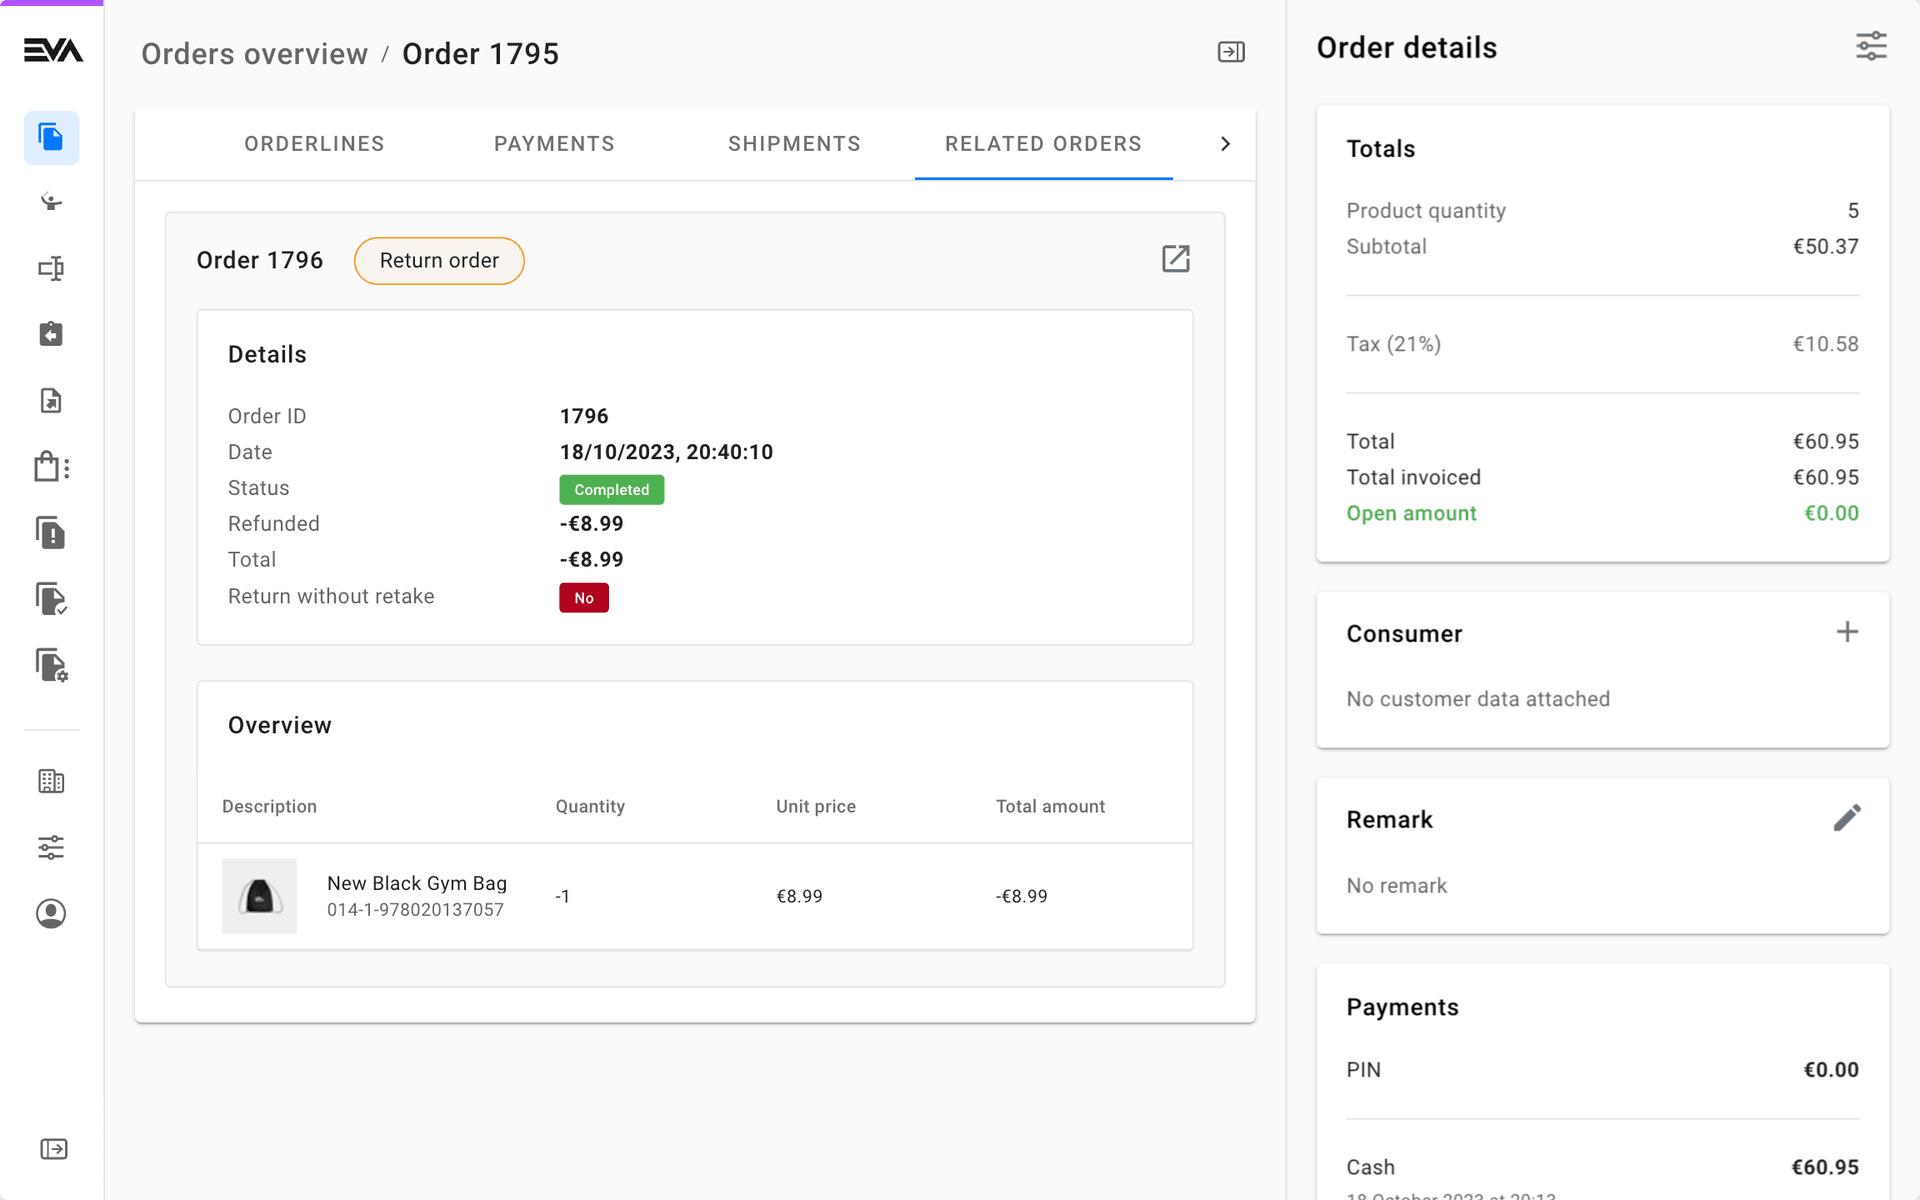
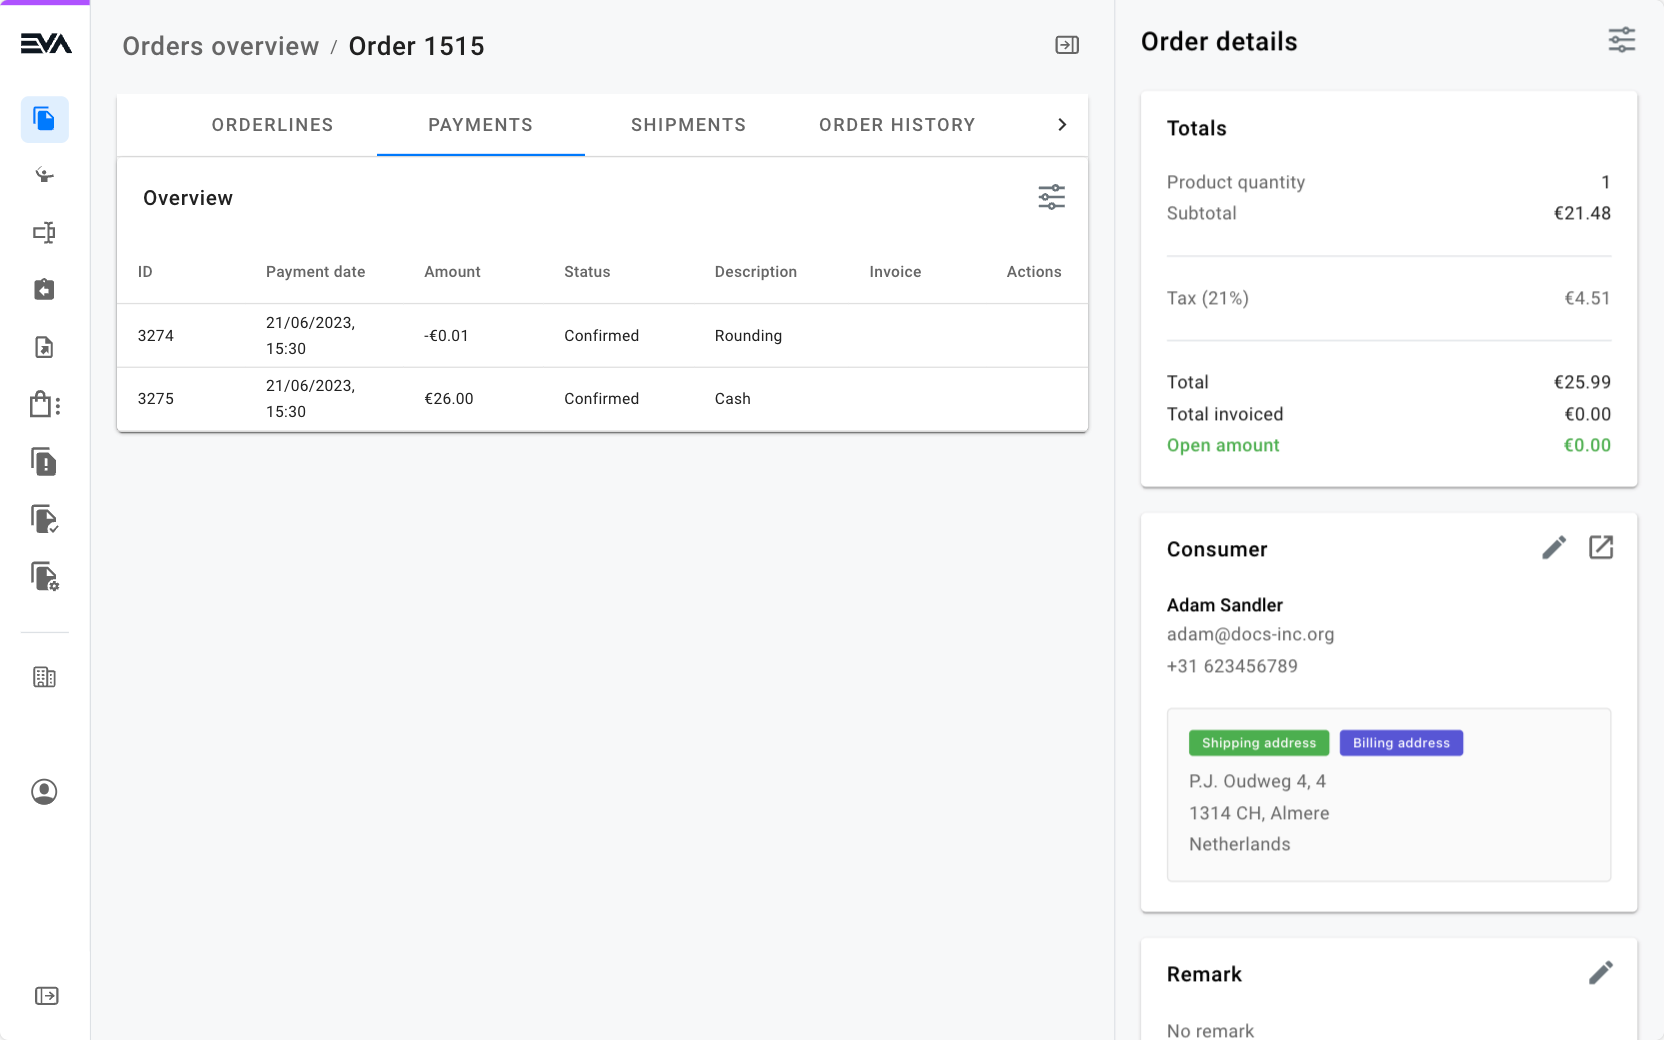
Sidebar cards
The sidebar of the order detail page shows you a variety of cards with details concerning the order. You can change what cards are shown by clicking the 'reorganize filters' icon. The details in most cards can be edited directly by clicking a card's 'pencil' icon. Here are some examples:
The Totals card mainly provides a financial summary of the order, such as the Subtotal, Tax amount, Total invoiced, and Open amount. Add to that the total Product quantity included in the order.
The Orders card gives you lots of information about the logistics of the order and allows you to change the Requested delivery date (if applicable) via the 'pencil' icon. Furthermore, you have the option to 'Duplicate order to POS', 'Open order in POS', view the Sold by user(s), or use the QR code scan option to transfer that order to your device.
Additional information POS duplication
The following image shows you the icons on the Orders card.
Duplication entails essentially creating a new order. When initiating a duplication to POS, EVA will first check availability of each individual item on the OU the order would be duplicated to. If any items are unavailable, their sliders will be greyed out and be unavailable for duplication.
You can also enter a reason for the duplication, providing additional context or information for the duplicated order.
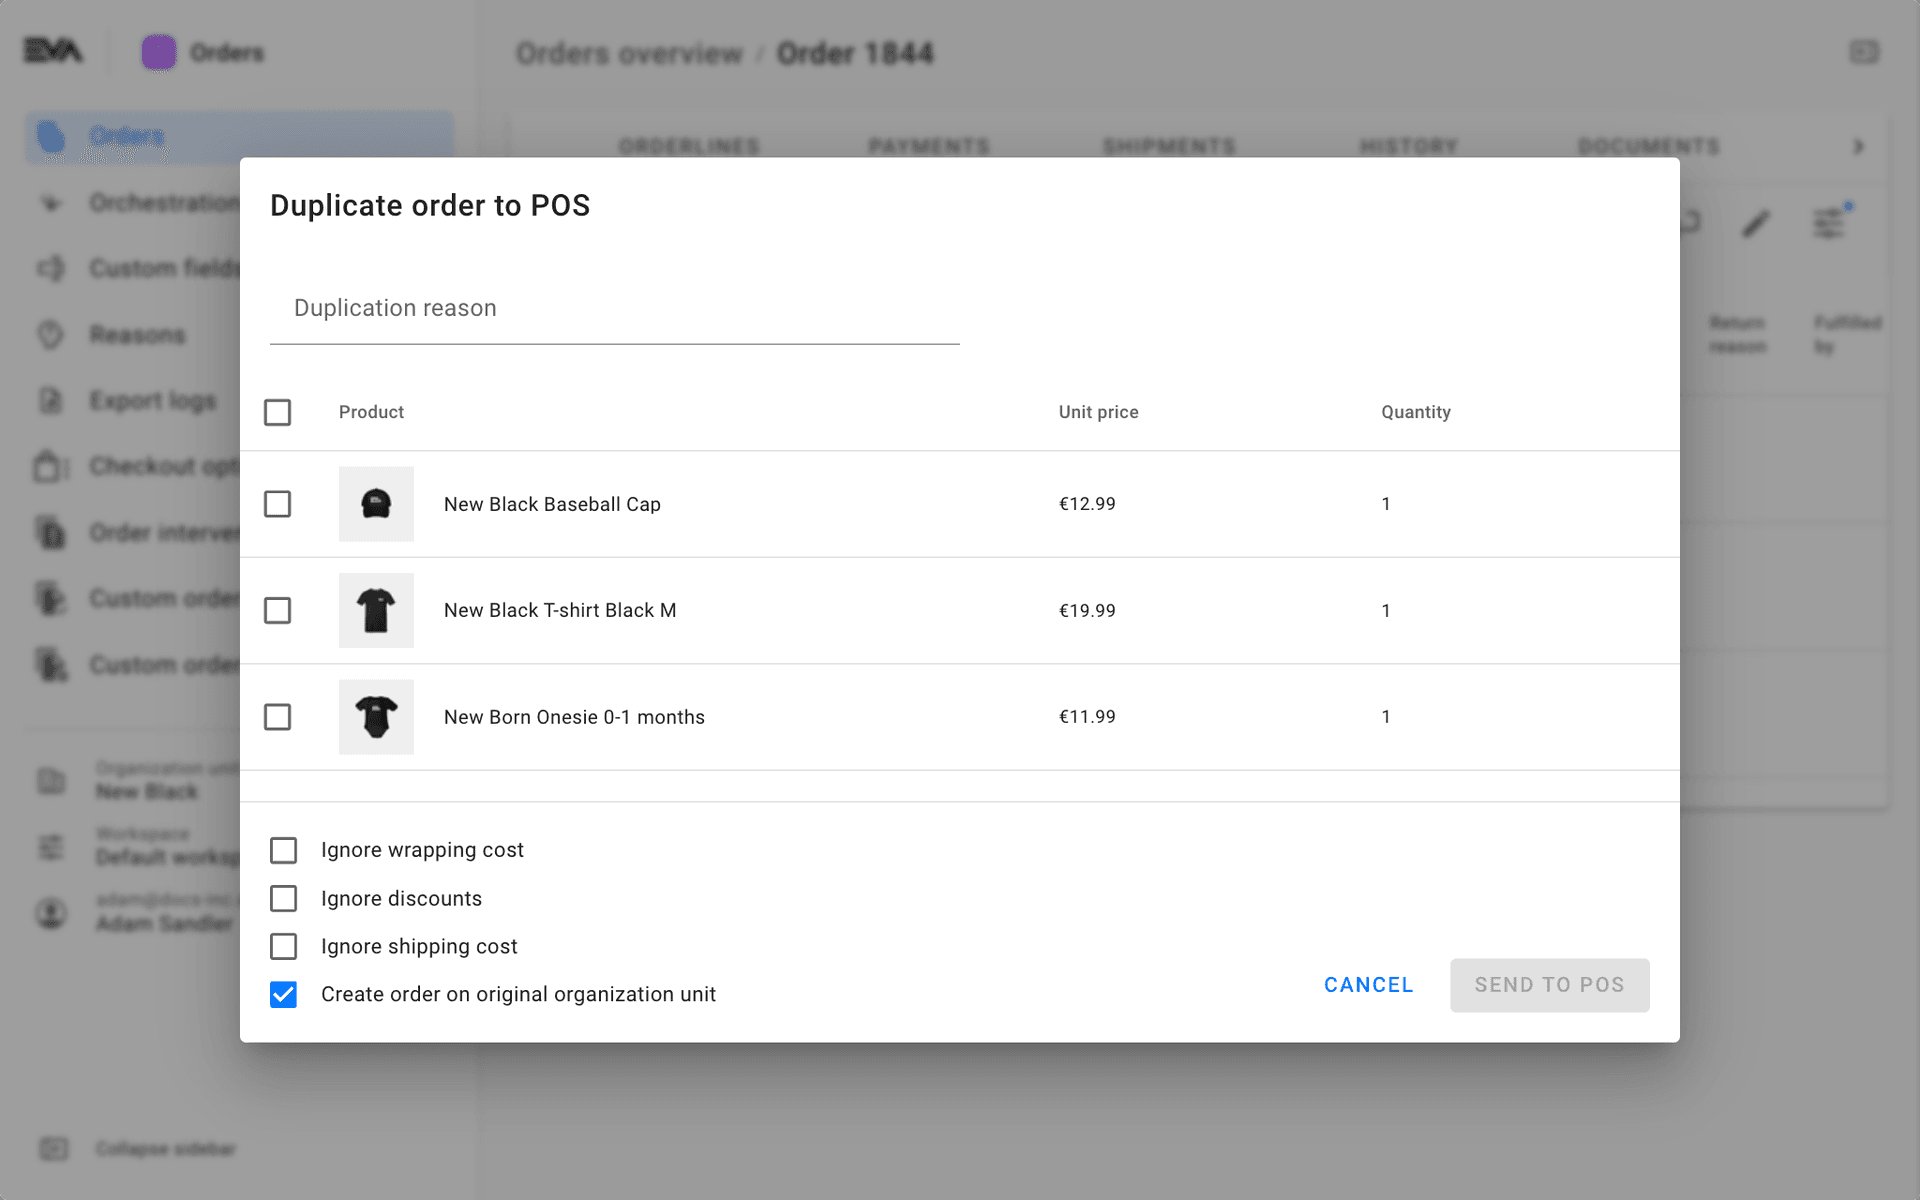
The bottom switch Create order on original organization unit will be, by default, switched on. Switching this off will duplicate the order on the organization unit where the user is logged in.
In order to open up the order in POS, EVA should know the URL to your POS web deployment:
| Setting | Description | Value |
|---|---|---|
EvaPos:Url | The URL to your POS web deployment. | your adminsuiteurl/pos |
The Cases card allows you to see any cases related to the order, the case status, create a new case, or edit existing ones.
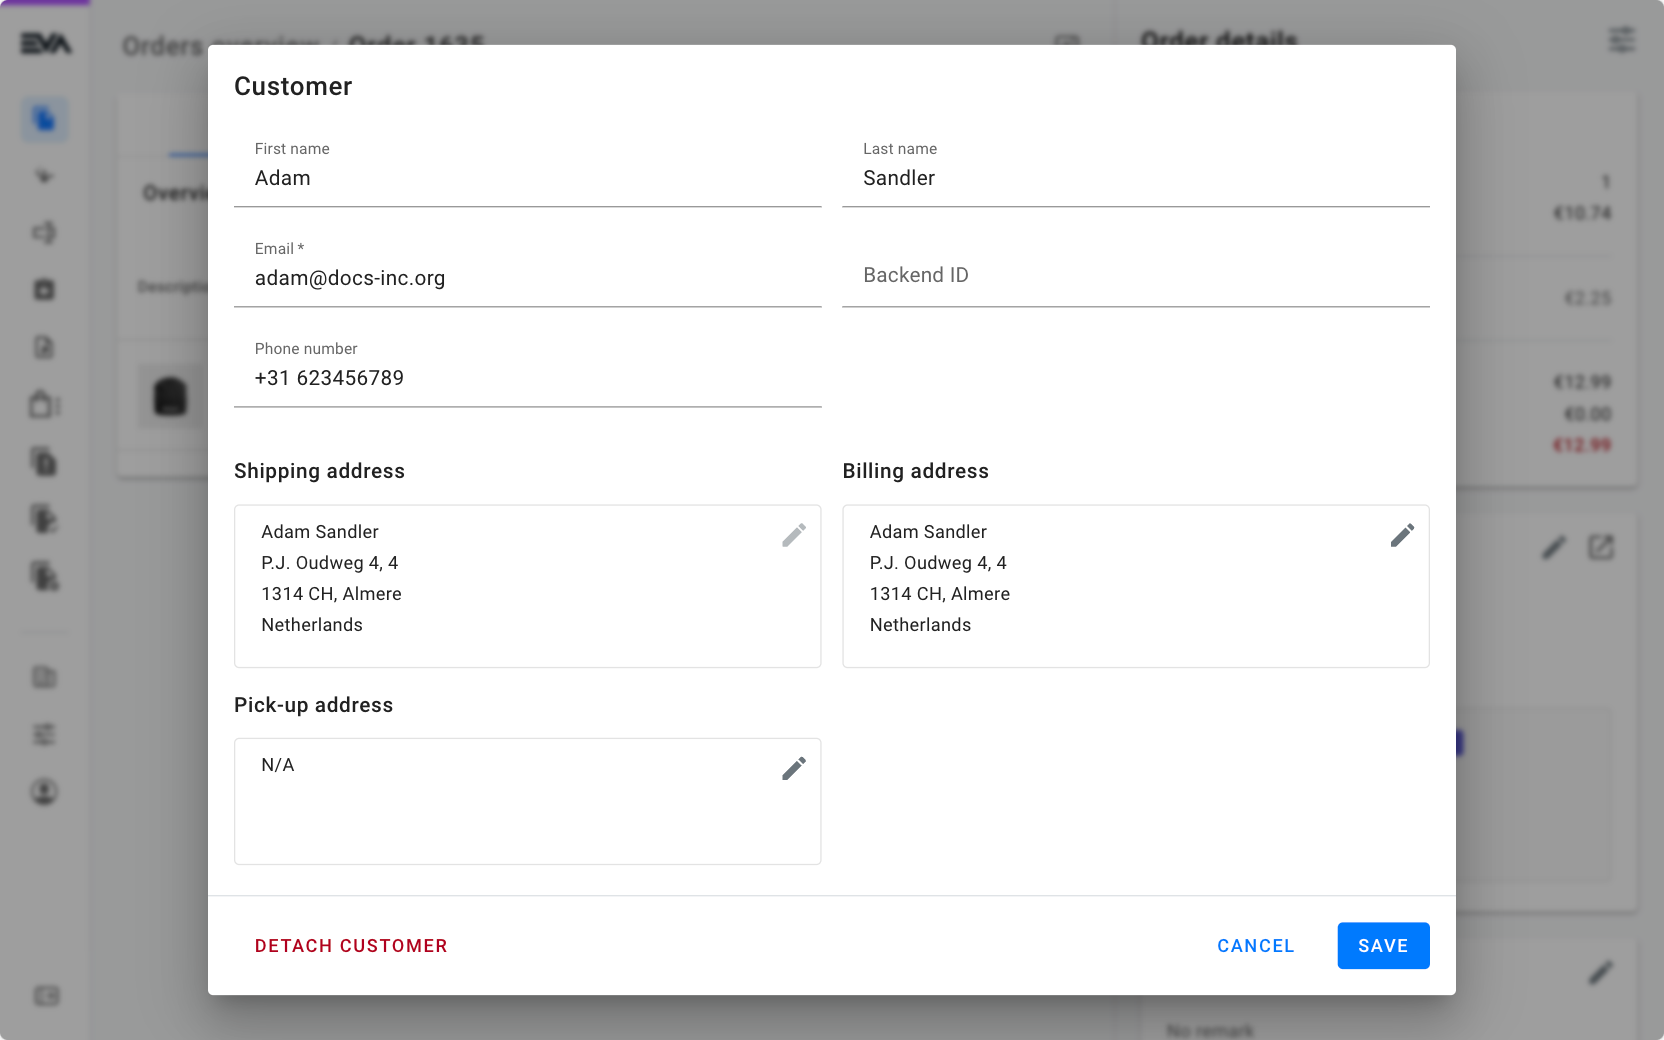
The Consumer card lets you see and edit the attached customer's details (name, email, phone number, and addresses) or Detach Customer from the order completely. Note that detaching a customer is only possible if the order status is not Completed.
To have a custom field(s) appear in the consumer card, the App setting App:Order:DisplayUserCustomFields with a value that corresponds to the BackendID of the user custom field must be configured.
Multiple backend IDs separated by a comma are allowed as values (e.g. fieldA,fieldB,fieldC) which would in turn display multiple custom fields within the consumer card.
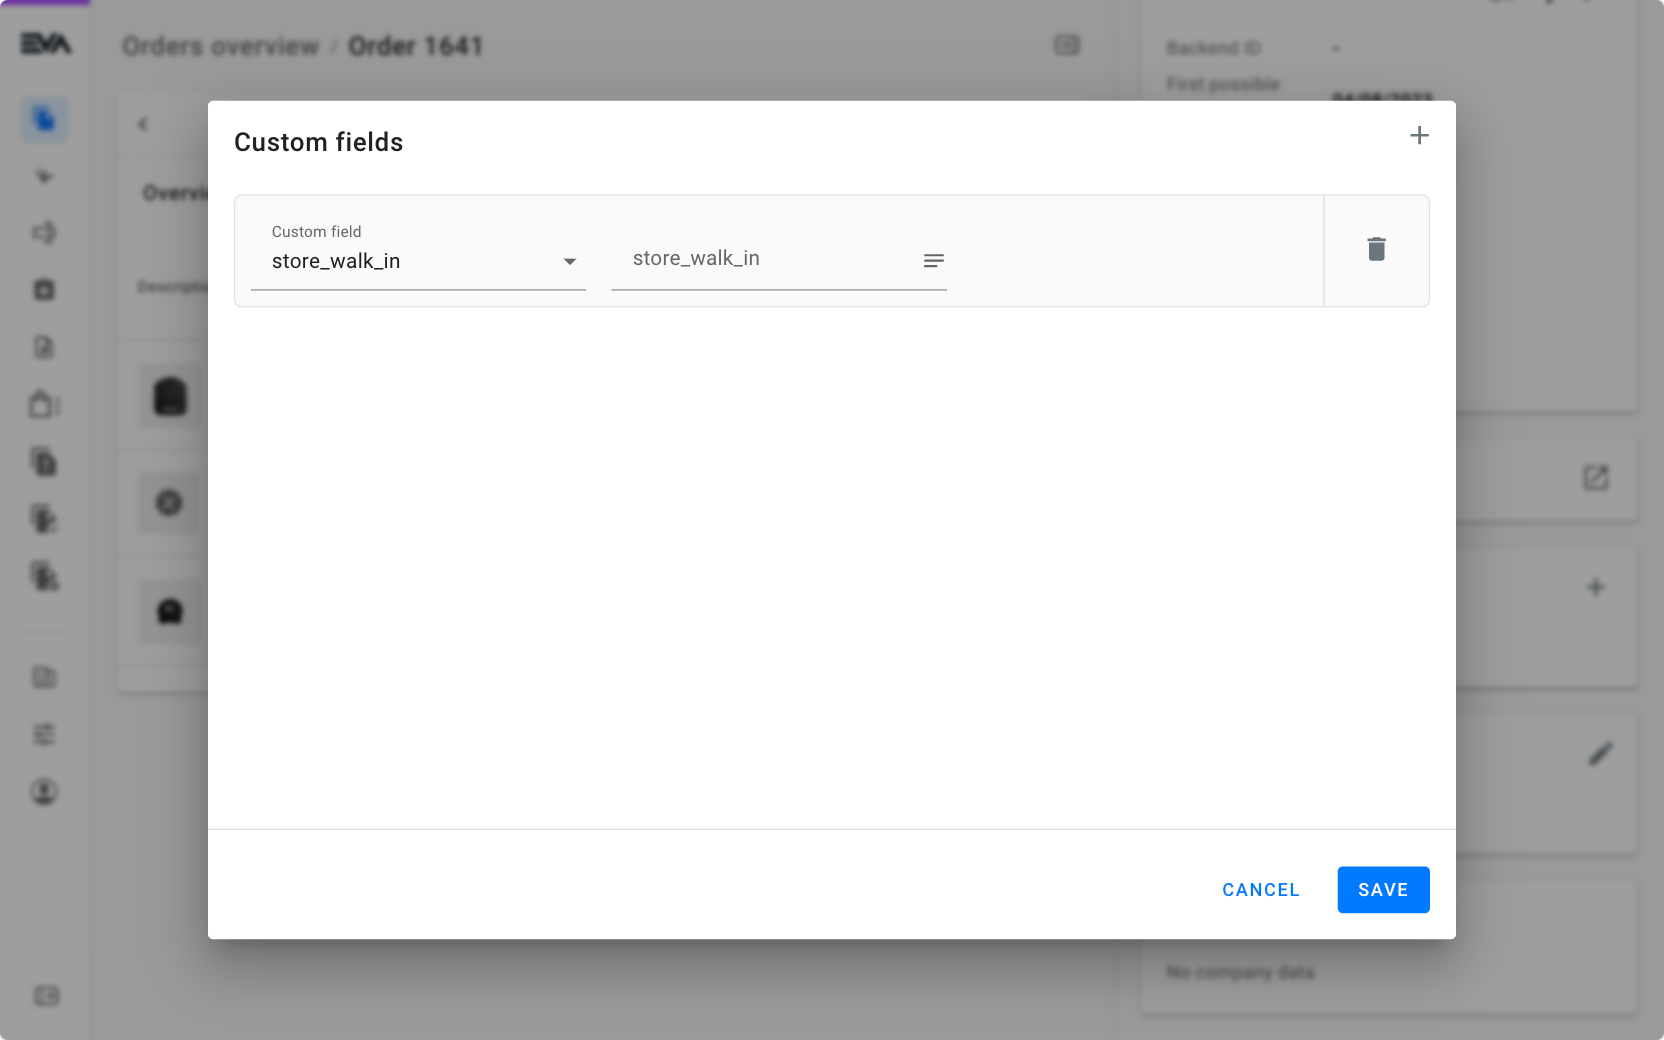
The Custom fields card allows you to add custom fields to the order on the fly. You cannot however create new custom fields directly. You can only add those custom fields already created.
Order lines
The primary tab in the order detail page is the Orderlines tab. It shows you all order lines in your order and a bunch of options besides. You can tap a product line for more details, such as product information, stock information, discounts, and orderline history.
If there are remarks on individual (discount) order lines, then these will be displayed in their corresponding lines in Remarks column.
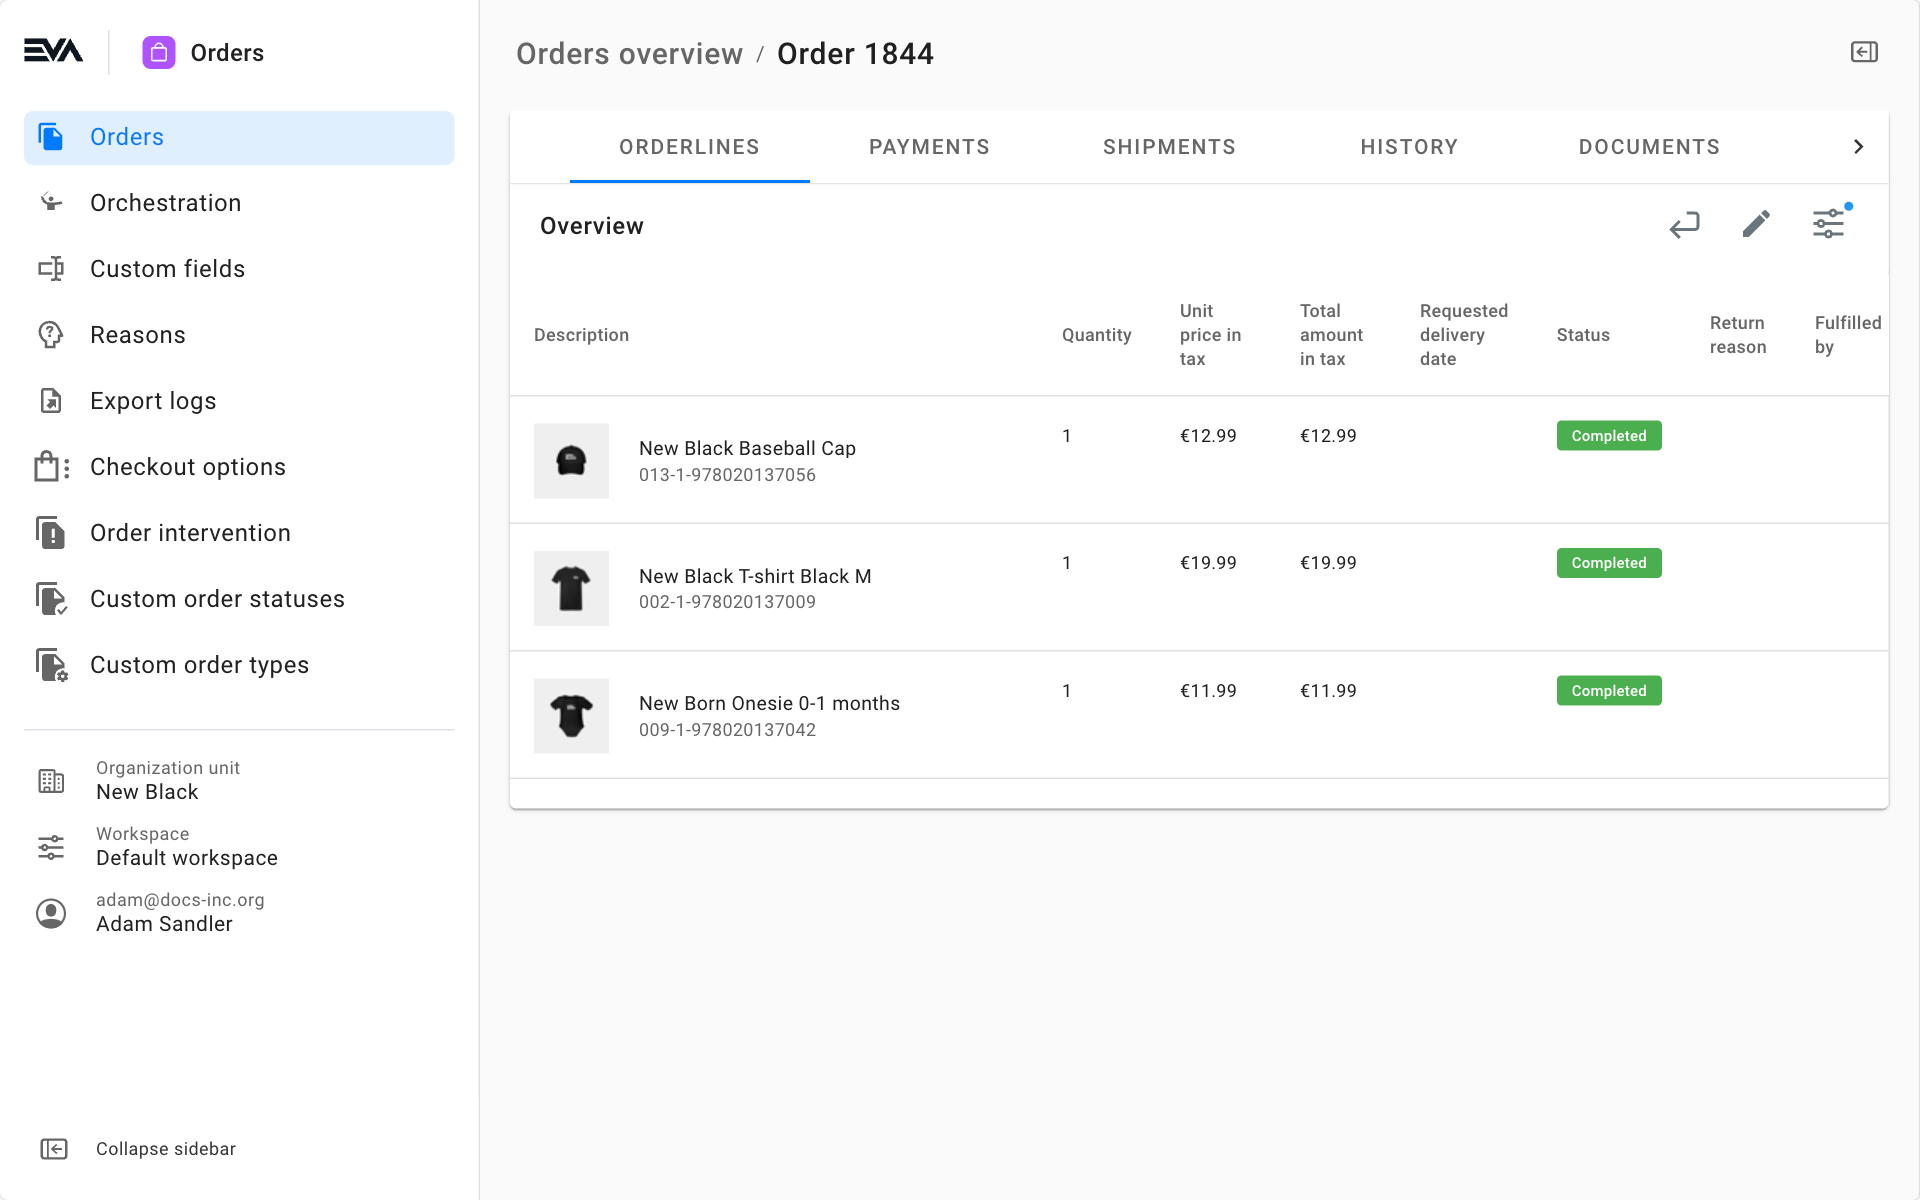
This tab comes with several options, all displayed in the top right of the order's Overview. We'll go by them one-by-one, from left to right. Their availability differs per order.
Auto-complete order icon
The checkmark surrounded by arrows is our 'Auto-complete' icon. By clicking it, you can complete orders which couldn't be closed the usual way. Mind that this action is irreversible.
The payment type used for the auto-completion is Auto_balance_open_amount, which is configured automatically by EVA.
Create return order icon
Tapping the return order icon on the top right ('back arrow' icon) will start a return order flow.
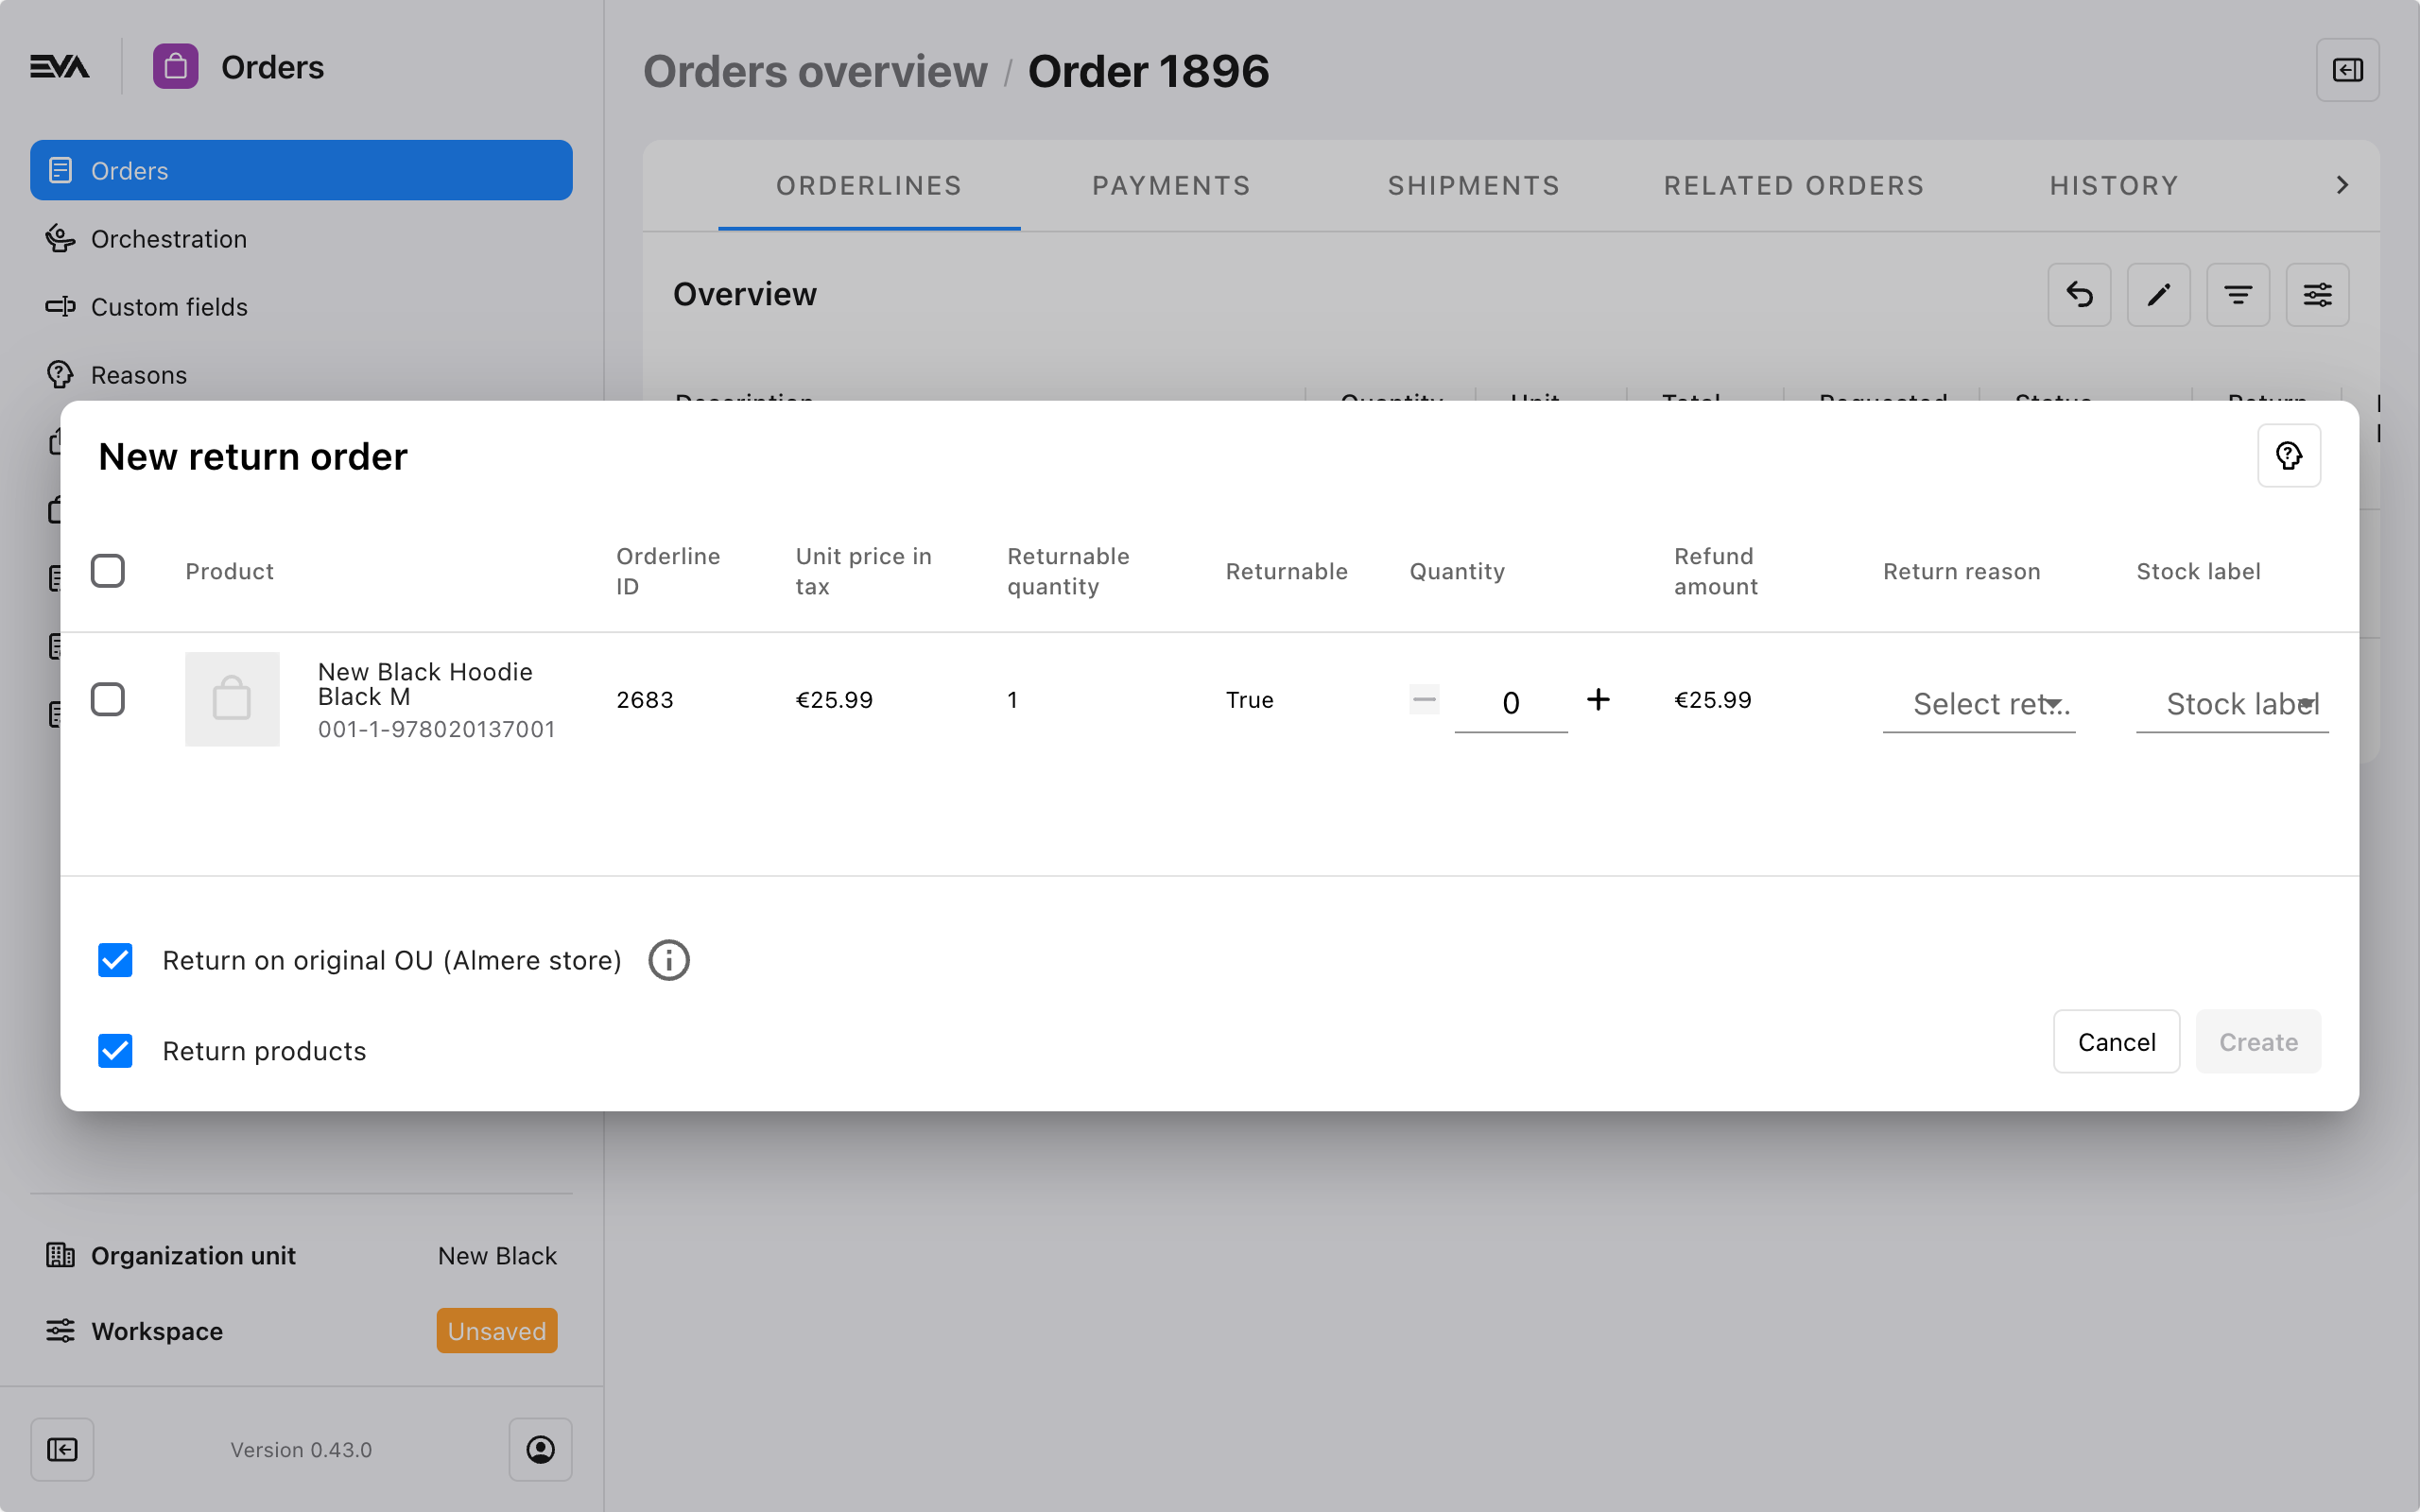
The modal displays what items are in the order and which are returnable with a clear True or False in the Returnable column. Any cancelled order lines are not displayed.
You can specify the item(s) you want to return (or refund), the quantity for each and to what stock label the items should be returned to.
To select all order lines at once, use the checkbox at the top of the left-most column.
The return modal will display the original OU at a glance. By unchecking Return on original OU, you will be able to change the OU to your currently logged-in OU.
Each return line requires a Refund or Return reason. You can do this for all lines at once by using the return reasons icon ('question mark') in the top right corner. If none of the products are returnable, this is hidden.
If you have configured more than 10 reasons and cannot find the desired reason at first glance using the dropdown, you can search for the return reason directly by typing in the dropdown.
The type of reason you see depends on your selected options:
- When Return products is checked: The product is returned, and the consumer is always fully refunded. A Return reason is required.
- When Return products is NOT checked: The product will not be returned; instead, it becomes a Refund without retake. Selecting this option also allows you to set a custom Refund amount, either partial or full. A Refund reason is required.
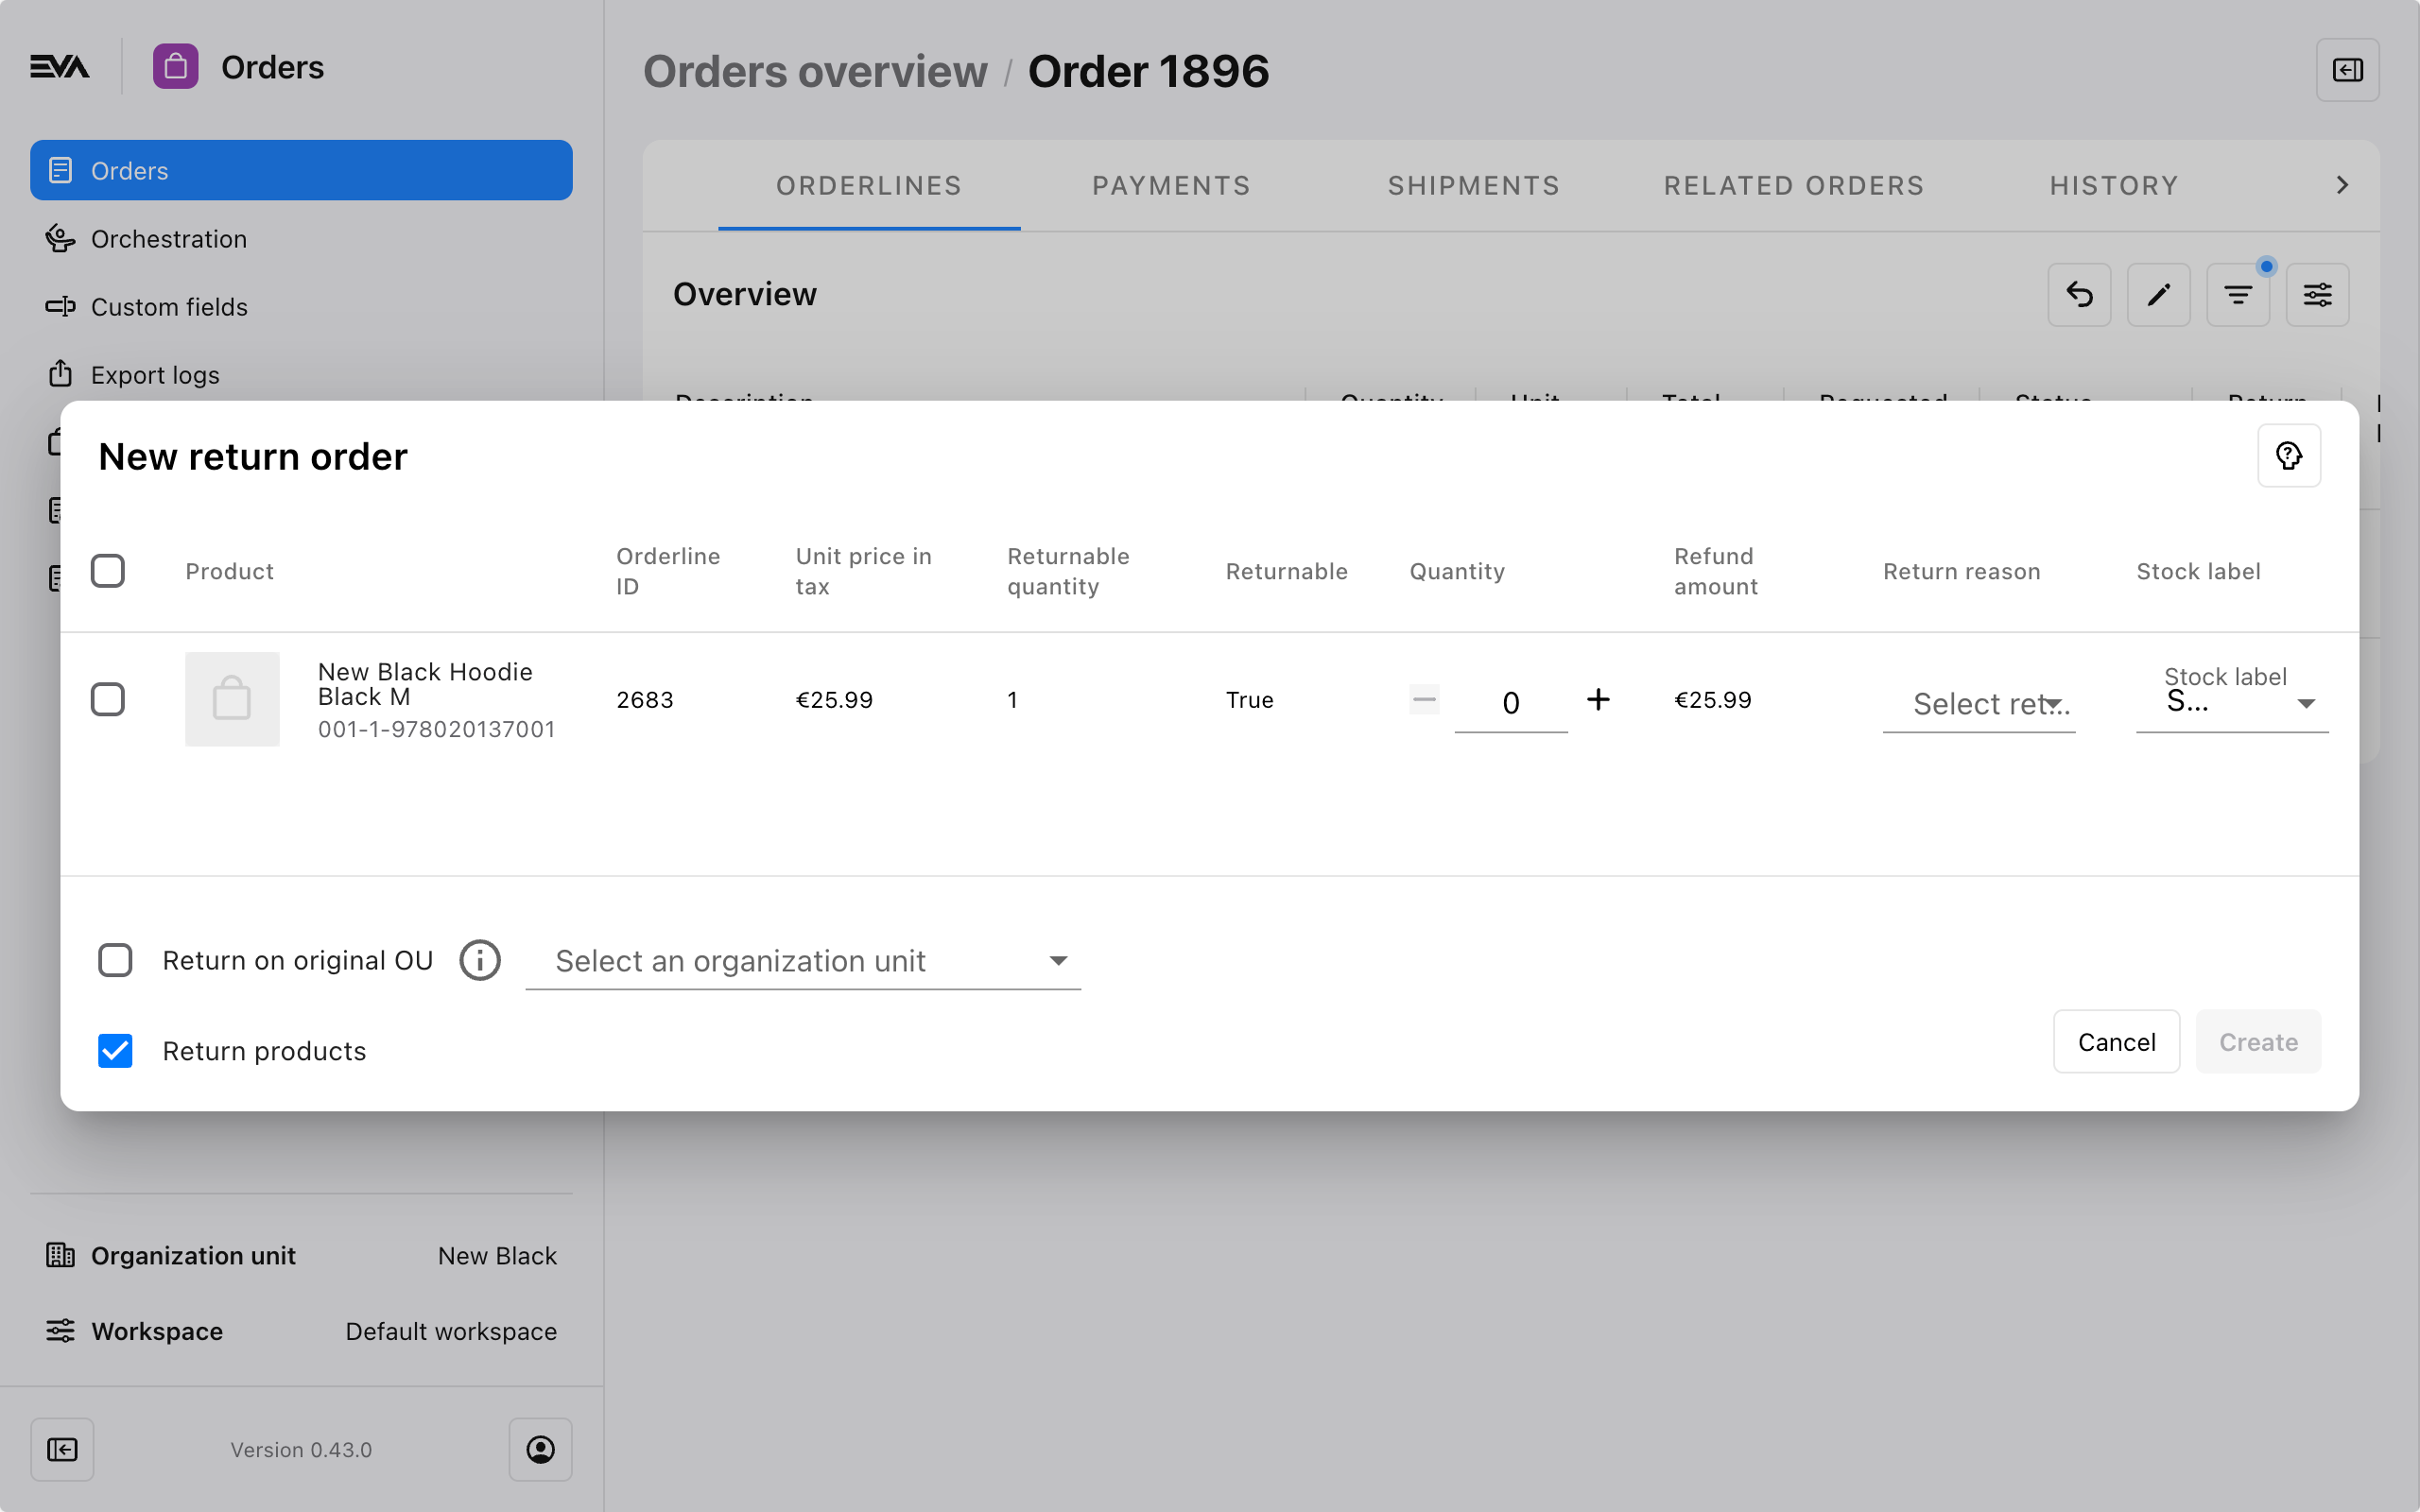
You can initiate the return order flow from a different organization unit than the original one. To do this, just uncheck the Return on original OU, and a dropdown list of your organization units will appear.
The default behavior of the Return on original OU checkbox can be influenced by means of a setting called App:Returns:PrefilledOrganizationUnit and its respective value. A certain behavior will apply, based on the value. The possible values are as follows:
- False: This is the default behavior - The Return on original OU checkbox will automatically be checked however, it can be manually unchecked. Once unchecked, you will have the option to select another organization unit from a dropdown list, based on your user rights.
- True: The Return on original OU checkbox will be checked and the specified return OU will be the same as the original OU where the order was performed. The checkbox is then greyed out, and no modification to the selection can be made.
- Current: The Return on original OU checkbox will be checked and the specified return OU will be the same as the one you are logged into i.e. specified in left sidebar under Organization unit. The checkbox is then greyed out, and no modification to the selection can be made.
After filling out your return (without retake) details, the Create button will be activated. Tapping it will start the flow, which means a new return order will become visible in your order overviews across your devices.
First off, you cannot use the returns modal to create a regular return as well as a return without retake. You'll have to go through the returns flow more than once to accomplish both for a single order; it will result in multiple return orders.
Secondly, regardless of the choice you make in the Return products checkbox, the ReturnableStatus script may dictate another outcome and override it.
A store employee can directly refund via the POS, Companion or App Suite, or by creating a new payment in the Payments tab in the order in Admin Suite.
Edit order icon
Tapping the edit order icon visible on the top right ('pencil' icon) will prompt you with an option to cancel (all) order lines, change the order quantity or its requested date. You can choose to ignore order related costs and discounts for non-completed orders. From here, you can also enable partial fulfillment for your order.
You can also insert a price correction, either by setting the Order line correction or by altering Adjusted total amount - any changes made to one will automatically update the other.
If you have an order line with two or more units, a 'calculator' icon will appear on the order line. This allows you to make the same kind of adjustments, but to individual units of the product.
Depending on if your user has the ForceCancelOrder functionality, the option to cancel individual order lines (or all of them) will be available. Use this feature with extreme caution.
Below is an example to show you what the modal looks like.
If you change prices, the order amount will change and lead to a refund without retake. You can then create a new payment for the corresponding refund amount.
Receive returns icon
Return orders created via Admin Suite feature an additional 'box' shaped icon in the top right corner of the screen.
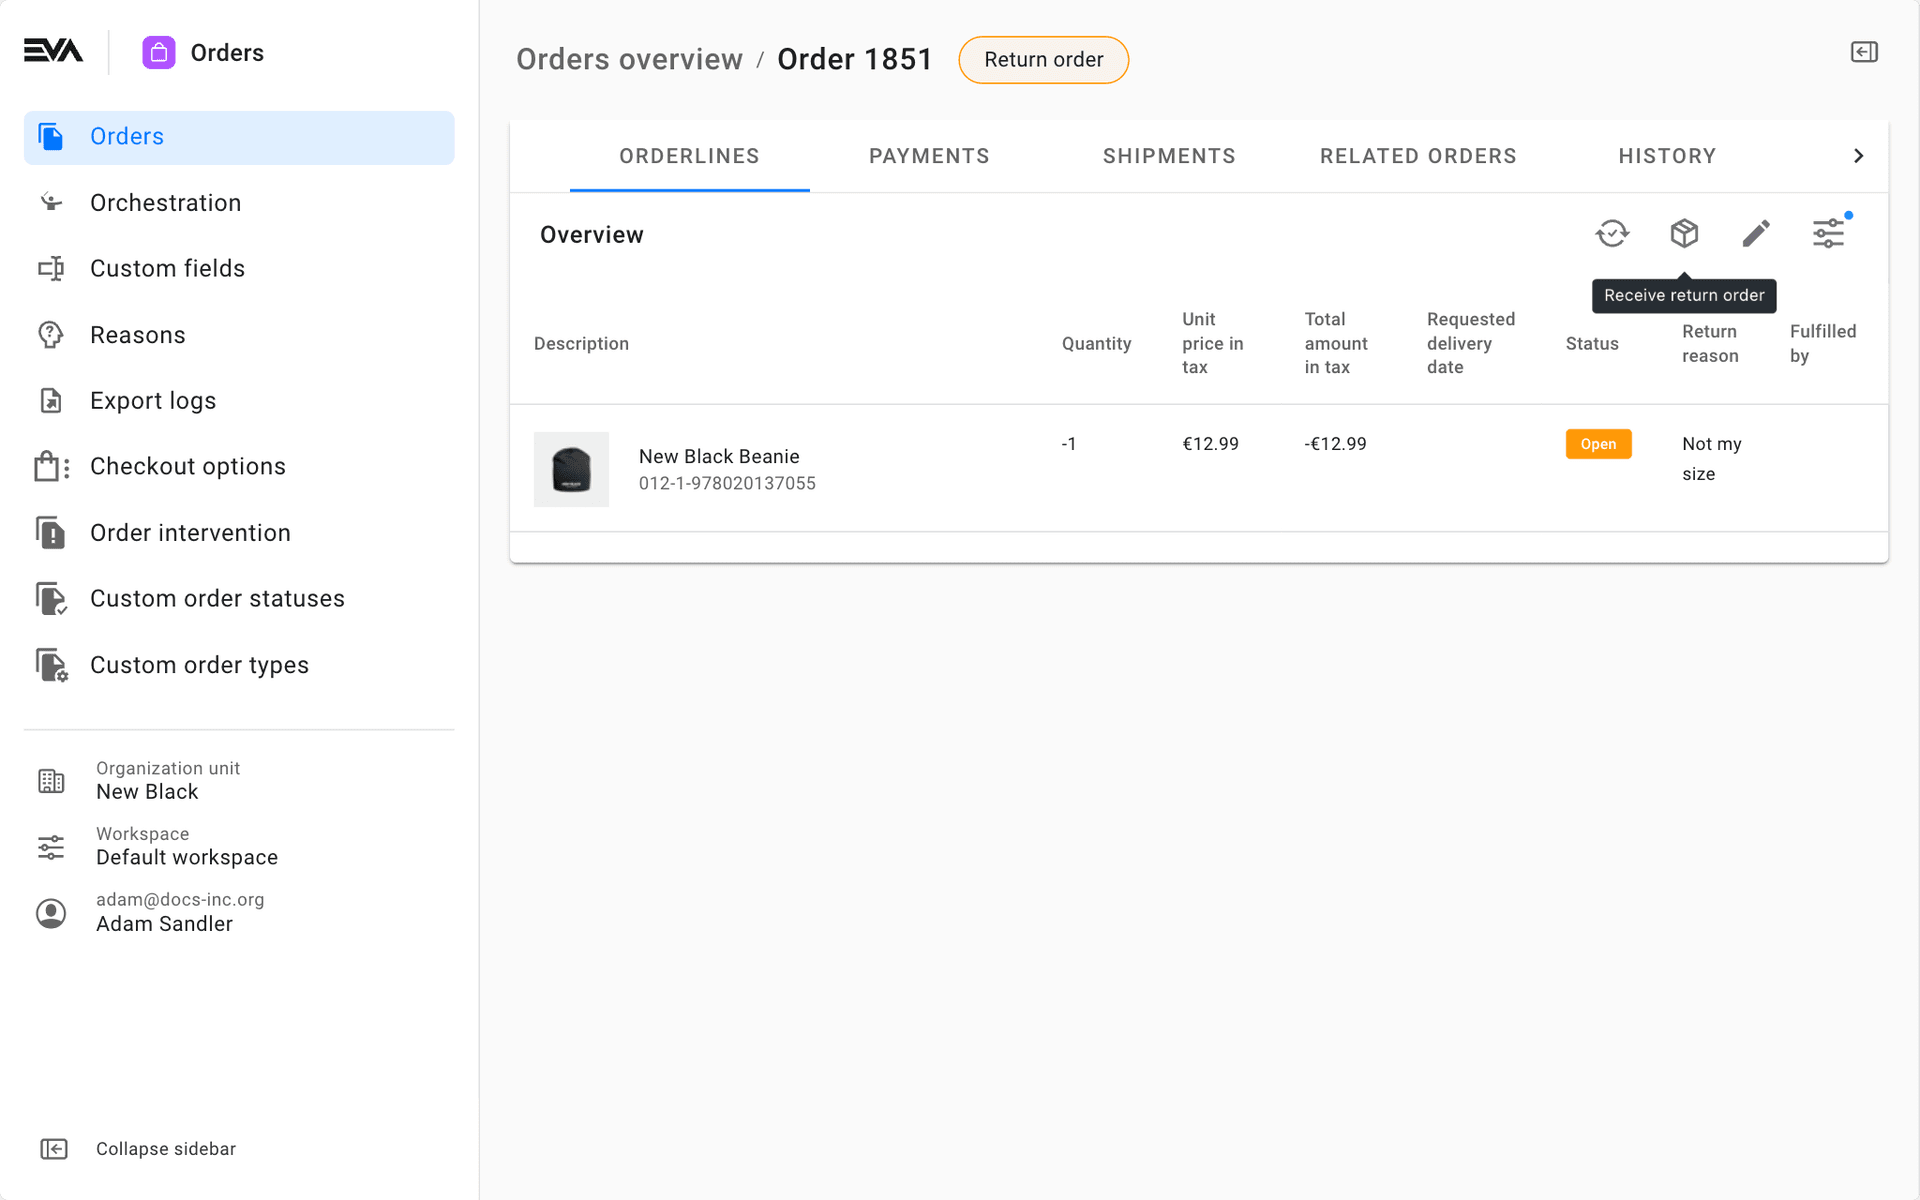
By tapping the 'box' icon, you can indicate the received product(s). A notification "Return order received successfully" will pop up on the bottom of your screen, and the order's status will change to Completed.
The refund can be processed in the Payments tab or via POS or Companion.
Reorganize columns icon
The 'Reorganize columns' icon lets you change the order and availability of columns for the order detail page specifically. The columns available here differ from those in the Orders overview.
Details on order line level
By clicking one of the order lines in the order overview, an abstract of the order line's product will be shown along with all its relevant data. This includes store stock information, discounts on the item and the order line's history.
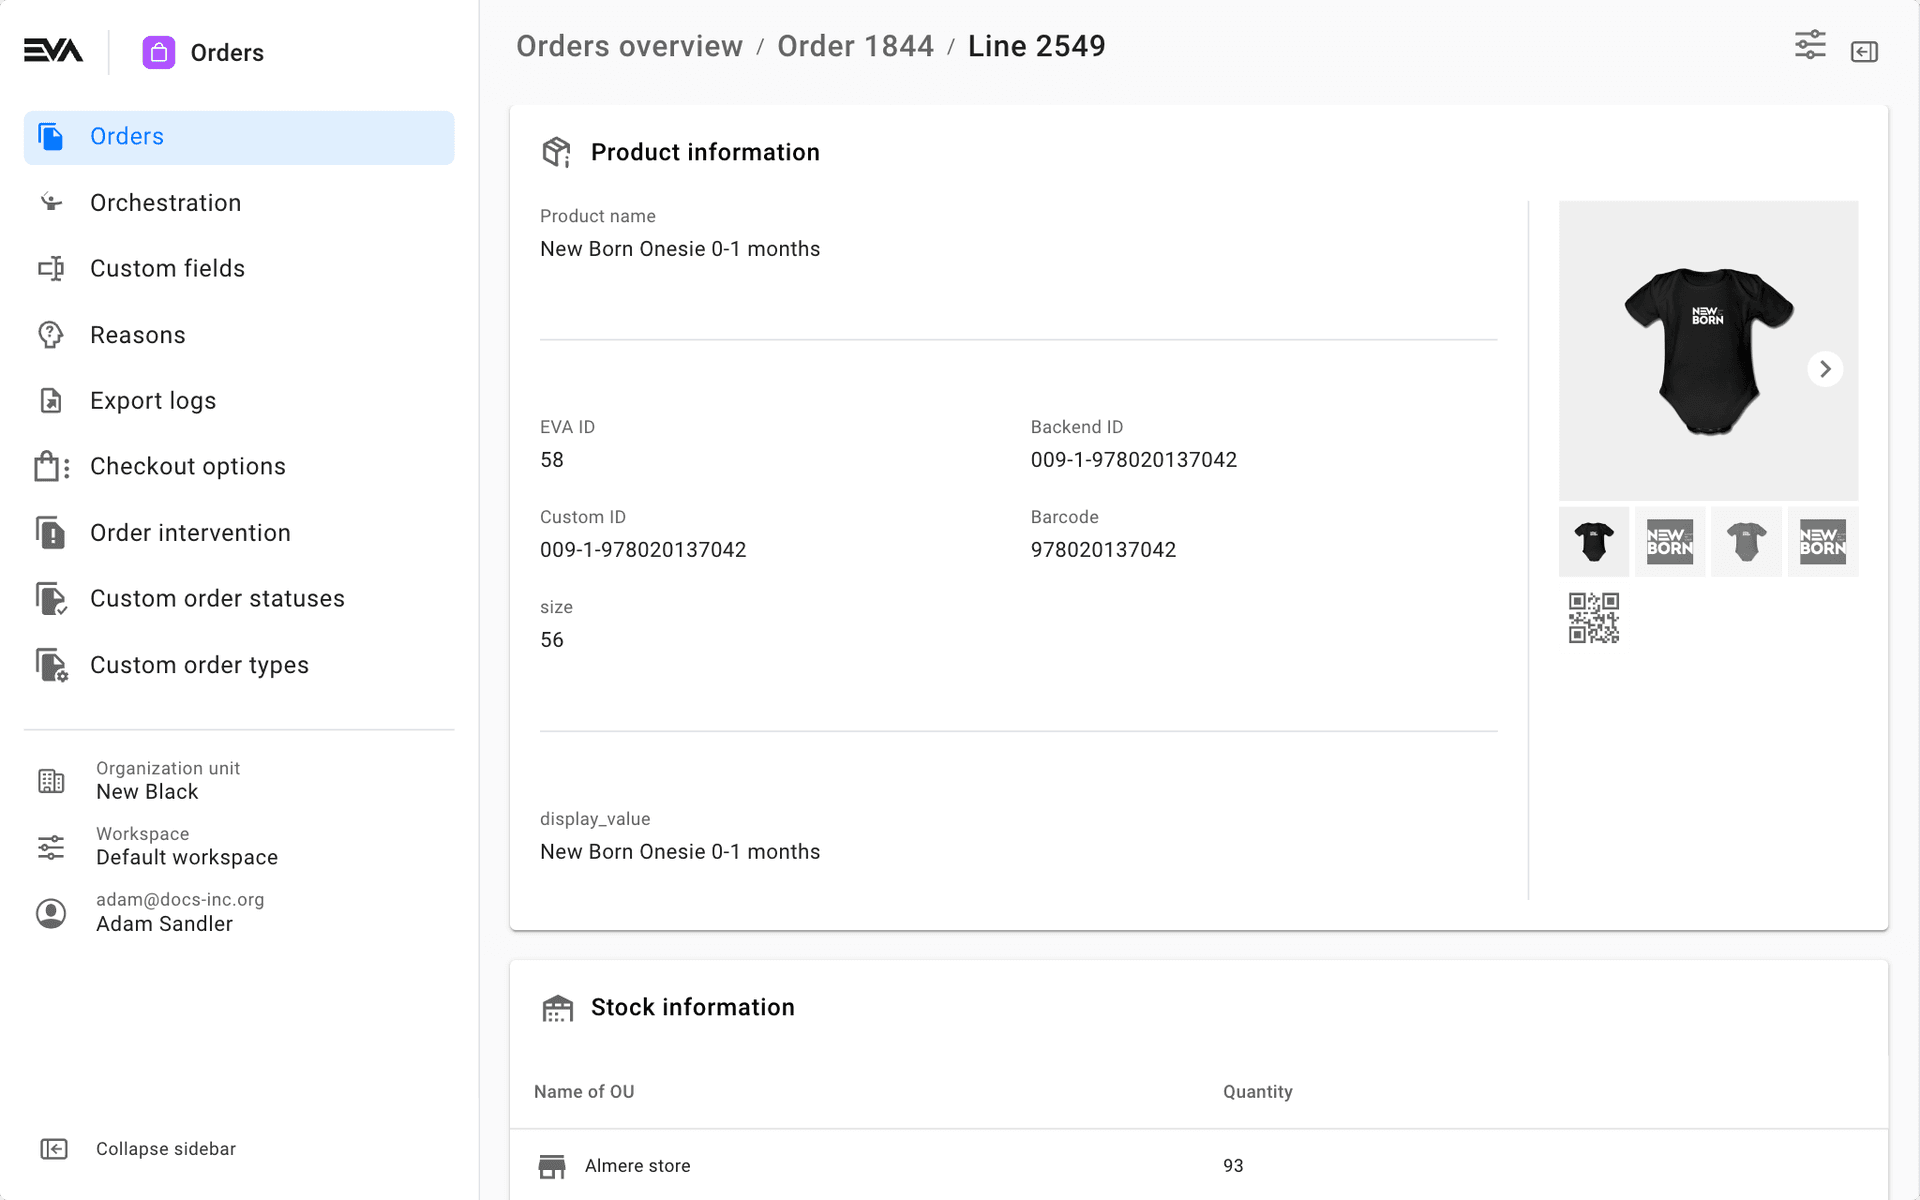
The first card also shows product properties. You can configure which product properties are shown precisely by using the following setting:
| Name | Example value |
|---|---|
| App:ProductDetail:Properties | { "EVA-Admin": ["product_name", "brand_name", "display_price", "size_range" } |
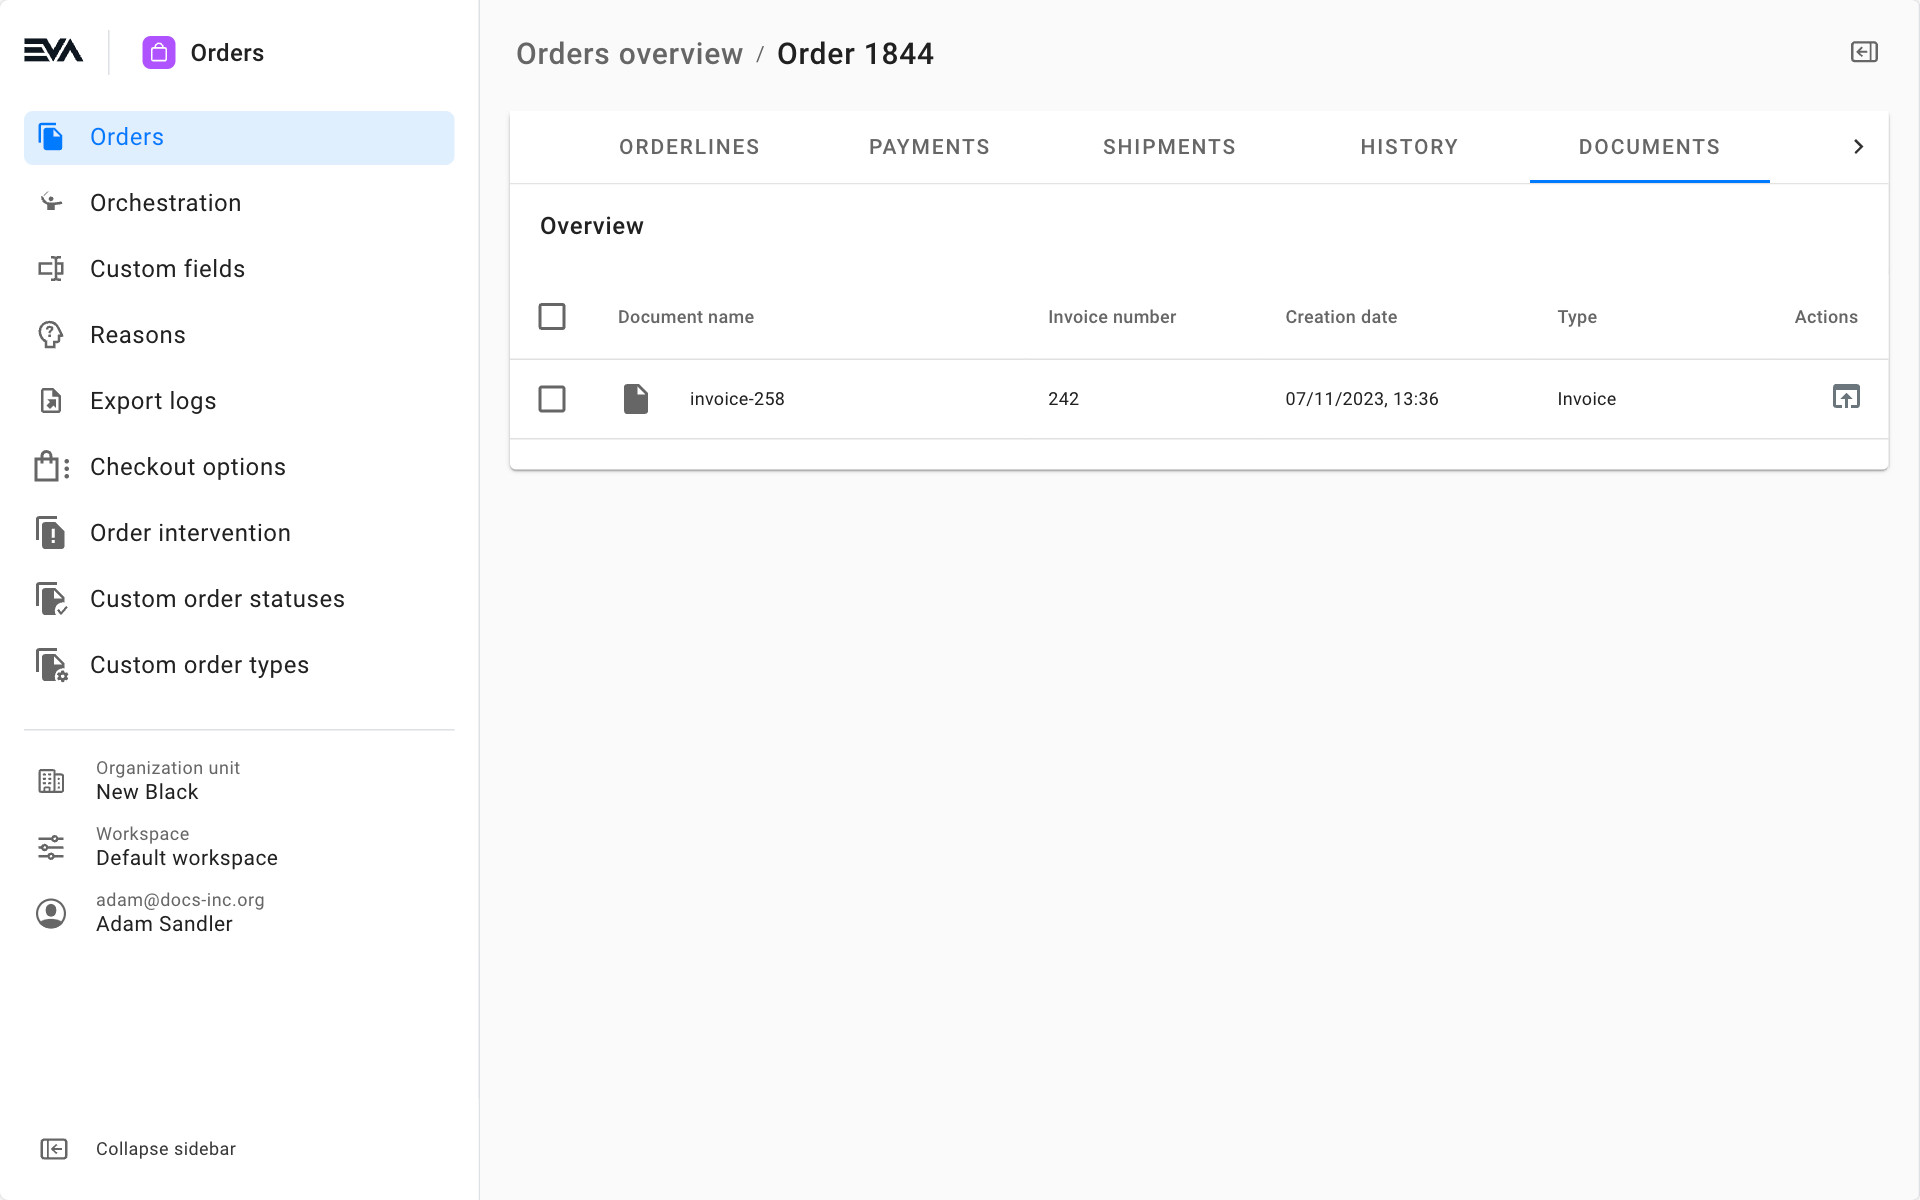
Documents
The Documents tab shows you a complete overview of all documents related to your currently selected order.
Use the action icon to Open the corresponding document (view/download/print). Each document is downloaded as a .pdf file. If you are downloading multiple documents at once, they will be compressed into a .zip file.
Exports
The Exports tab gives you a complete overview of all exports related to your currently selected order.

Click one of the exports for a detailed overview of the order's request, like in the Export logs chapter.
Bookings
The Bookings tab shows you a complete overview of all bookings related to your currently selected order.

Like the order overview, the order detail page can also be completely customized, and the customizations can be saved in a workspace.
Order history
The Order history tab shows you when and by whom precisely the order was created along with any changes to the order.
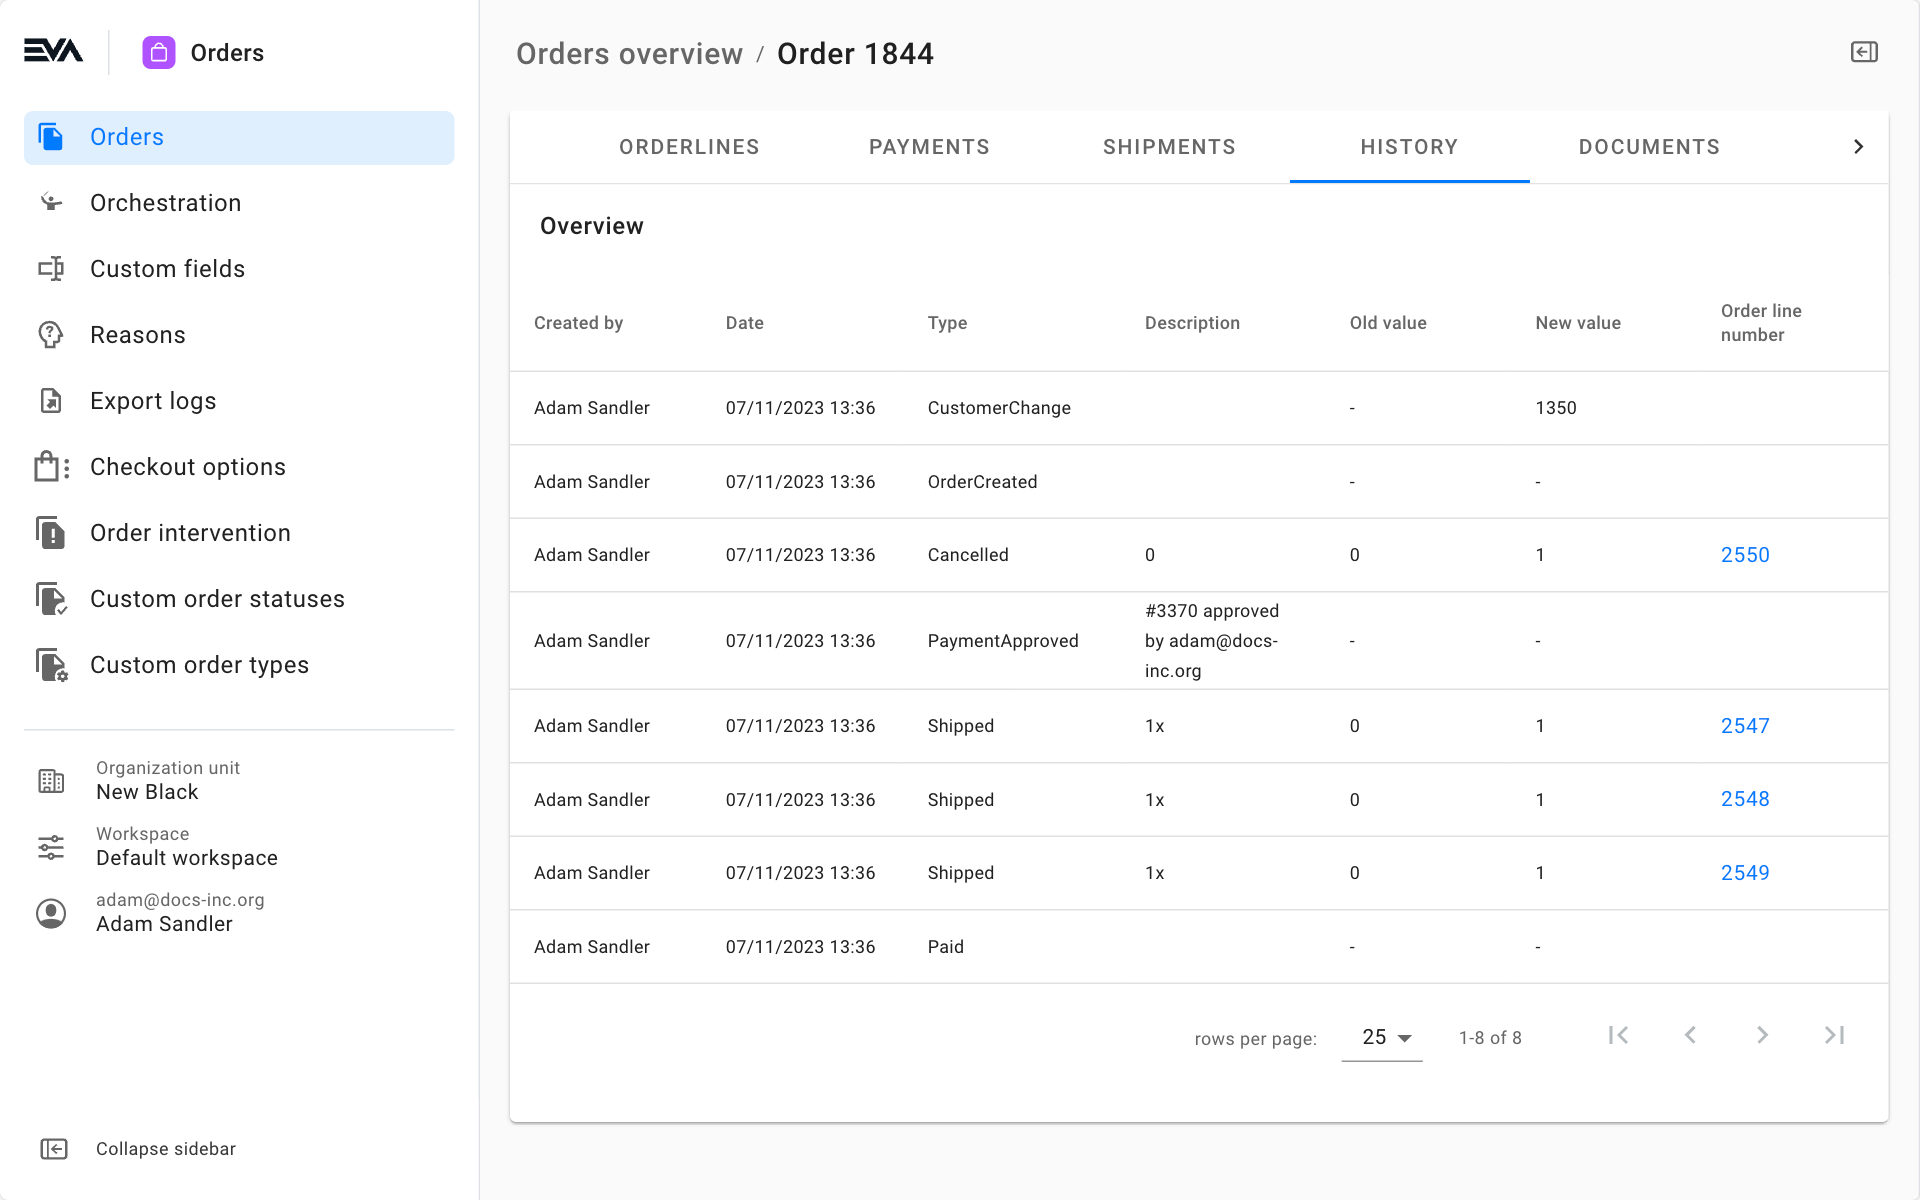
This specific example also shows how order lines can be delayed, either on request (see Edit order icon), or due to delivery date changes made in external systems, which in turn can be due to the ExpectedAvailabilityDates for products.
It's also possible to change the delivery date of only part of an order, for example, 1 out of 2 of the same products.
Related orders
As the name implies, this tab shows you a list of all related orders. In our example here, we are viewing order ID 802, and we can see an order ID 1298 in the Related orders tab. The latter is a return order for one of the items initially bought under order ID 802.
Once your return order is received by us, the Open status is updated to Shipped.
Payments
The Payments tab gives you an overview of all payments related to this order and allows you to make fictive manual payments on an open order. The latter is mainly used to make bookings check out. To do so, click the '+' icon. The options offered in the dropdown list will be based on your configured payment types.
Payments and refunds can be created, approved and cancelled in this tab. Which payment methods/refund methods are available depends on the store you're using - be sure to select the one you need in the OU selector in the left sidepanel.
Also keep in mind that you can't make any new refunds when there are refunds pending.
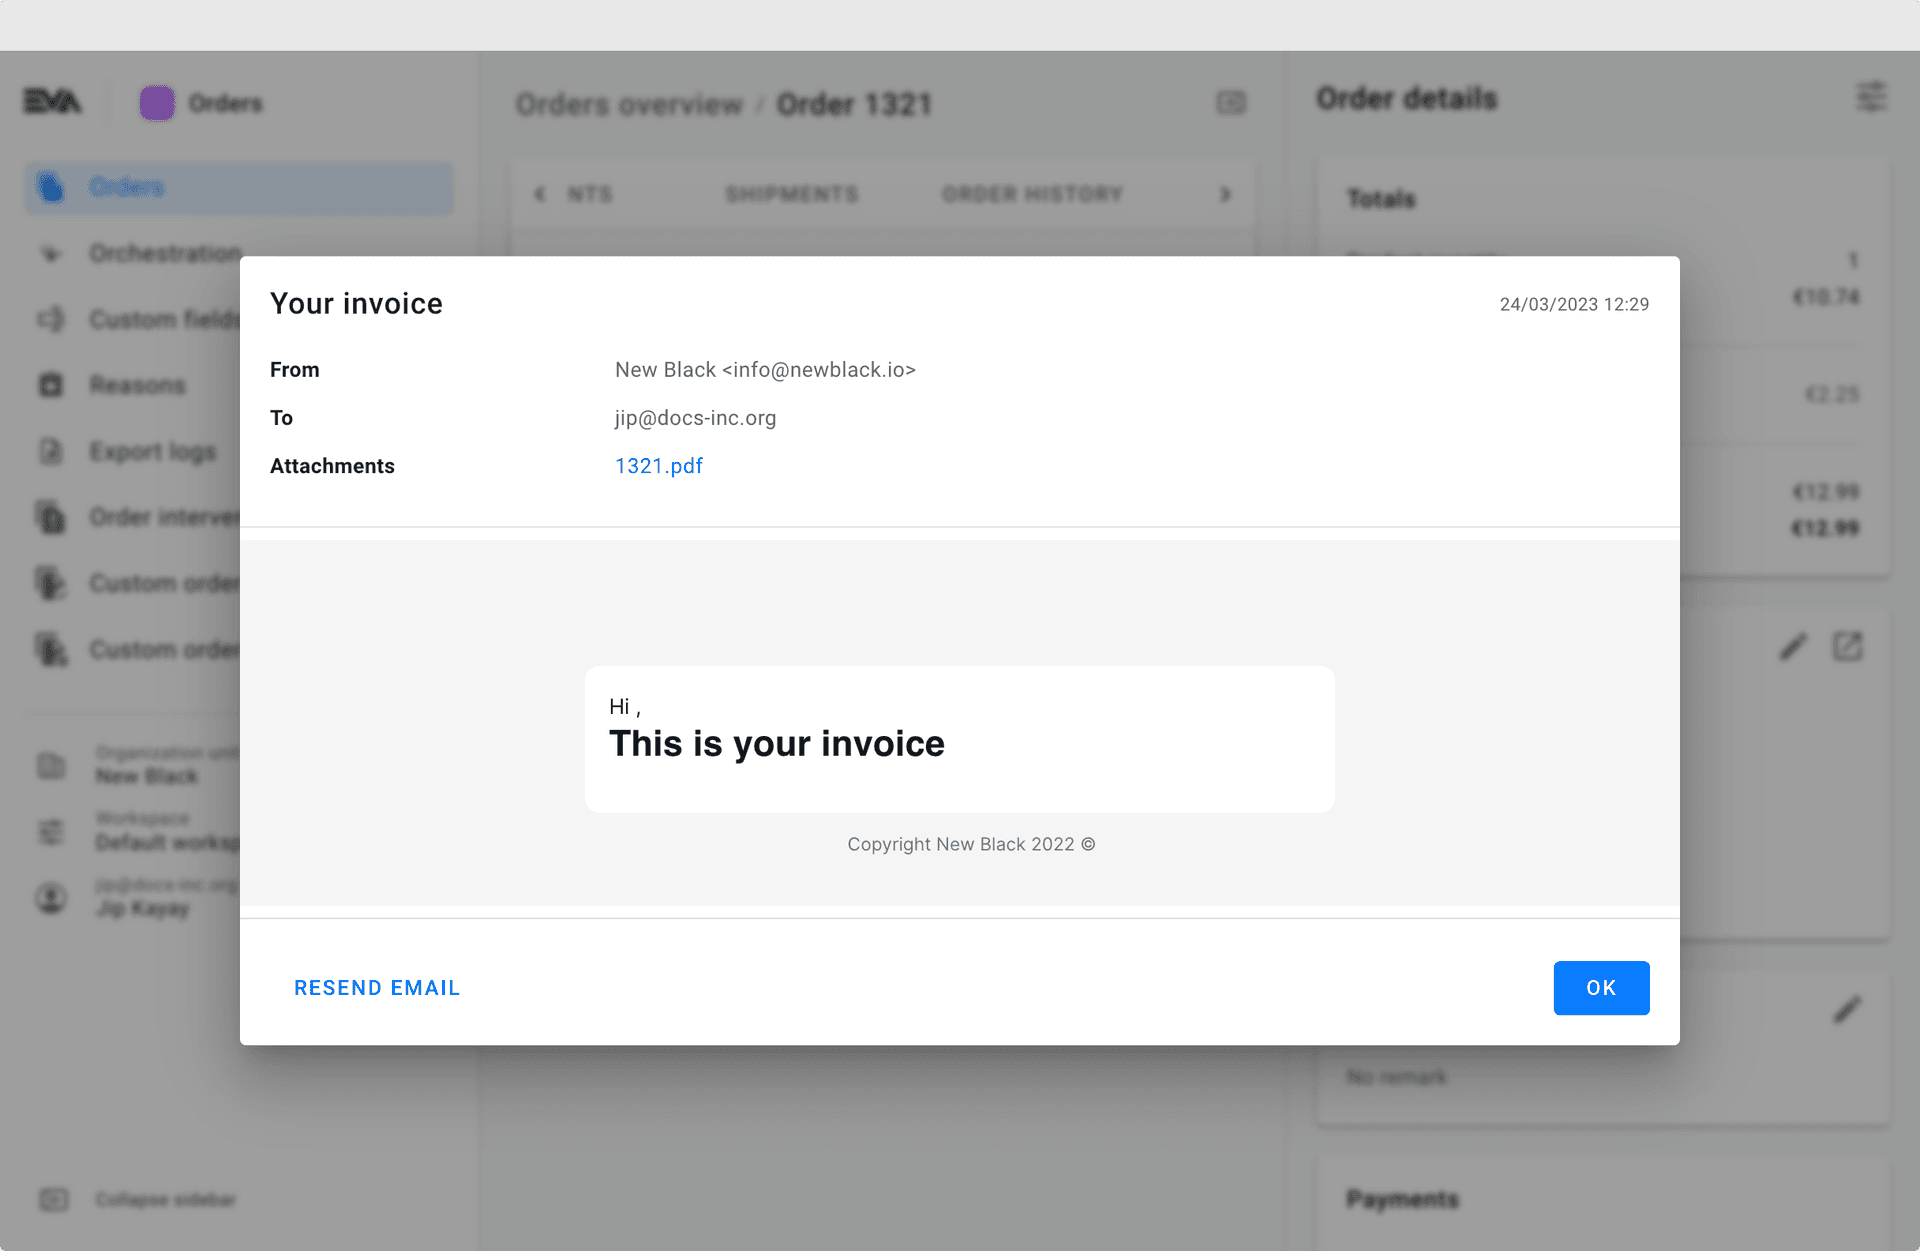
Interaction logs
The Interaction logs tab gives you an overview of all interactions with the corresponding customer and allows you to resend any communication. Tap the + icon for this order to create a new interaction log.
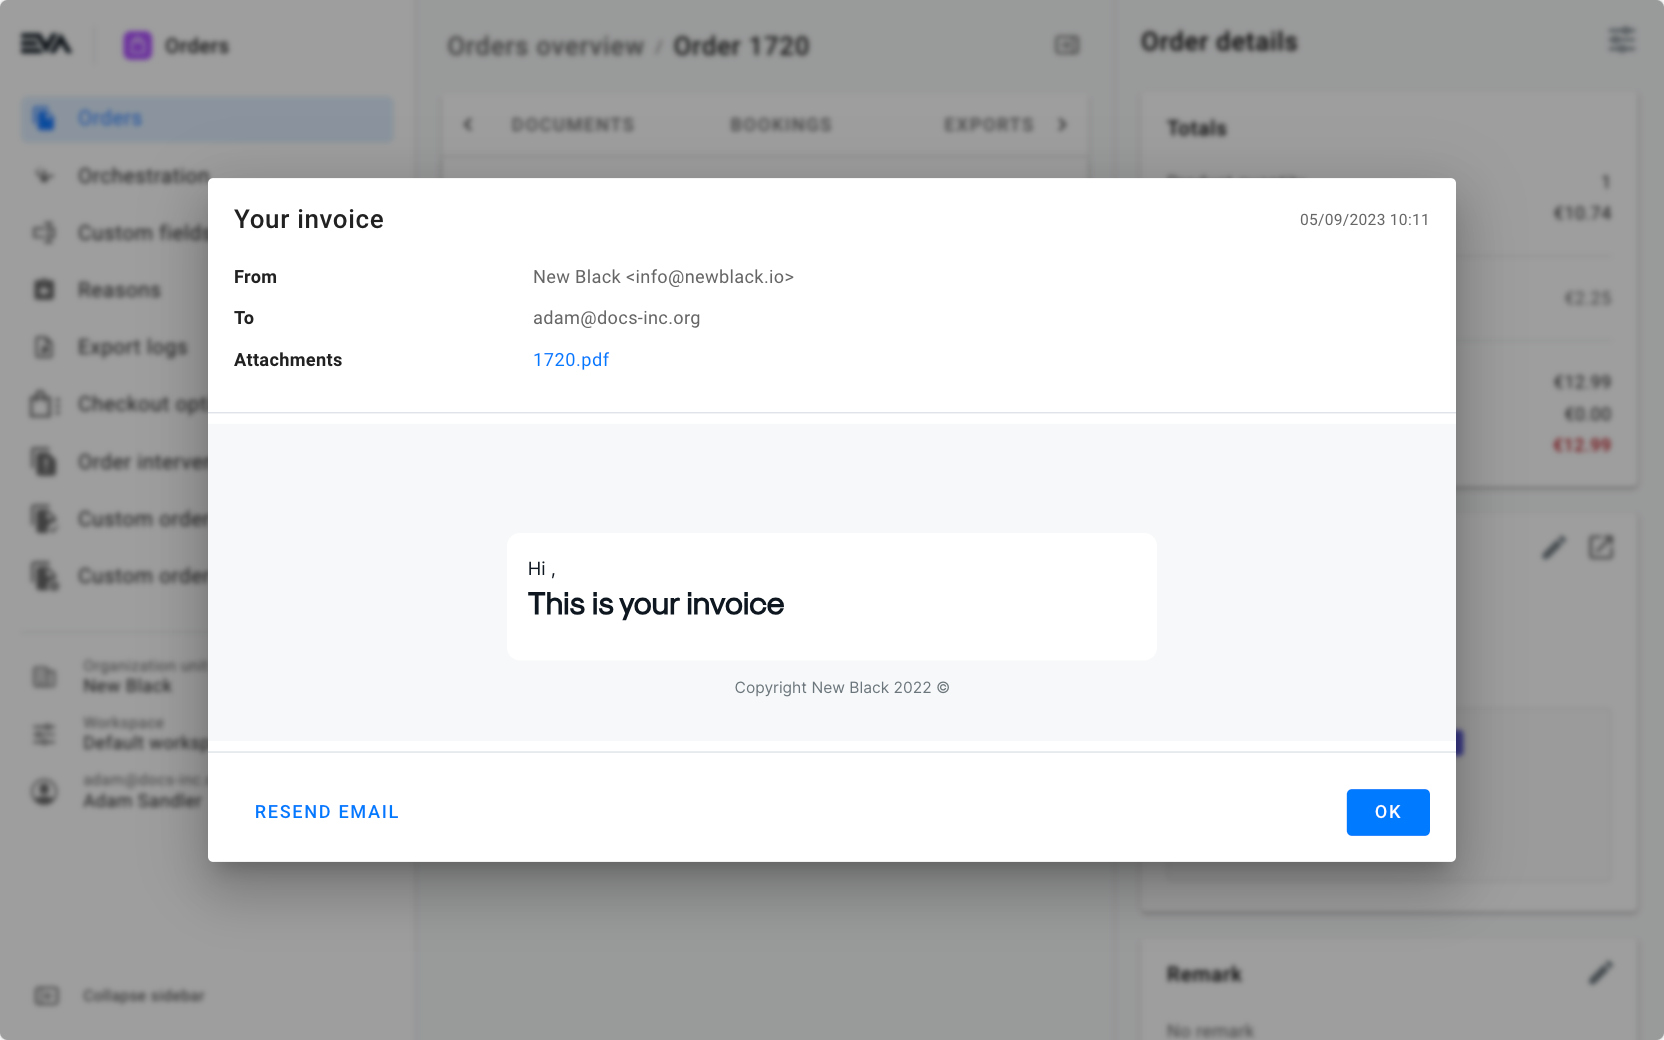
Click the 'mail' icon to check the correspondence, resend it, or open/view any of its attachments.
Using an App setting called App:ShowIndicationOnInteractionLogs and a value true you can control whether or not a red dot with a counter is displayed next to the tabs title. A true value will display that notification while a false value will not (the default value is false).
Shipments
The Shipments tab allows you to add, delete, or edit order shipments. This tab is mainly used for orders with the status open or pending. In case of orders with status completed or canceled, this tab serves as a "for viewing purposes only". Any custom fields on the order will be shown on this tab as well.
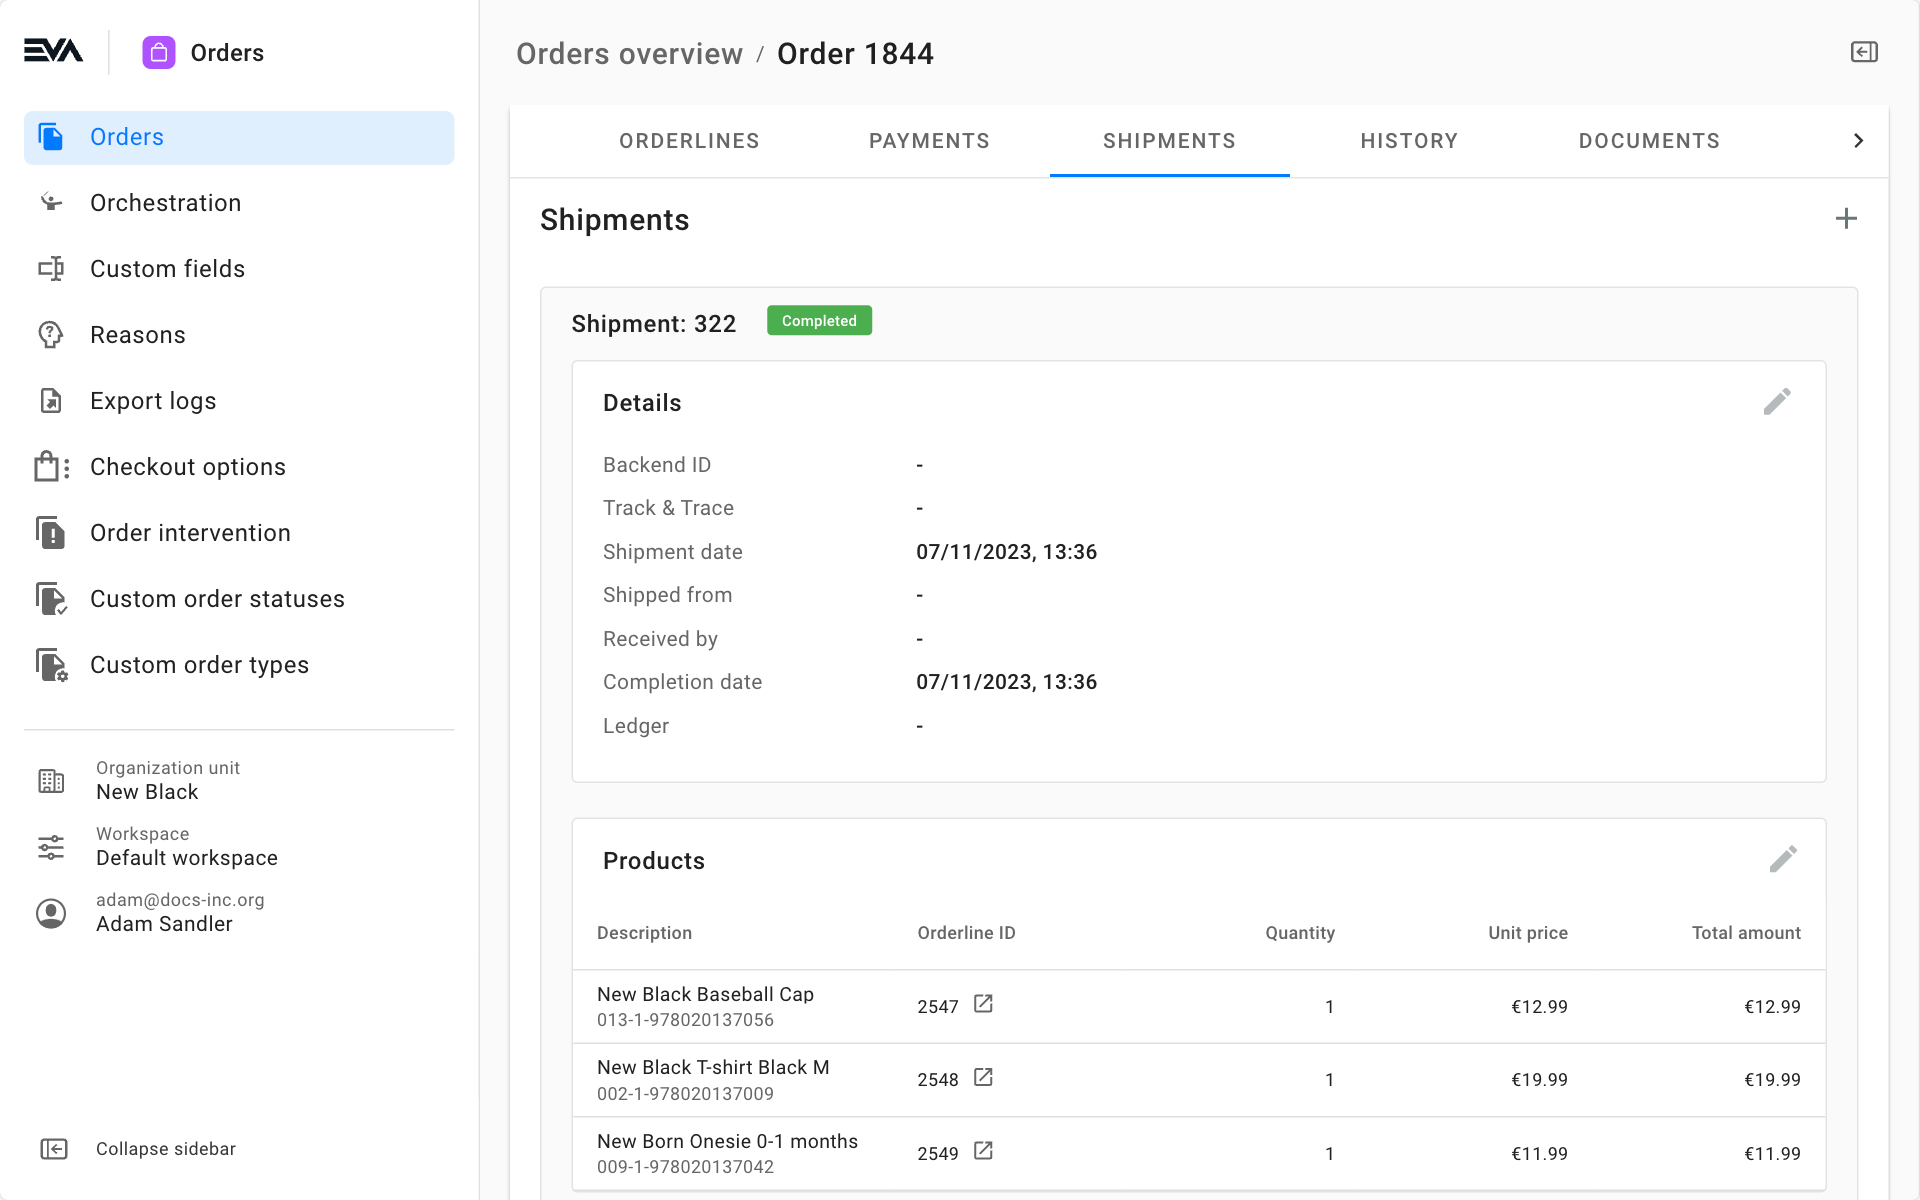
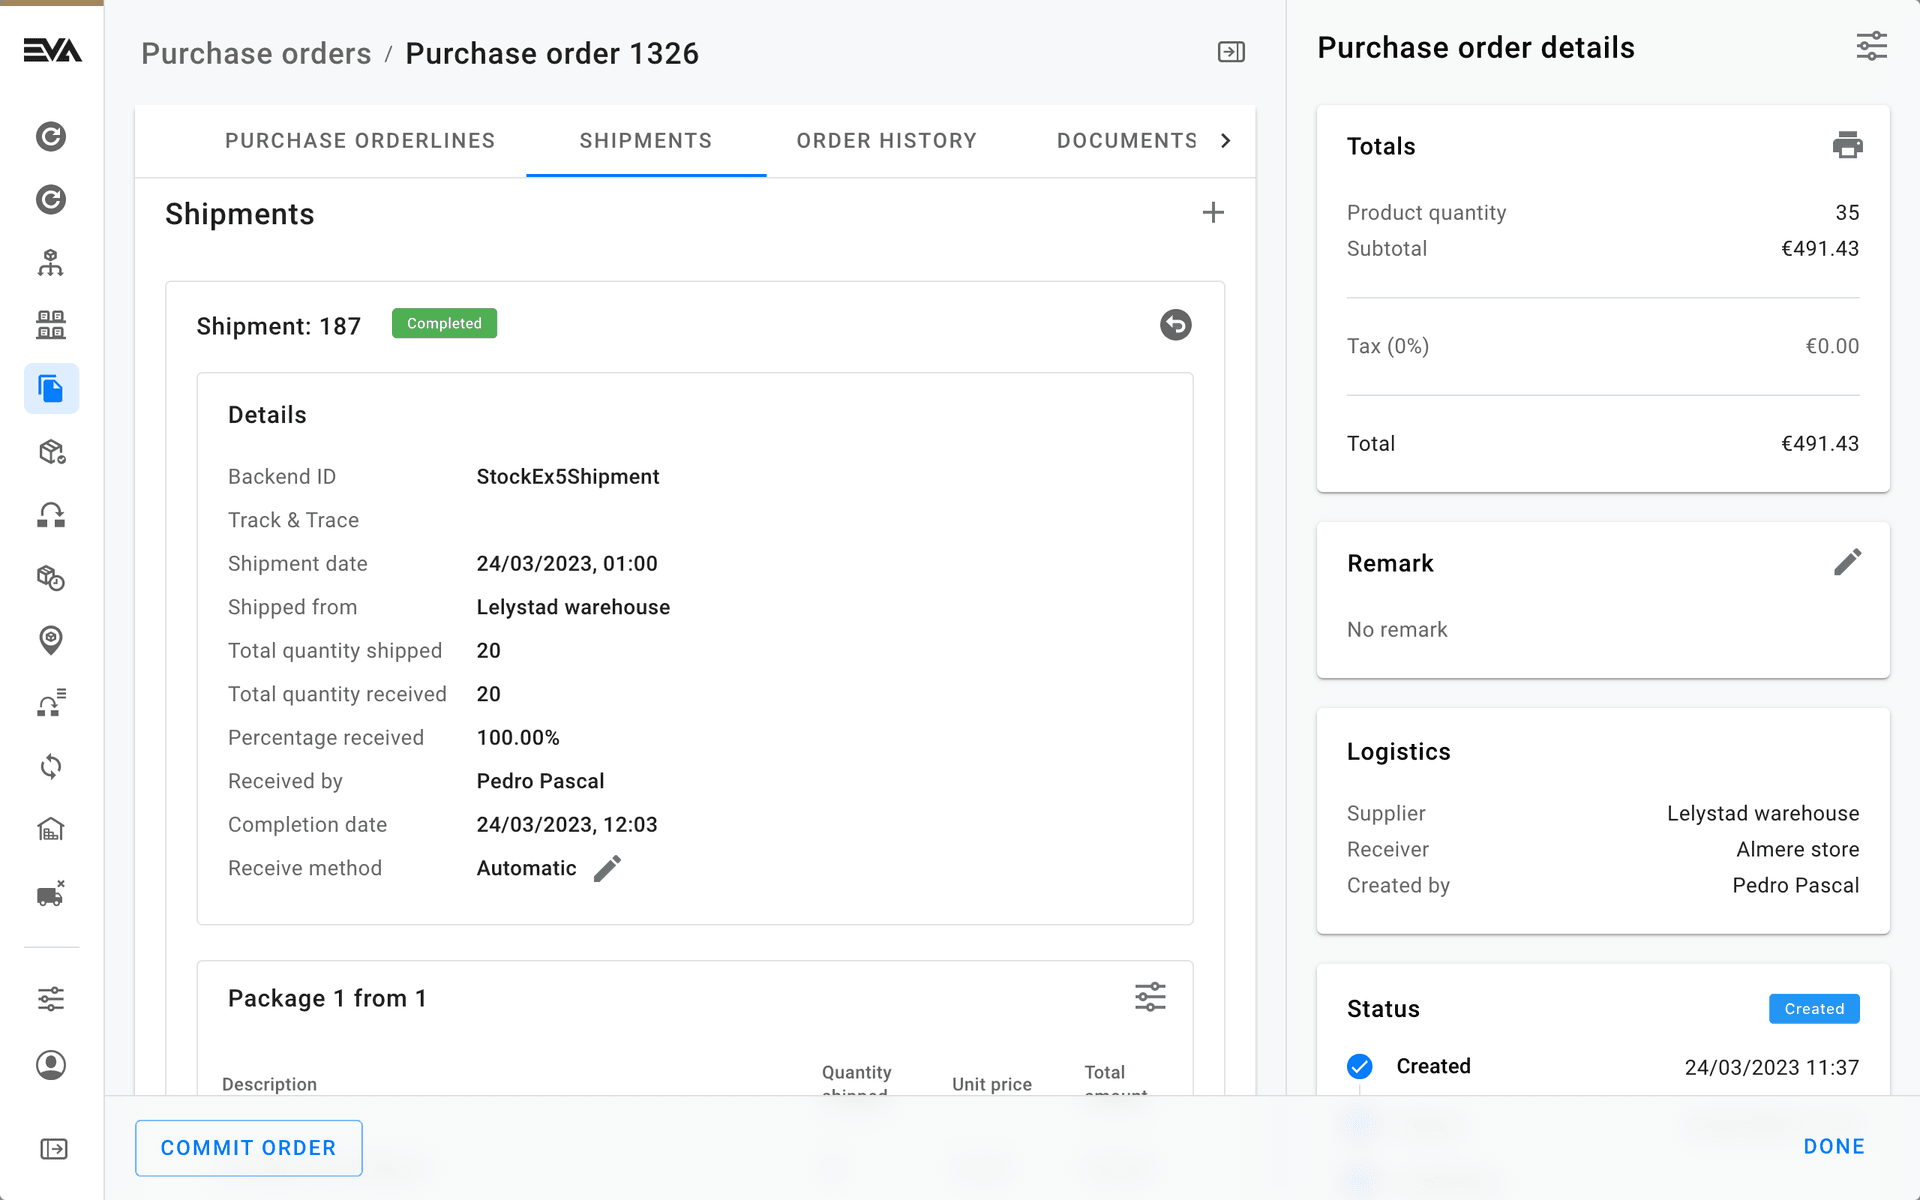
Mind that the Shipments tab of a purchase order has some slight variations in what is displayed.
Check out this tutorial as a use case to shipping an order via Admin Suite:
Adding Shipments
A shipment can be added by clicking the '+' icon in the top right corner. You will then be prompted to fill in the shipment details:
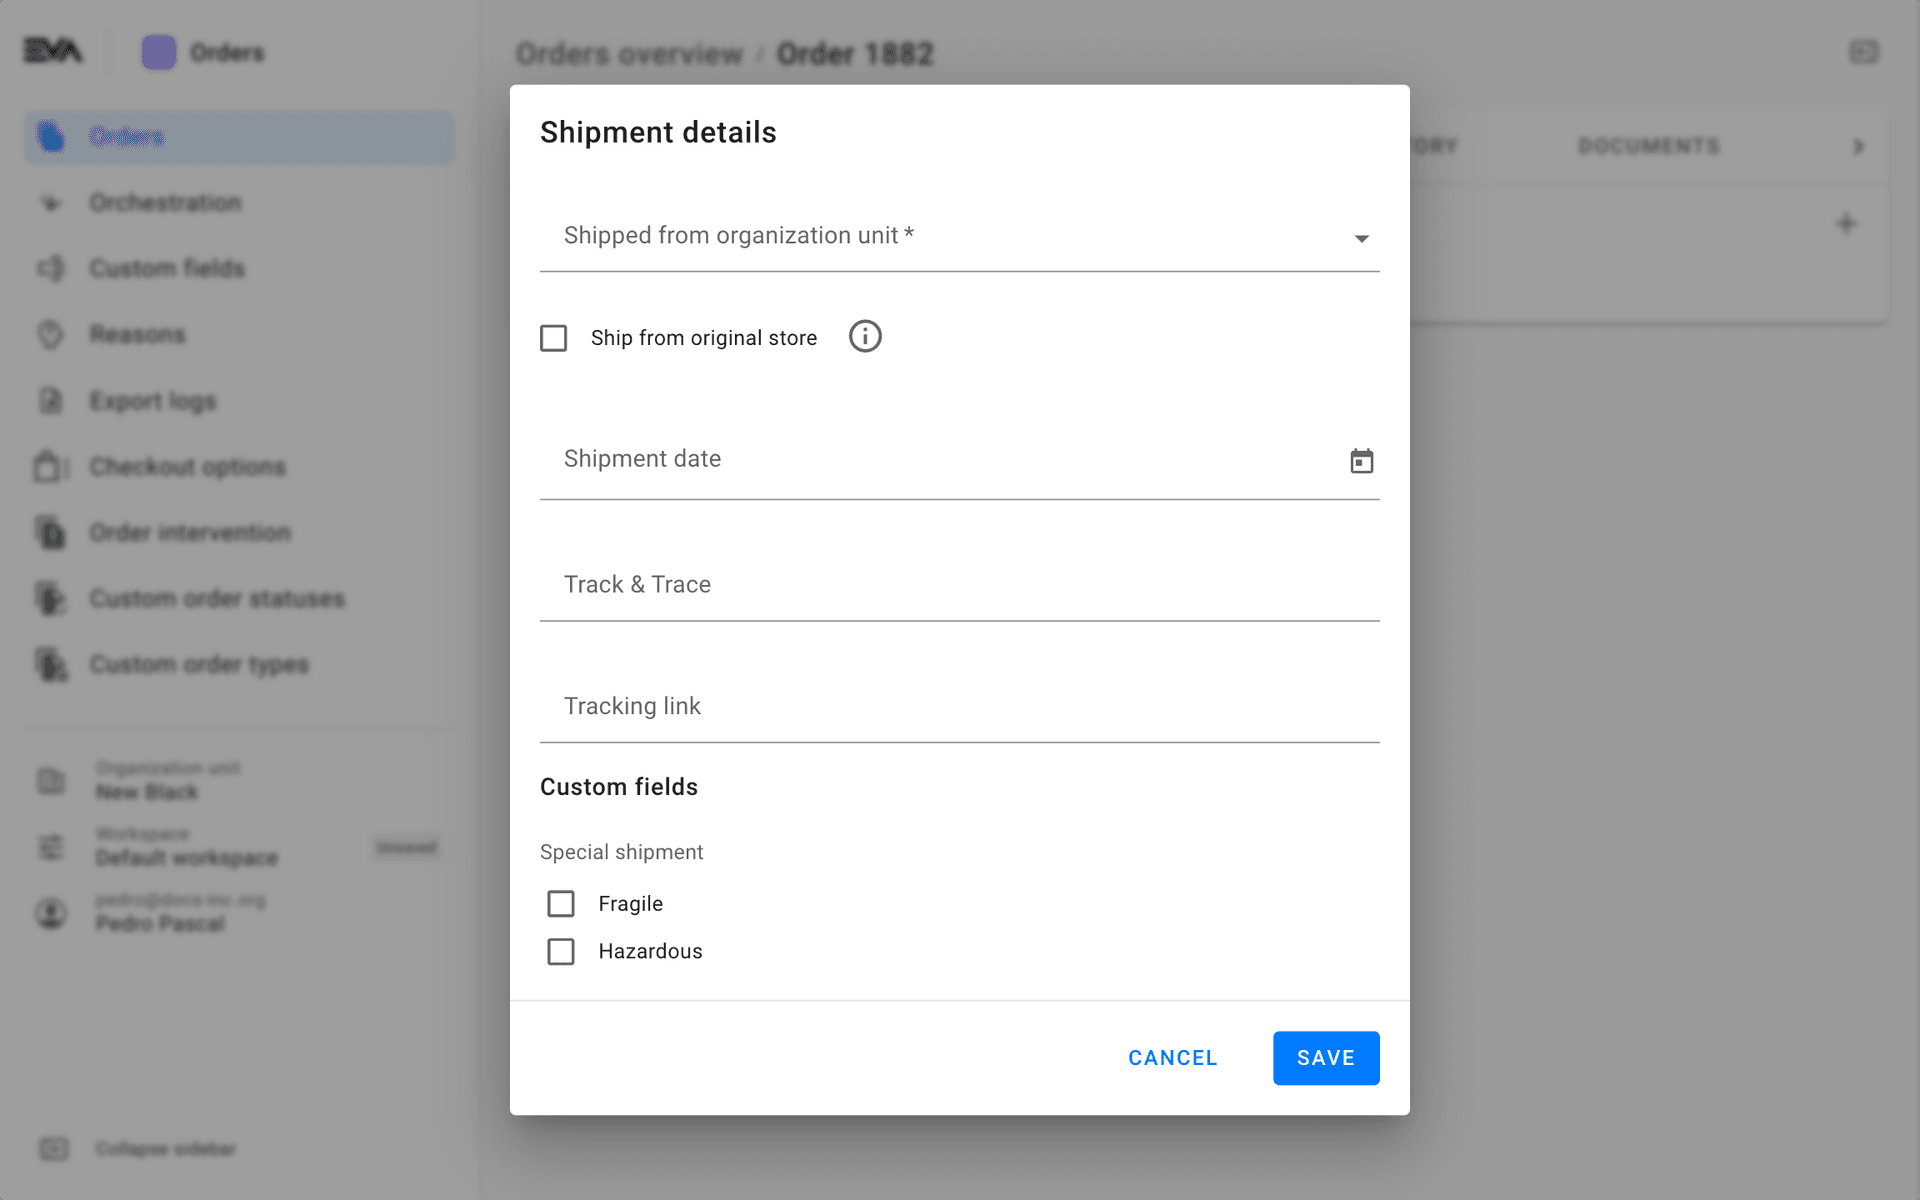
- Shipped from organization unit: The OU options you'll have presented in the dropdown list are based on your supplier relations setup. If you want to ship your order from the store it was sold from, checkmark the Ship from original store option.
- Shipment date: The date the order will/has shipped.
- Track & Trace: The track and trace code (if applicable).
- Tracking link: A link for tracking the shipment (if applicable). This usually corresponds with the track and trace code.
- Custom fields: Custom fields for shipments can be created in the Stock module. In our screenshot example, that would be Special shipment and corresponding checkboxes.
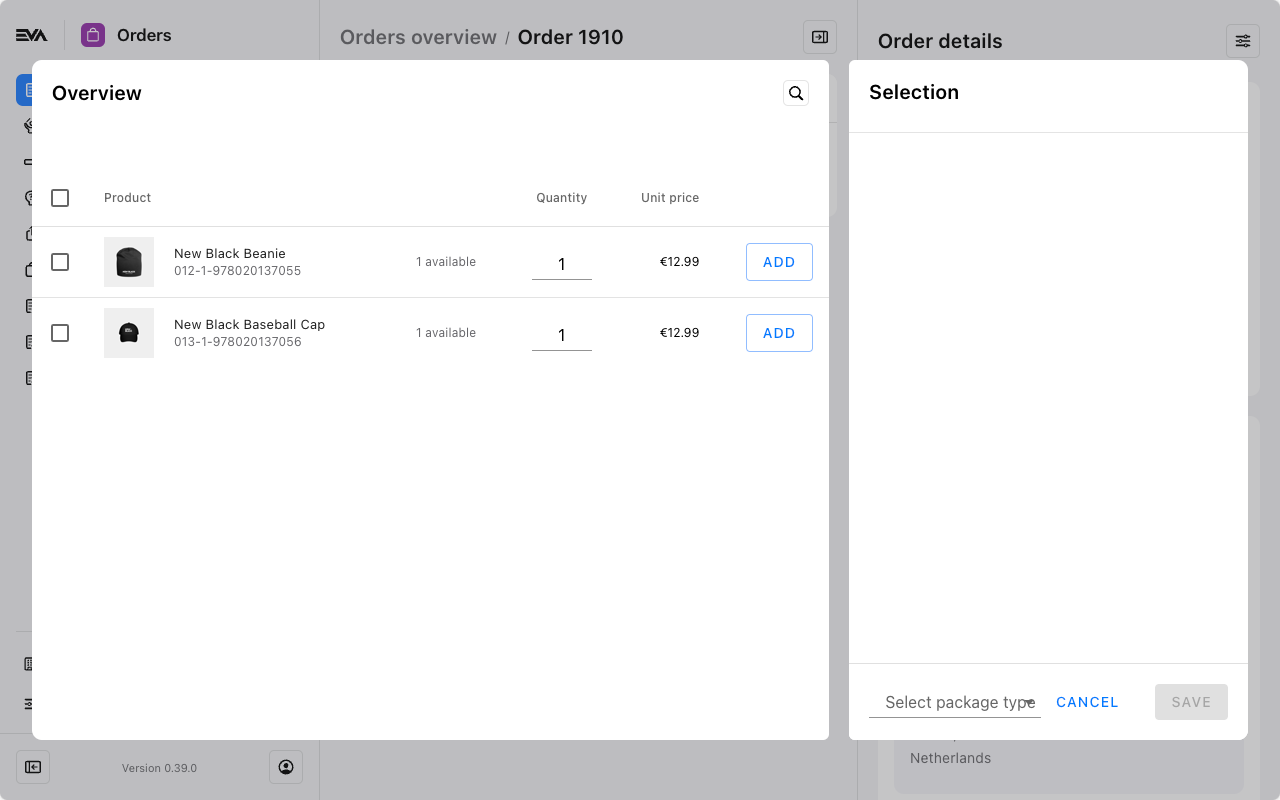
Once saved, you'll be directed to an overview page where you can select the product lines and quantities that would be included in the to-be-shipped package. Since the package type is a dropdown list, make sure you already have package type(s) configured.
Once you save, you will be directed back to the main shipments overview tab, where an overview of all your choices made so far is displayed.
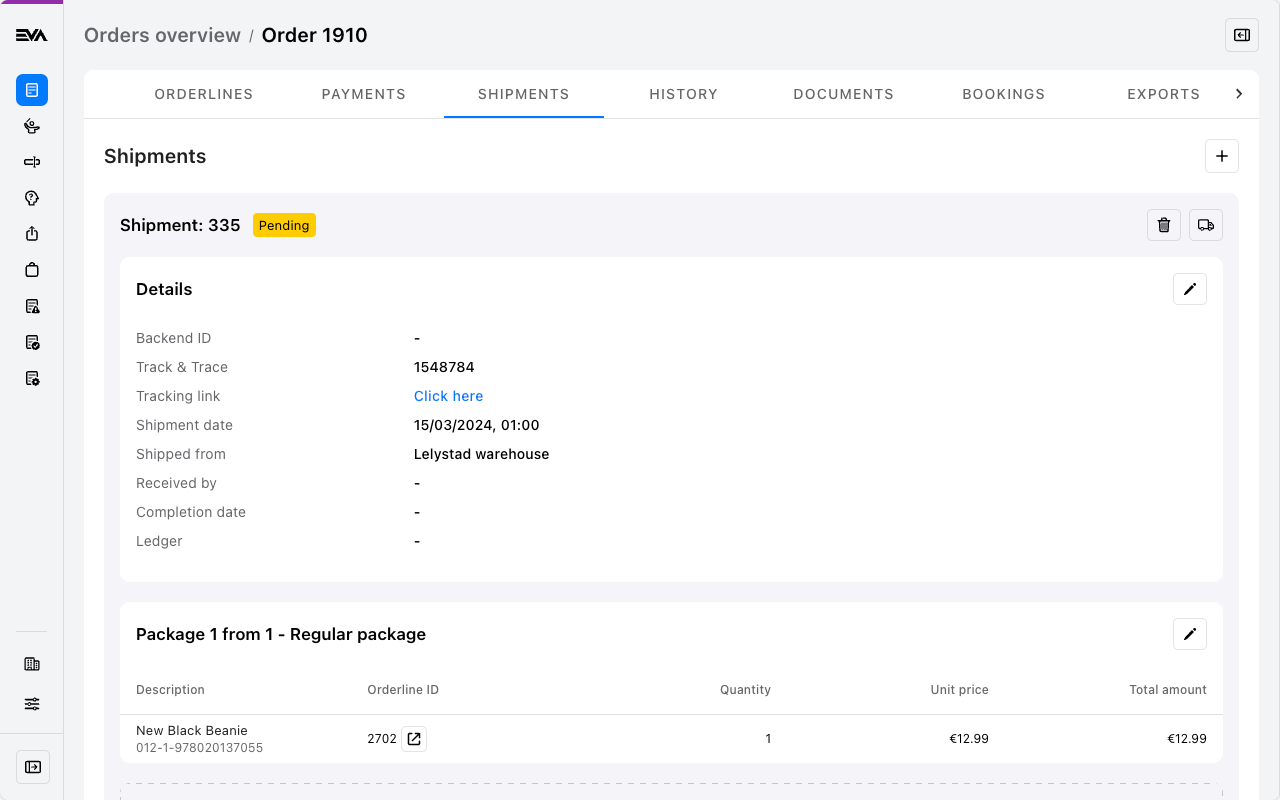
From here onwards, you can still:
Add more shipments: Once again, click the + icon in the top right corner. This can be used in instances of partial shipments.
Delete a shipment: Click the shipment's corresponding 'trash bin' icon to do that.
Complete a shipment: Click the 'truck' icon. This will change the shipment badge from Pending to Completed.
Edit the shipment details or package: Click the corresponding 'pencil' icon.
Add more packages: Click the Add package box
For example: In the same shipment, you have a large item that requires a large package type and another item that requires a small package type i.e. it's a multiple-package shipment.
A setting called AllowMultiPackageShipments with a value true would first need to be set in order to be allowed to perform multiple package shipment flows.
Your shipment flow will only be completed once open amounts on the order have been accounted for. You will be notified with an error message in the case of any open amounts.