Managing Cases
Managing Cases
Add or Edit Cases, Statuses, or TopicsThe Cases chapter is where you can create, view, or edit Cases and their related statuses and topics.
Check the Cases introduction page for a general overview of Cases and its uses.
Overview
This chapter provides a comprehensive overview of all current Cases, Statuses, and Topics. Statuses and Topics are essential for the effective management of Cases.
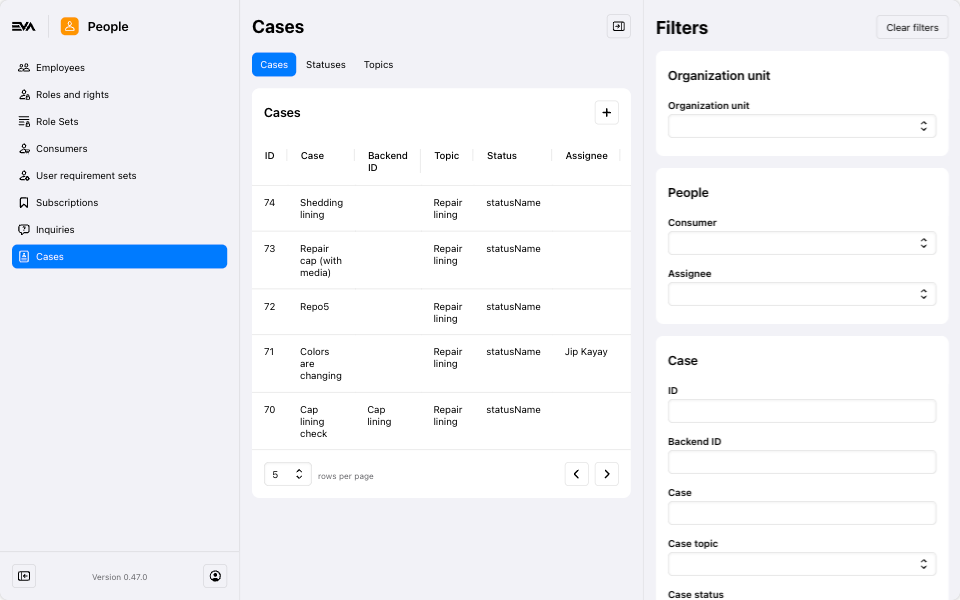
Make use of the filters in the right sidebar to streamline the display of cases in your overview.
Available Tabs
The overview consists of three tabs to choose from, Cases, Statuses, and Topics. Each expalined in details on this page.
For first time cases users, begin by configuring the Topics & Statuses tab. The configurations you make there will serve as possible input values for the corresponding dropdown fields in Cases.
Cases
The Cases tab not only provides an overview of all existing cases but also allows you to add new ones. To create a case, click the '+' icon, select the organization unit, and fill in the relevant fields.
Remember, the options in the Topic dropdown depend on your configuration settings.
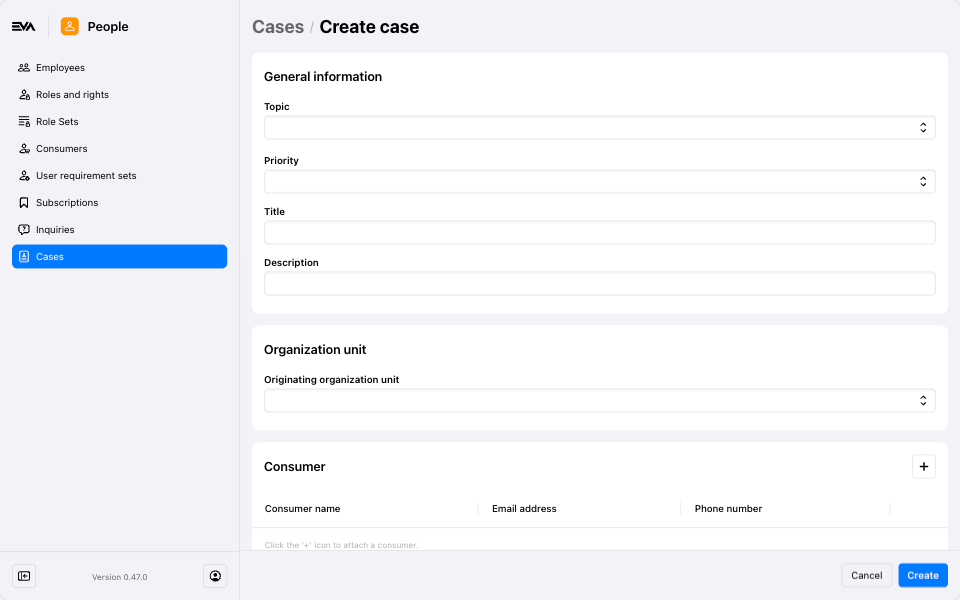
In the Consumer card, you have the options to Attach existing consumer or Create new consumer. When creating a new consumer, you must complete the fields as dictated by your User Requirements settings.
When you create a new case, it automatically defaults to the status New.
After clicking the Create button, you will see two new cards: Product or Order and Media. Here, you can add details about the related product or order and upload any relevant media, for example, an image of the damaged product. More on this can be found under View or Edit Cases.
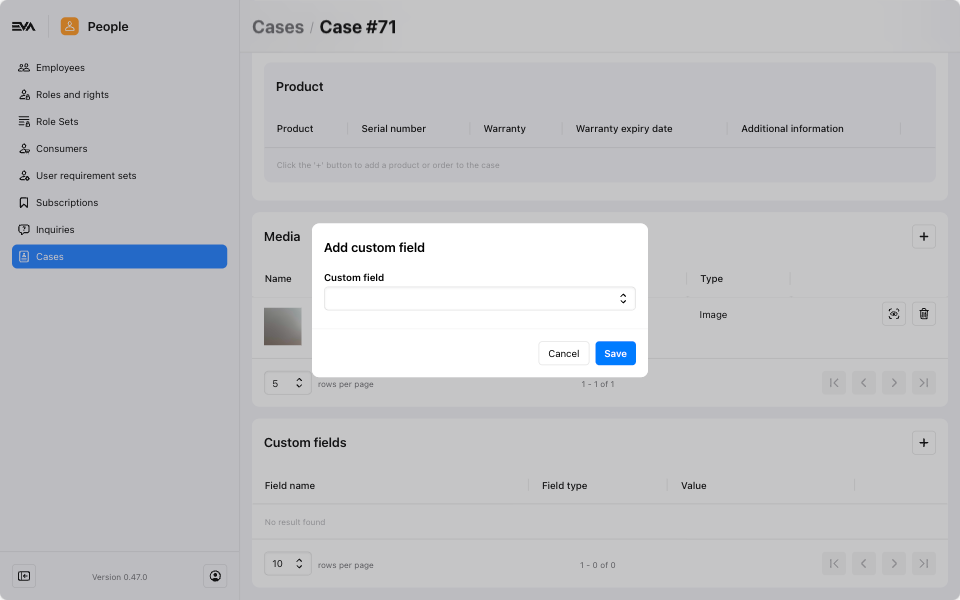
Custom Fields for Cases
The Custom Fields card becomes visible when the selected organizational unit includes custom fields categorized under Case. This feature allows you to add a custom field to collect additional information about an incoming case. The options available in the dropdown menu for adding a custom field depend on your configuration settings for Case-type fields. For more on how to add a custom field of this type, check here.
Add, View, or Edit Cases
Clicking an existing case will present you with the option to edit various case elements such as, Priority (default values: low, medium, high & critical), Topic and Status (based on your configurations), the attached Consumer, the attached Order line(s) or product(s), and more.
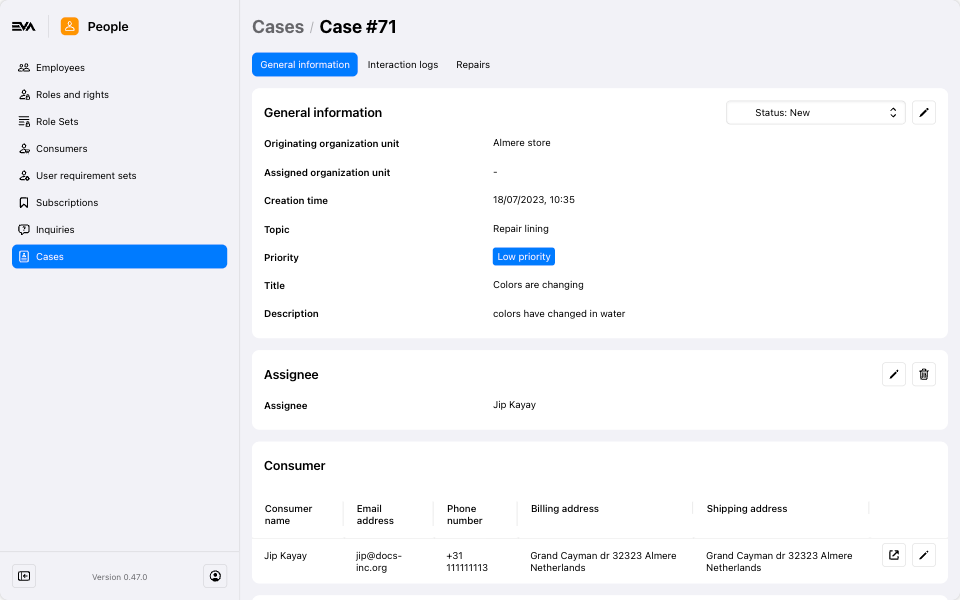
Most fields are self-explanatory, but let's explore a few in detail:
- Add images: You can upload or drop images using the Media card, such as a photo of the received product.
- Status: Modify the case status. You can also, for example, configure specific statuses to trigger certain actions. For details, refer to Cases Linked to Repairs.
- Product(s) or Order(s): Link product(s) or order(s) to your case using the Product or order card. You'll have four options:
- Add product: Look up items in your product catalog.
- Add consumer bought product: Add a product from a customer's previously purchased items, accessible through the Bought Products modal, which shows product details like name, last purchase date, quantity, total purchased, serial number, and warranty status (if applicable) See warranty not below.
- Add product from order: Search by order ID and select the product(s).
- Add order: Search by order ID.
- Add Interaction Logs: To add an interaction log, navigate to the Interaction Logs tab. Enter your message in the multiline field and select the checkbox to make the message public. This action will email the message to the consumer if a case stencil is properly set up. Remember to configure the appropriate case stencil for public logs. Additionally, you can add new interactions or filter the existing ones as required. For more details, refer to Interaction Logs.
Warranty status and end dates are displayed on the Product card if the Product:WarrantyEndpoint setting is configured and a serial number is available. If no serial number or endpoint is set, a status of no warranty will appear. Additionally, if a serial number is present, a chip indicating the registration status (Pending | Verified | Rejected) and, if applicable, the warranty status (Active | Expired | Not covered) will be shown.
Warranty checks are conducted through the GetProductWarranty service, which requires a valid SerialNumber or OrderLineID.
Cases Linked to Repairs
Cases can be linked to repairs and vice versa. This can occur in scenarios where a Status is configured in such a way that its Action initiates a Repair task.
Once a Case status with an Action type Repair is chosen, you'll be presented with a notification to confirm that a repair task will be started as a result of this action.
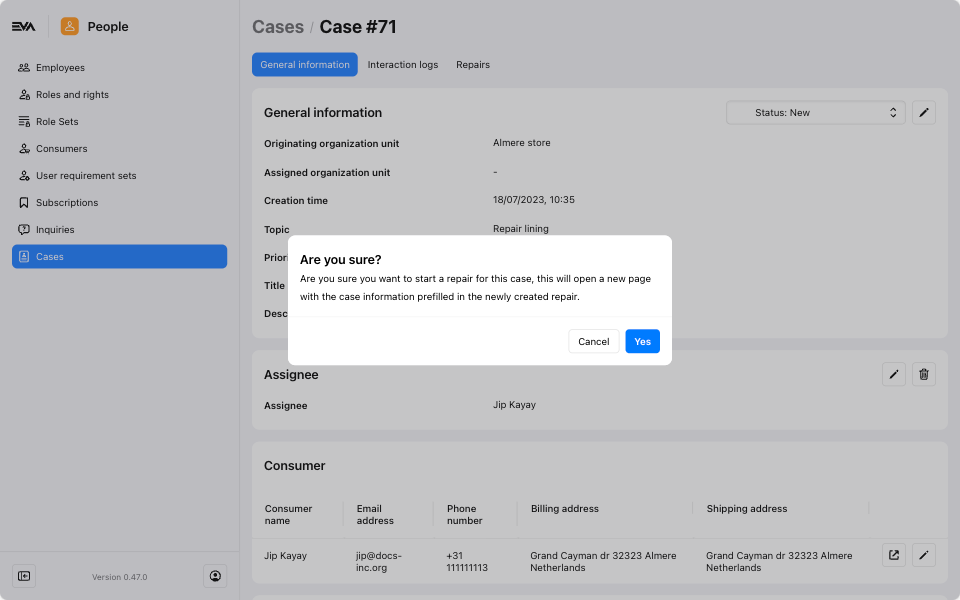
Once confirmed (Yes), you will be redirected to the Repairs chapter where you can create the repair.
An overview of any created or linked repair will then be shown in the Repairs tab (third tab) of the case.

Interaction Logs
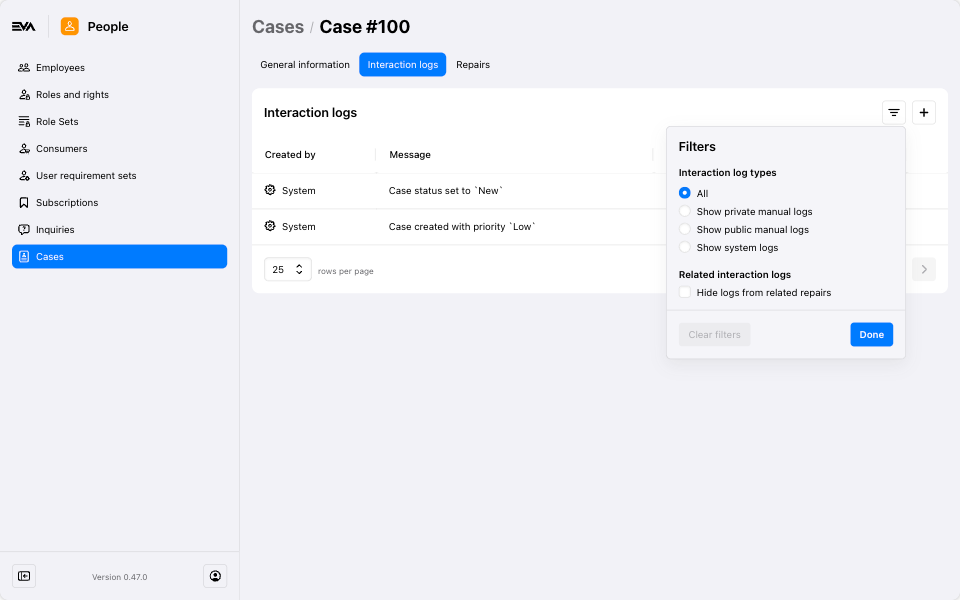
There are a few types of interaction logs that would display under the Interaction logs tab, and things could get quite messy. Therfore the filters feature allows you to filter on what you really need to see at that moment of time when it comes to interactions. To show all, or just show private, public, system, or repair related interaction logs.
To add a new interaction log simply click the '+' icon, and check the box to make the message public (if desired), sending it to the consumer via email. Ensure the appropriate case stencil is configured if using public logs.
Status
In order to be able to access this tab, you need the CaseStatuses permission. Permissions are managed from the Roles and rights chapter namely, from the functionalities card of a users role.
The Status tab allows you to manage the statuses available for cases. Here, you can add new statuses or modify existing ones. Those will then be displayed in the dropdwon of the Status field, when managing a Case.

The default statuses—New, InProgress, Completed, and Cancelled—are default ones and cannot be deleted.
For instance, consider a case request for an item you sold. The status starts as New when the item is received. It changes to InProgress while the item is en route to or at the workshop, and during the maintenance. Once the maintenance is complete and the item is ready for pickup, the status updates to Completed. In this scenario, you must use the three case statuses: New, InProgress, and Completed. You may also add custom statuses if necessary.
A newly created case will always get status New (this is default behavior).
Add, View, or Edit Statuses
To add a custom case status, simply click the '+' icon. Give it a name (mandatory field), a color, description, an action, specify whether the status is considered the closing one or not using the Is closed checkbox. This should be checked if this status would be the last stage of how your cases would flow, and only which after a case would be considered as closed.
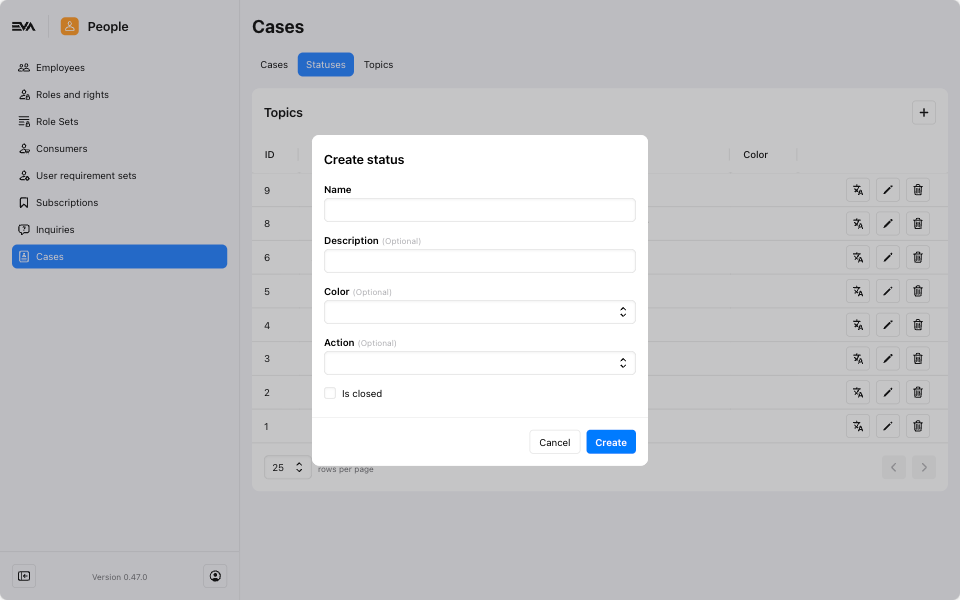
To edit or view, simply click the desired status. Notice how you'll also have the option to use name translations in the overview. This influences the name displayed on front end(s) for users based on their preferred or specified organization unit language.
The corresponding input for the Name field is what users would see on the front end(s) when creating or editing cases as an option when specifying or editing the Status field.
Action
An action can be tagged to a case status, which in other words if that case status is selected, a corresponding action would be auto triggered.
The following are available actions that could be triggered along with a case status:
- None: No action.
- Create repair: A new repair case will be created in the Repairs chapter. The case information will already be prefilled.
Topics
In order to be able to access this tab, you need the CaseTopics permission. Permissions are managed from the Roles and rights chapter namely, from the functionalities card of a users role.
The Topics tab allows you to add or modify the categories under which cases can be classified.

For instance, case types might include Maintenance or Replacement. For these examples, you would create two topics: Maintenance and Replacement.
Add, View, or Edit Topics
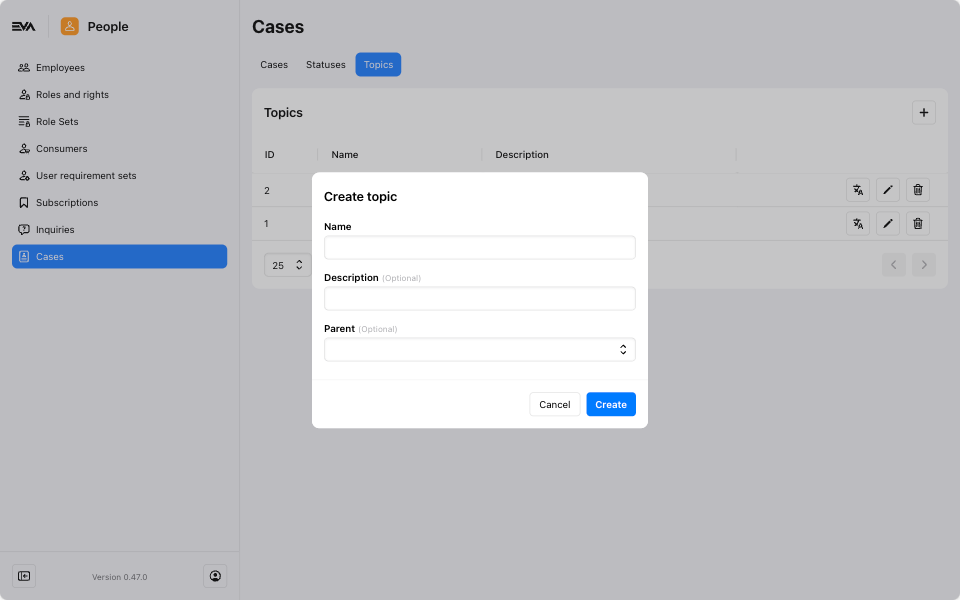
To add a topic, click the '+' icon of the Topics tab. You must provide a topic name, and you can optionally add a description and a parent topic. Click Create to finalize.
Parent Topic: Selecting a parent topic makes the new topic being created a subtopic of the selected parent.
For instance, lets assume a case topic Maintenance which could be further classified into Part replacement or Part fixing. For such a scenario, you would create two topics: Part replacement or Part fixing and for each of those, choose Maintenance as the Parent topic.
To view or edit a topic, click on the desired topic. Notice how you also have the option to set name translations from the list overview, using it will adjust the topic name displayed to users based on the language settings of their organization unit.
The corresponding input for the Name field is what users would see on the front end(s) when creating or editing cases as an option when specifying or editing the Topic field.
For more information on the - potential - next step, see Repairs in Admin Suite.
Case Stencils
There are four possible case instances where a stencil could be triggered. All four are type Template.
The following table represents those four different instances that, if triggered, will send an automated email to the customer associated with the case.
| Event | Template name |
|---|---|
| The moment a new case is created. | CaseCreatedEmail |
| The moment a new case interaction is added to the case. | CaseInteractionCreatedEmail |
| The moment a case status has been changed. | CaseUpdatedEmail |
| The moment a case has been set to status that is considered closed. | CaseClosedEmail |
The stencil should look as follows:
- Type: Template
- Organization: Please choose the organization unit you'd like this template to apply to
- Name: One of the above-mentioned template names.
- Country: Please choose the country you'd like to set this template to apply to
- Language: As desired (make sure your content is aligned to the selected language)
- Destination: Mail
Customize the content of your template(s) as you please.
Pushed Cases
Cases can be pushed from an external system. For more on that please refer to the pushing cases docs.
Export Cases
Cases can be pushed to an external system by means of event exports. For more info on exporting, please see Event exports.