Basket
The basket is the main tool to assemble your customer's order. You can create different basket types, add discounts, and more.
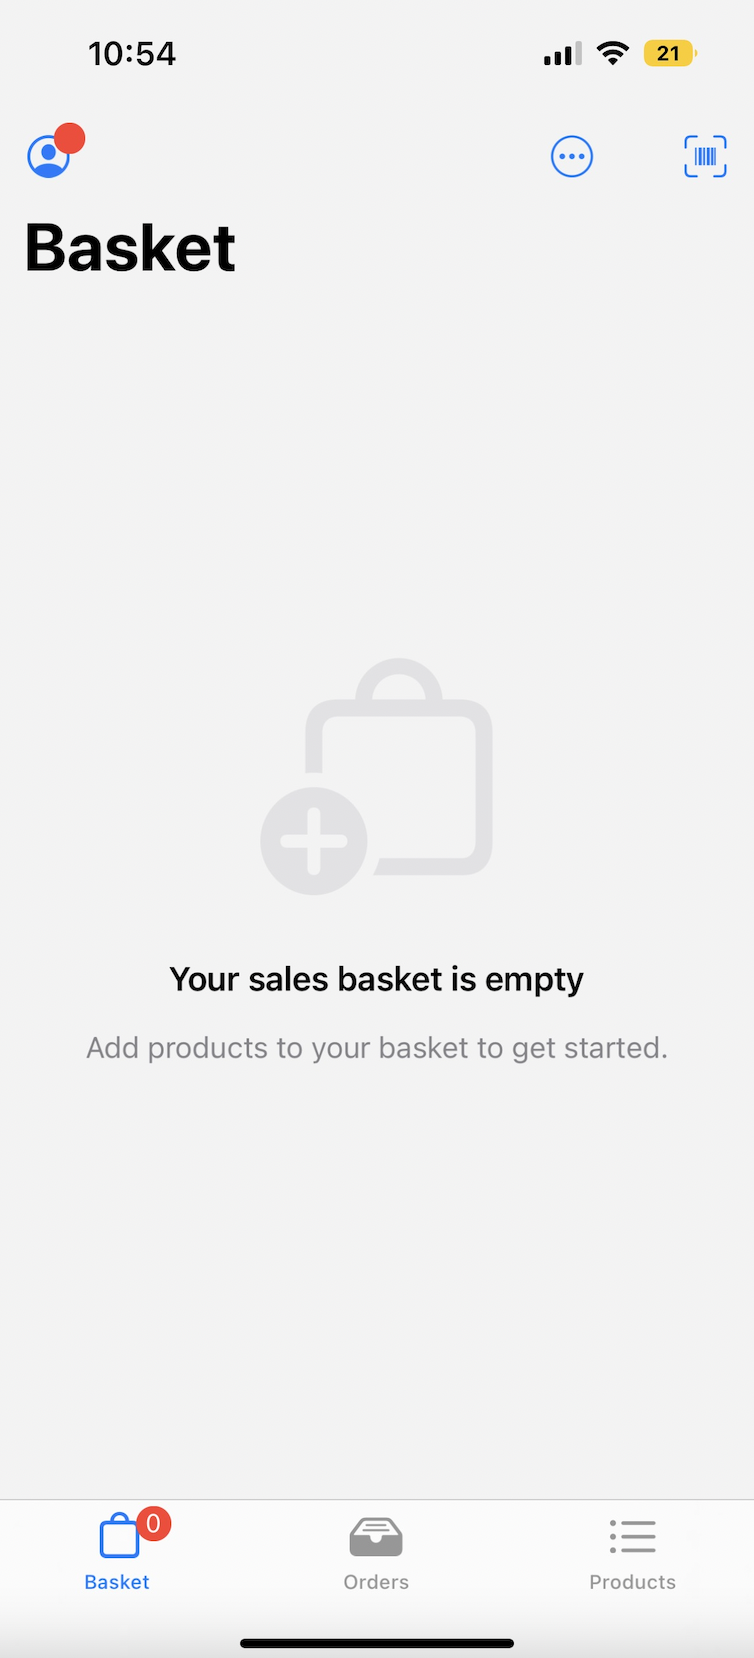
View Basket
By default, a sales basket is always ready for you to fill with products. If you want to start a new basket and reset the old one, tap the '...' option in the basket and use Start New Basket. This action will replace the current open basket with a new and empty one.
If the current order has partial payments on it when you attempt to start a new basket, you will be notified.
Tapping Start New Basket will not delete the current one. The old basket moves to the orders.
Fill Basket with Products
To add products to the basket, use the 'Barcode' icon at the top of the Basket tab. This option will open the scanner to add products. You can also do it from the Product details page or directly from the Product Search.
For products available in various sizes and colors, we pre-select a size and color only when the product has just one size and color option.
Product unavailability or invalid bundle requirements result in them being grayed-out. Bundles show "Bundle Unavailable" on the order line when delivery is not possible. If individual bundle items are unavailable, it displays "No Stock available." For undeliverable products, it shows "Unavailable for Delivery" on the order line.
When attempting to add a product with insufficient stock to a delivery order, an error message appears.
Various upsell options can be configured. This includes unlimited and restricted options, and the exclusion of specific products within a bundle.
Edit Products in Basket
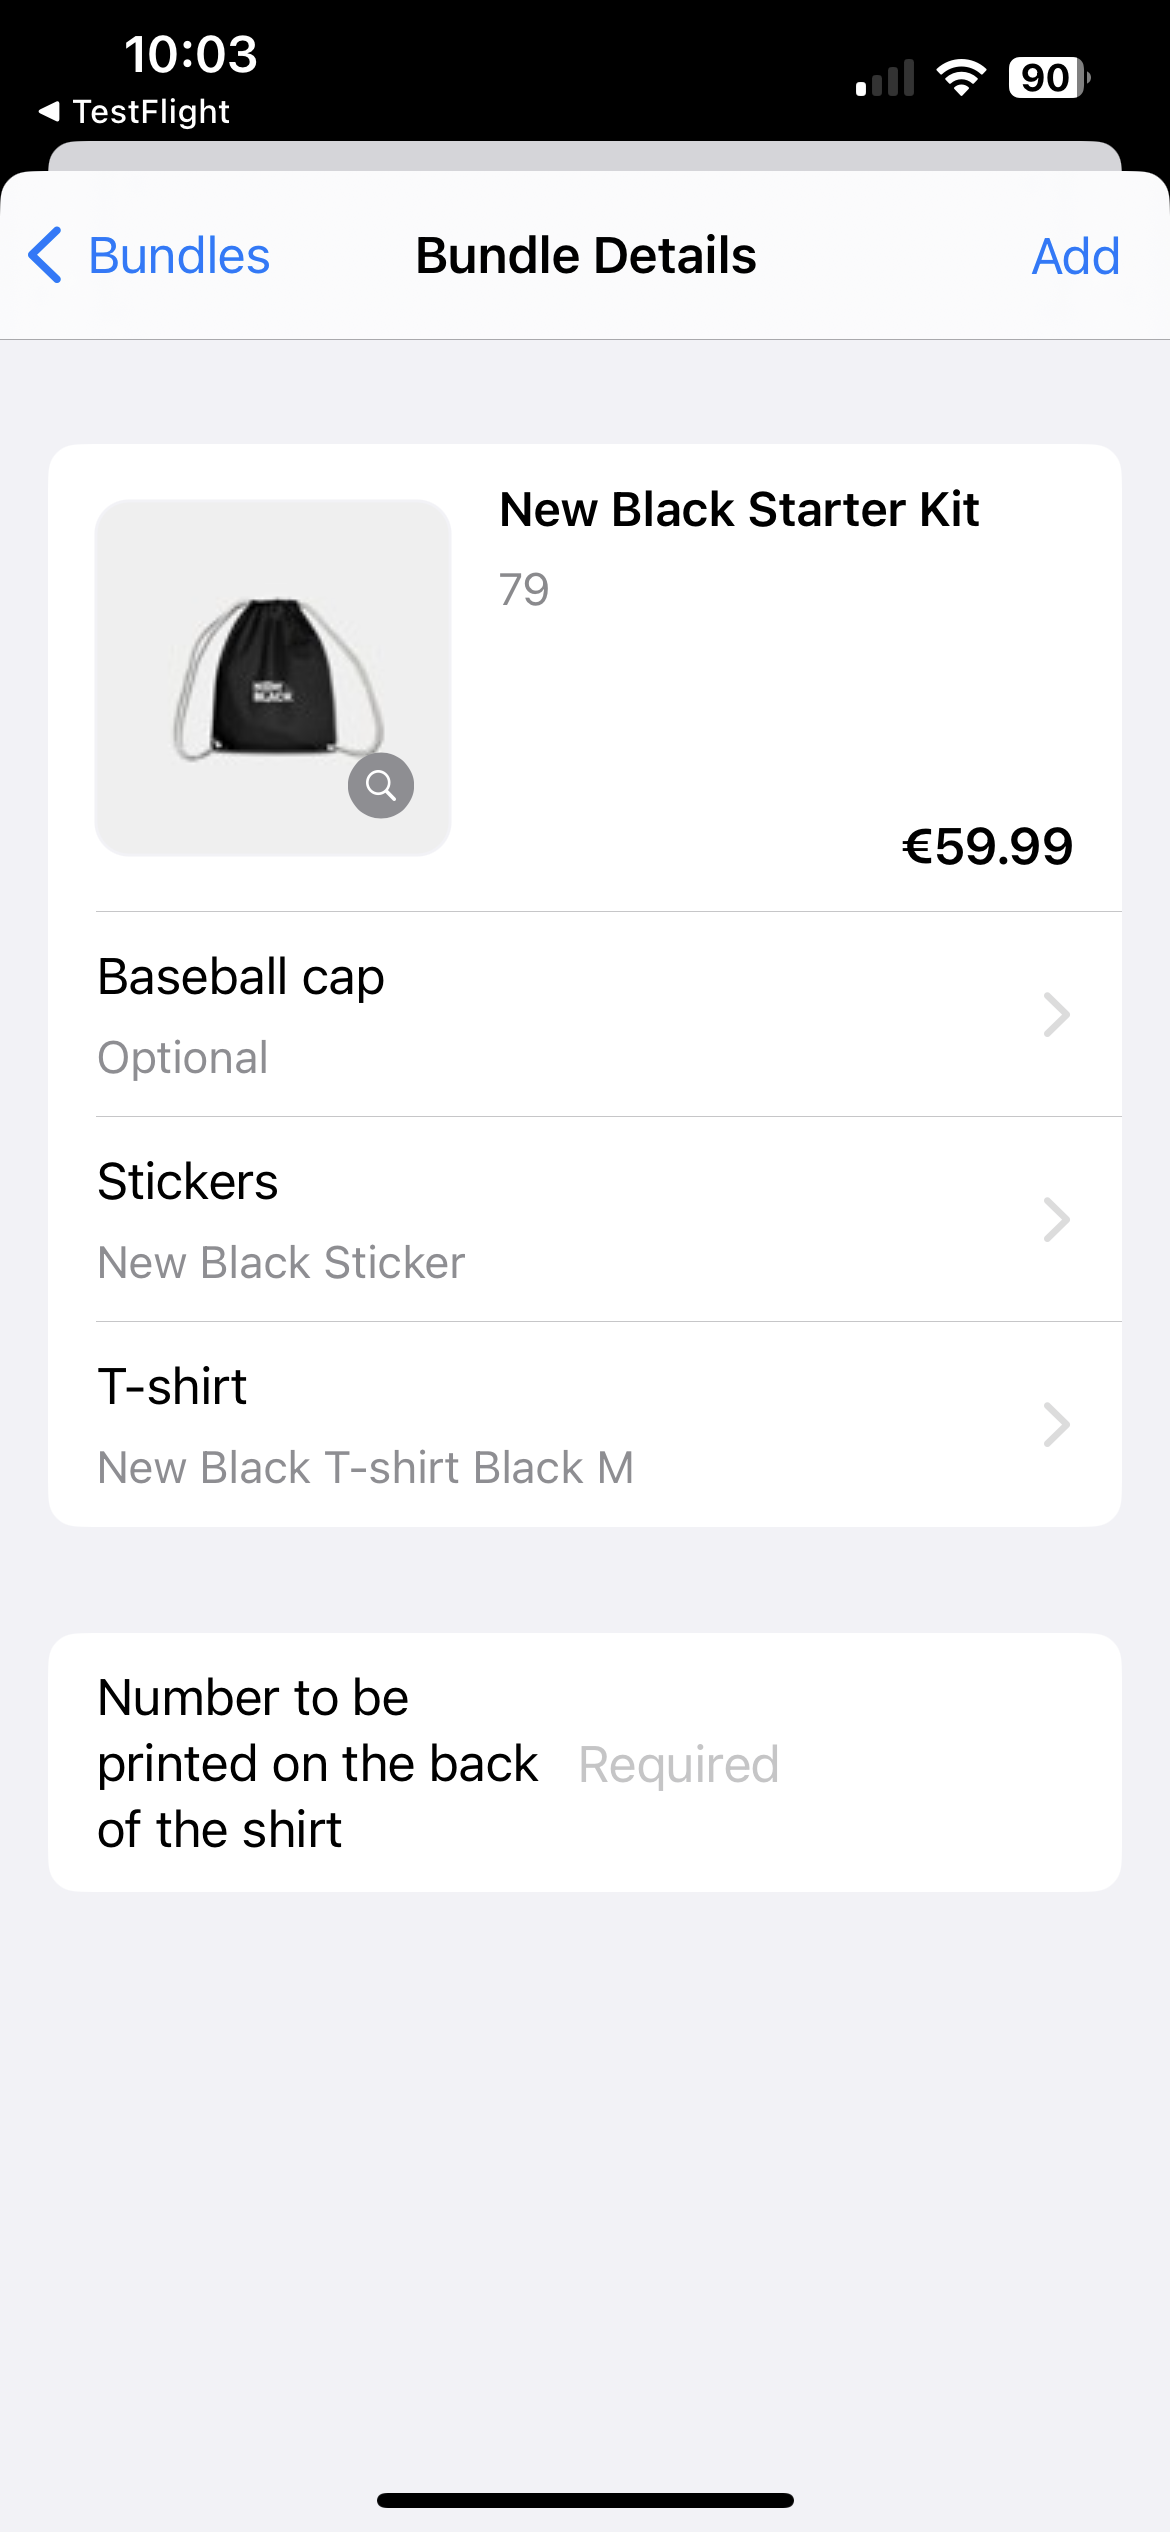
Should you have configurable products, or bundles, in your basket, you can tap on the product in the basket to change the configurable options, such as which product was chosen in a bundle.
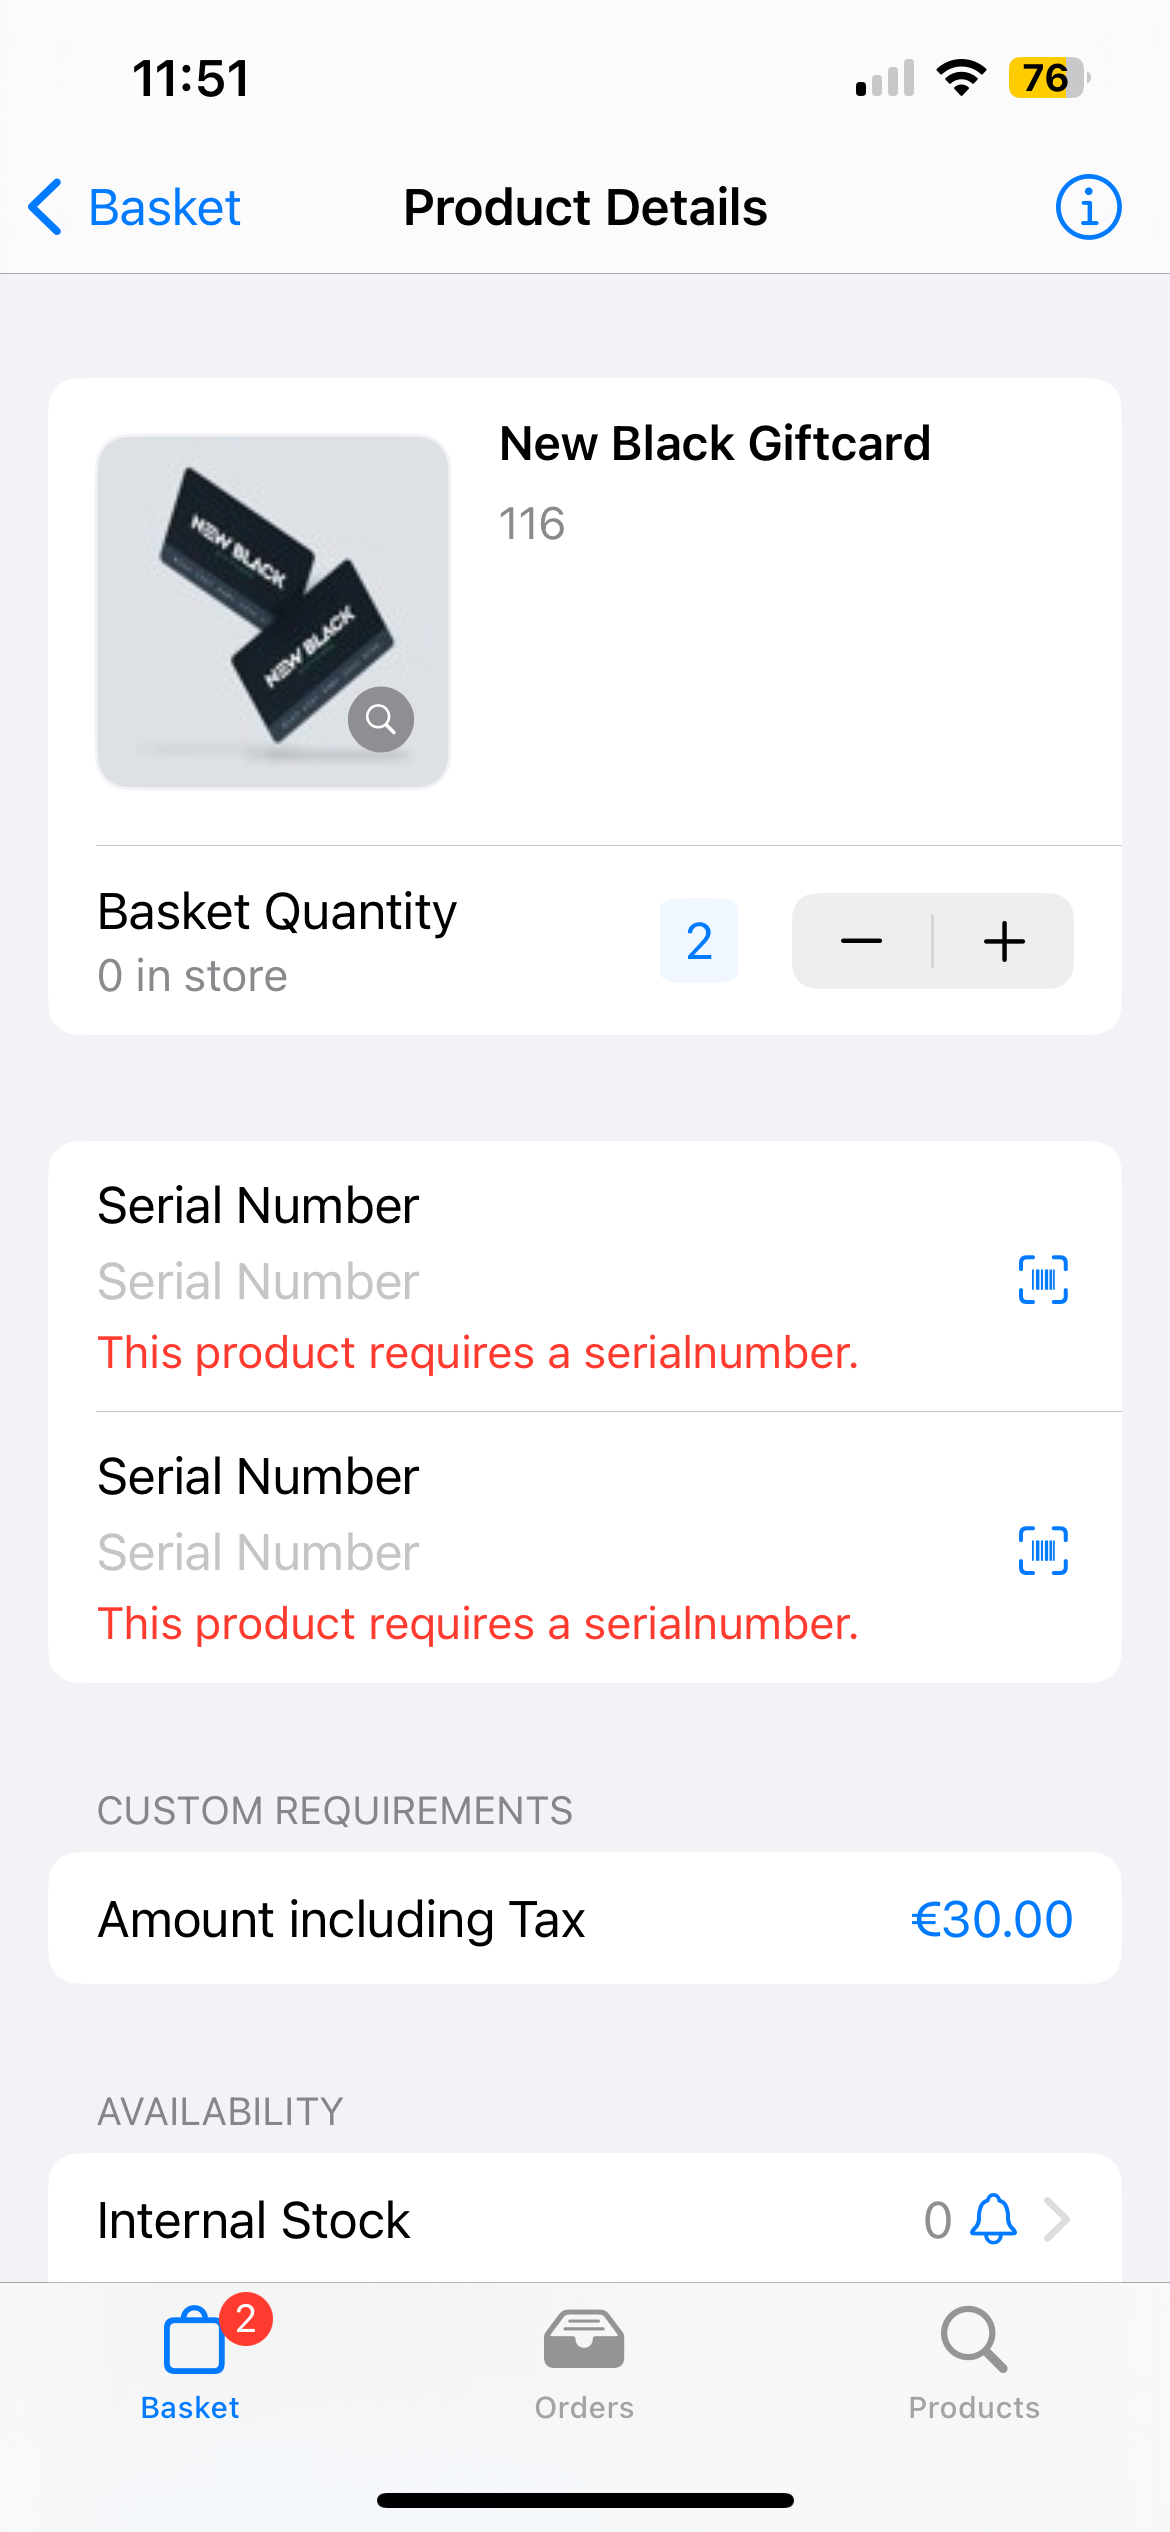
For physical gift card products, you can easily add multiple cards of the same amount to your basket. Just tap on the order line, where you can input the desired amount and enter the serial numbers for each gift card. You have the option to manually enter the serial numbers or use a scanner to quickly add them.
Remove Products in Basket
You can swipe right on an order line to remove the product from your basket.
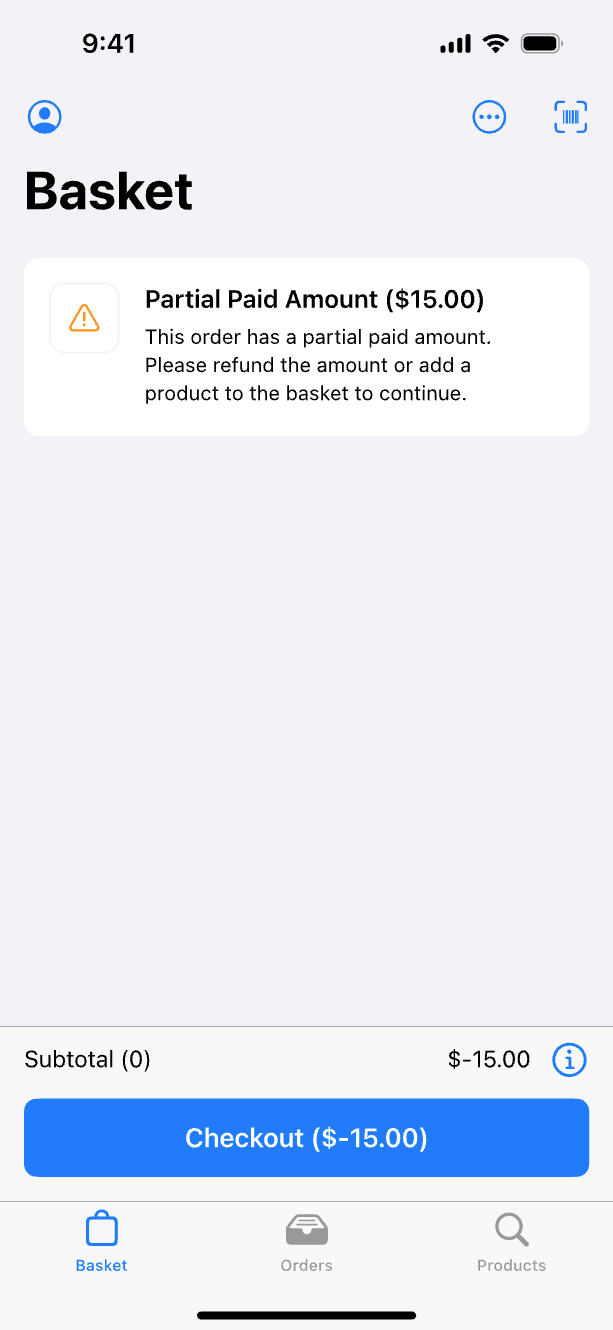
If partial payments have been made for an order, you can still remove the last order line. However, you will receive a warning, notifying you that you must either initiate a refund for the partially paid amount or add a replacement product to the basket in order to proceed to checkout
Add Gift card in Basket
When you add a gift card product to your basket, you will receive a notification if you try to configure a duplicate serial number. If there is already another order line in the basket with the same serial number, you won't be able to configure or update the serial number.
This applies to both manually entering the serial number and scanning it for gift card products.
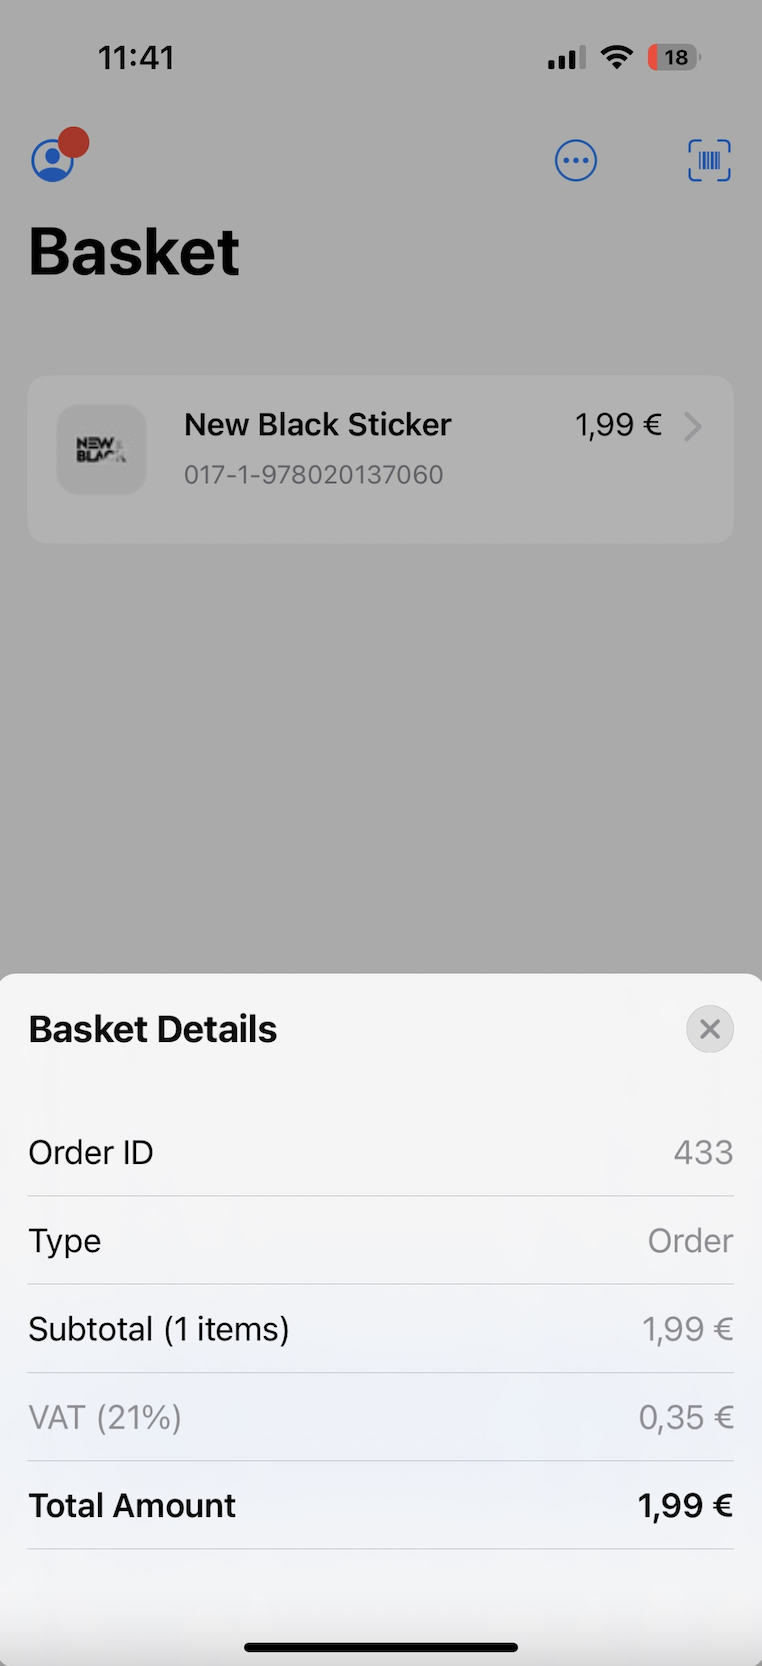
View Basket Details
The Basket Details will give you an overview of the currently open basket. At the bottom of the basket window, the 'I' will open it.
Order Types
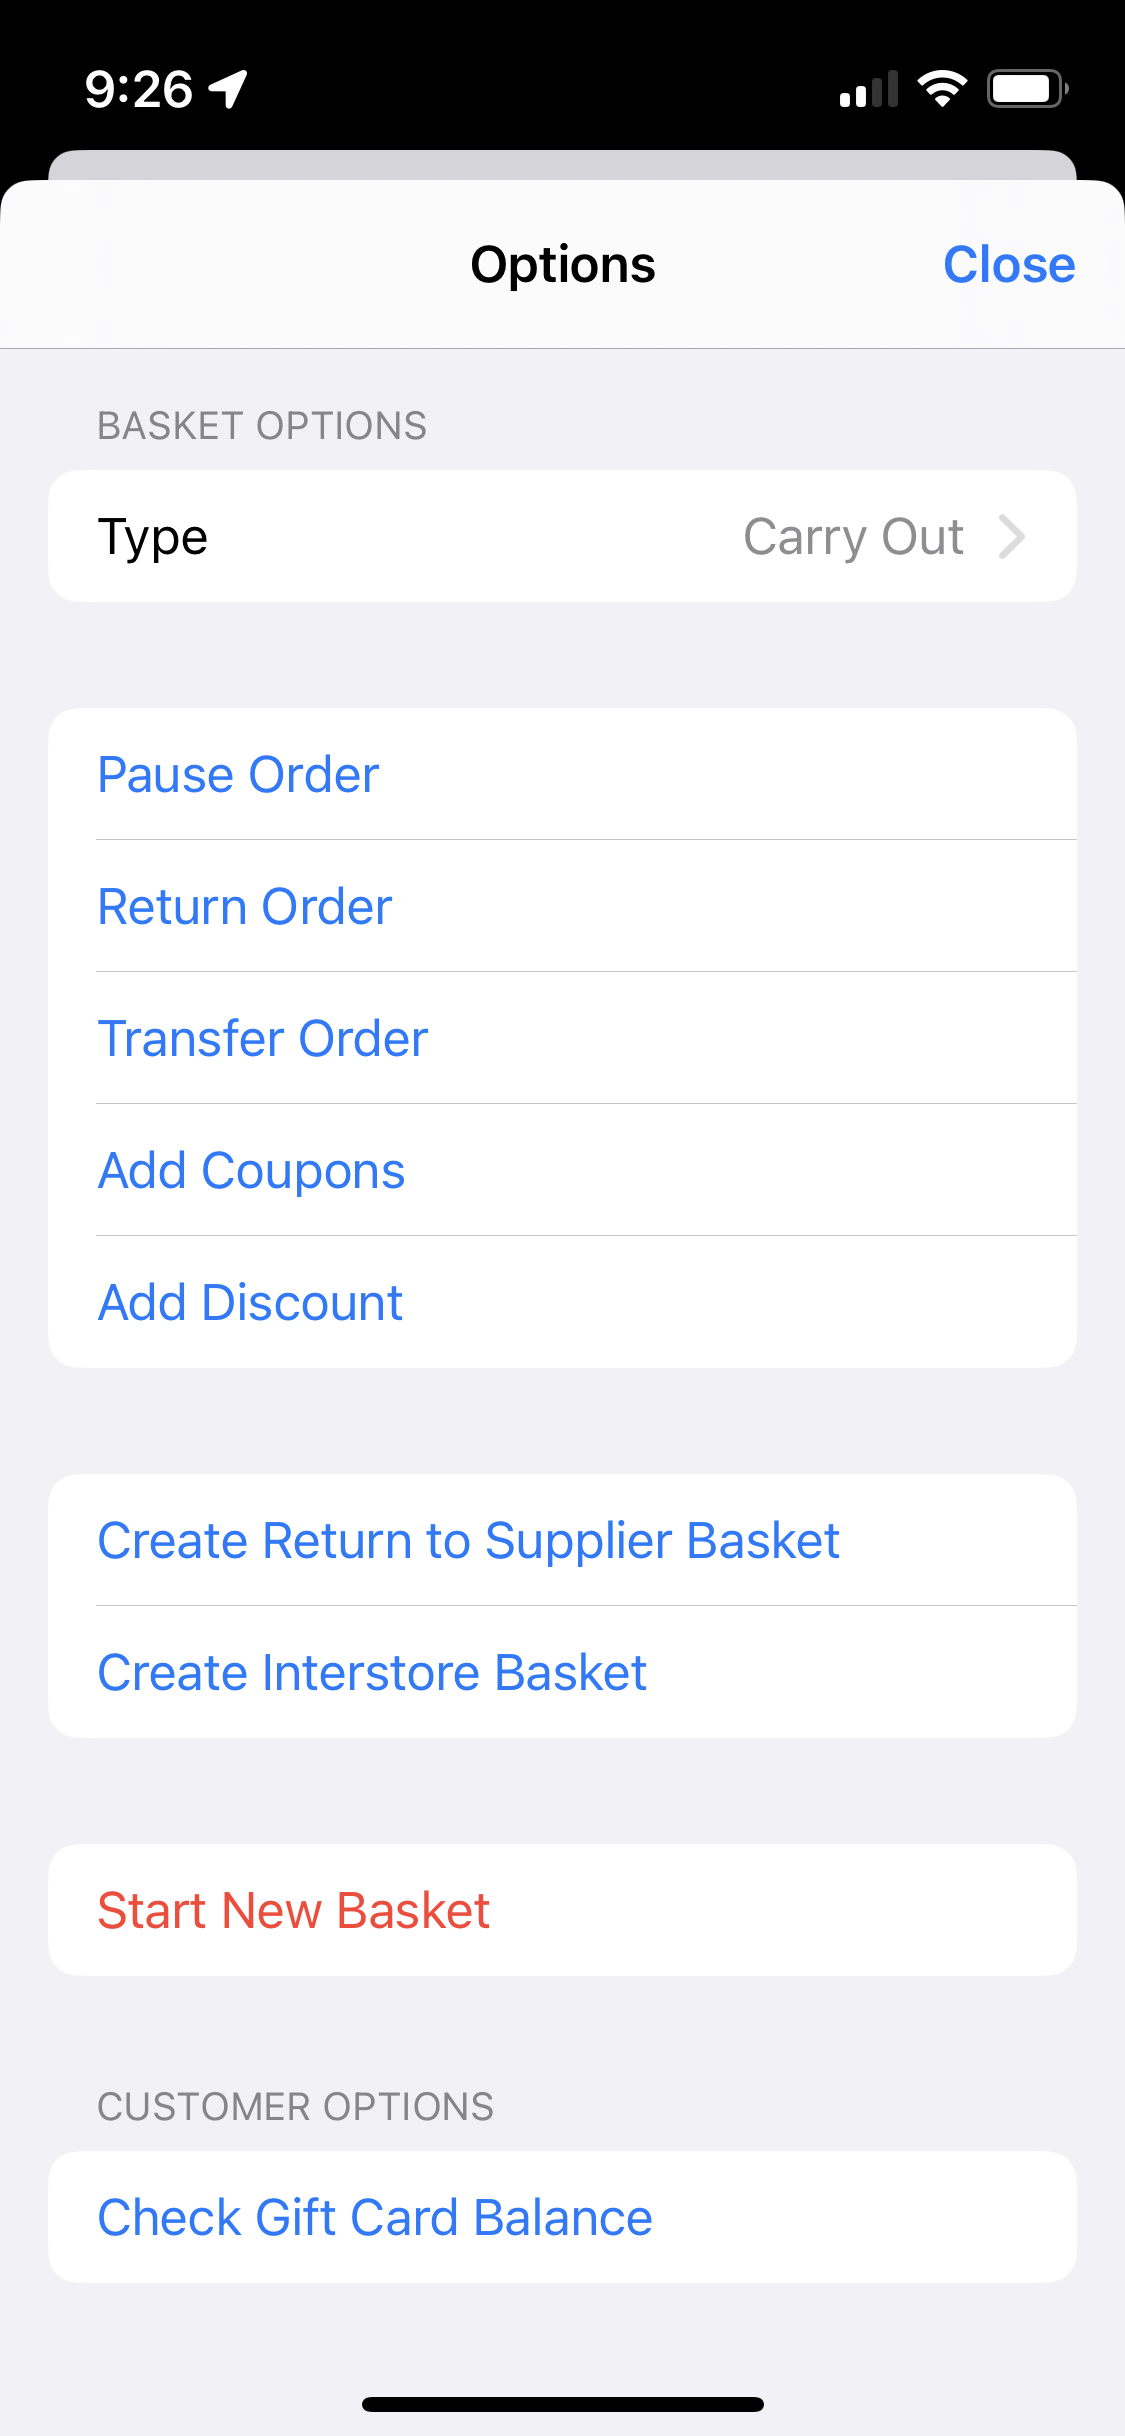
To change the type of the order, click the Type option in the '...' menu.
Add Coupons and Discounts
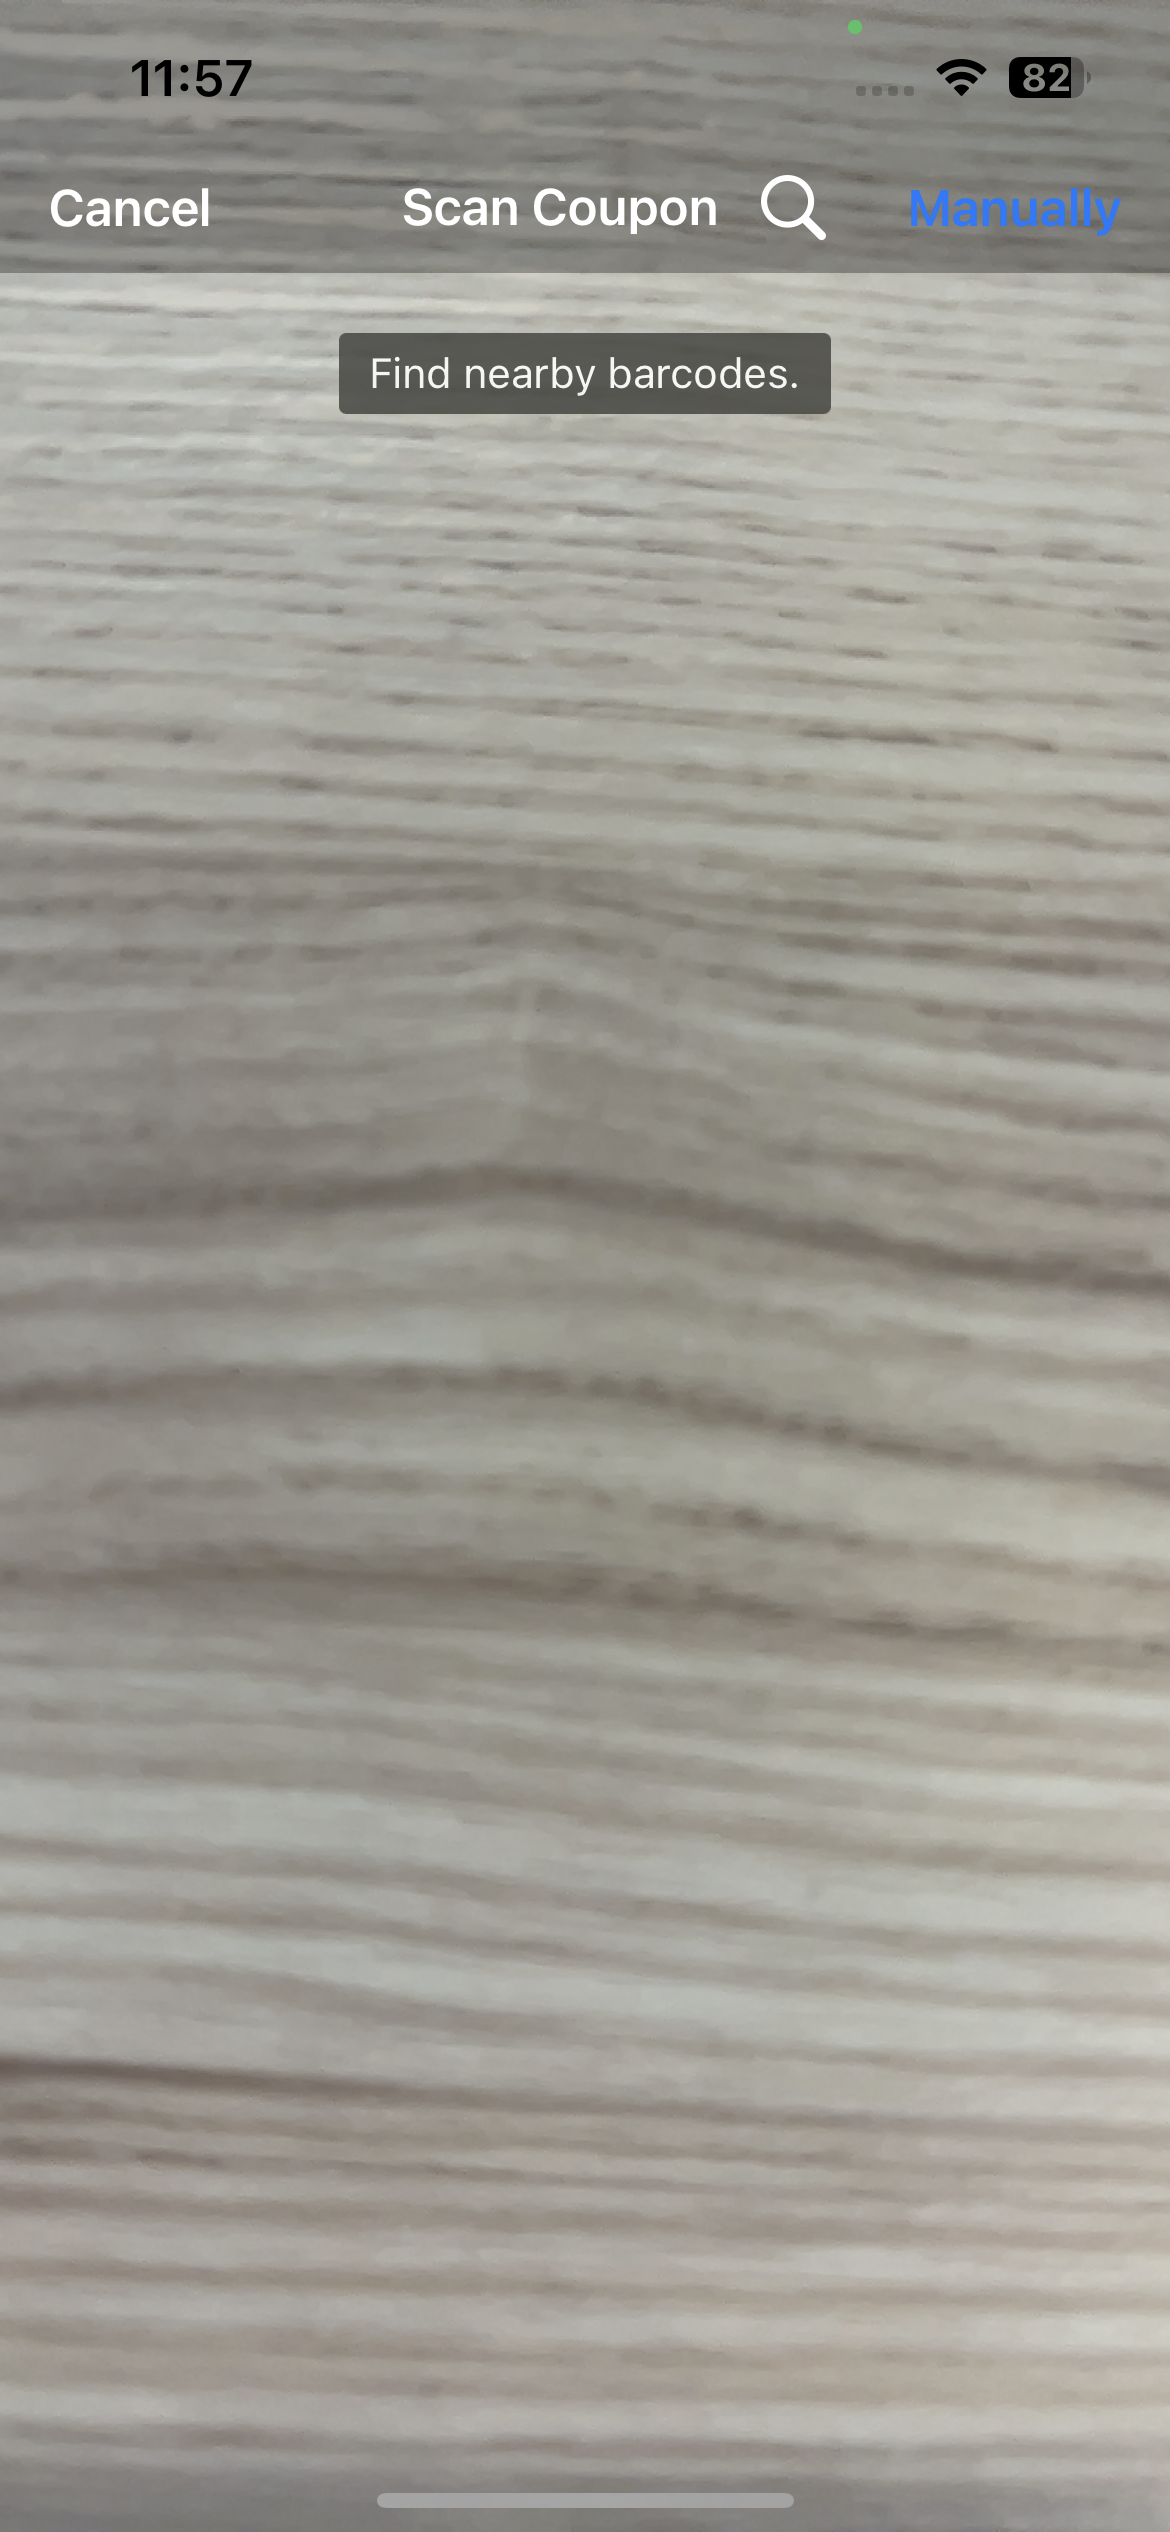
Coupons
To add a coupon, go to the '...' menu at the top of the Basket tab. The easiest way to add the coupon would be to scan it. Should that not work, tap the Manually button at the top right.
When applying a coupon, you'll be notified via a toaster if either the minimum order amount has not been meet or if the maximum order amount has been exceeded.
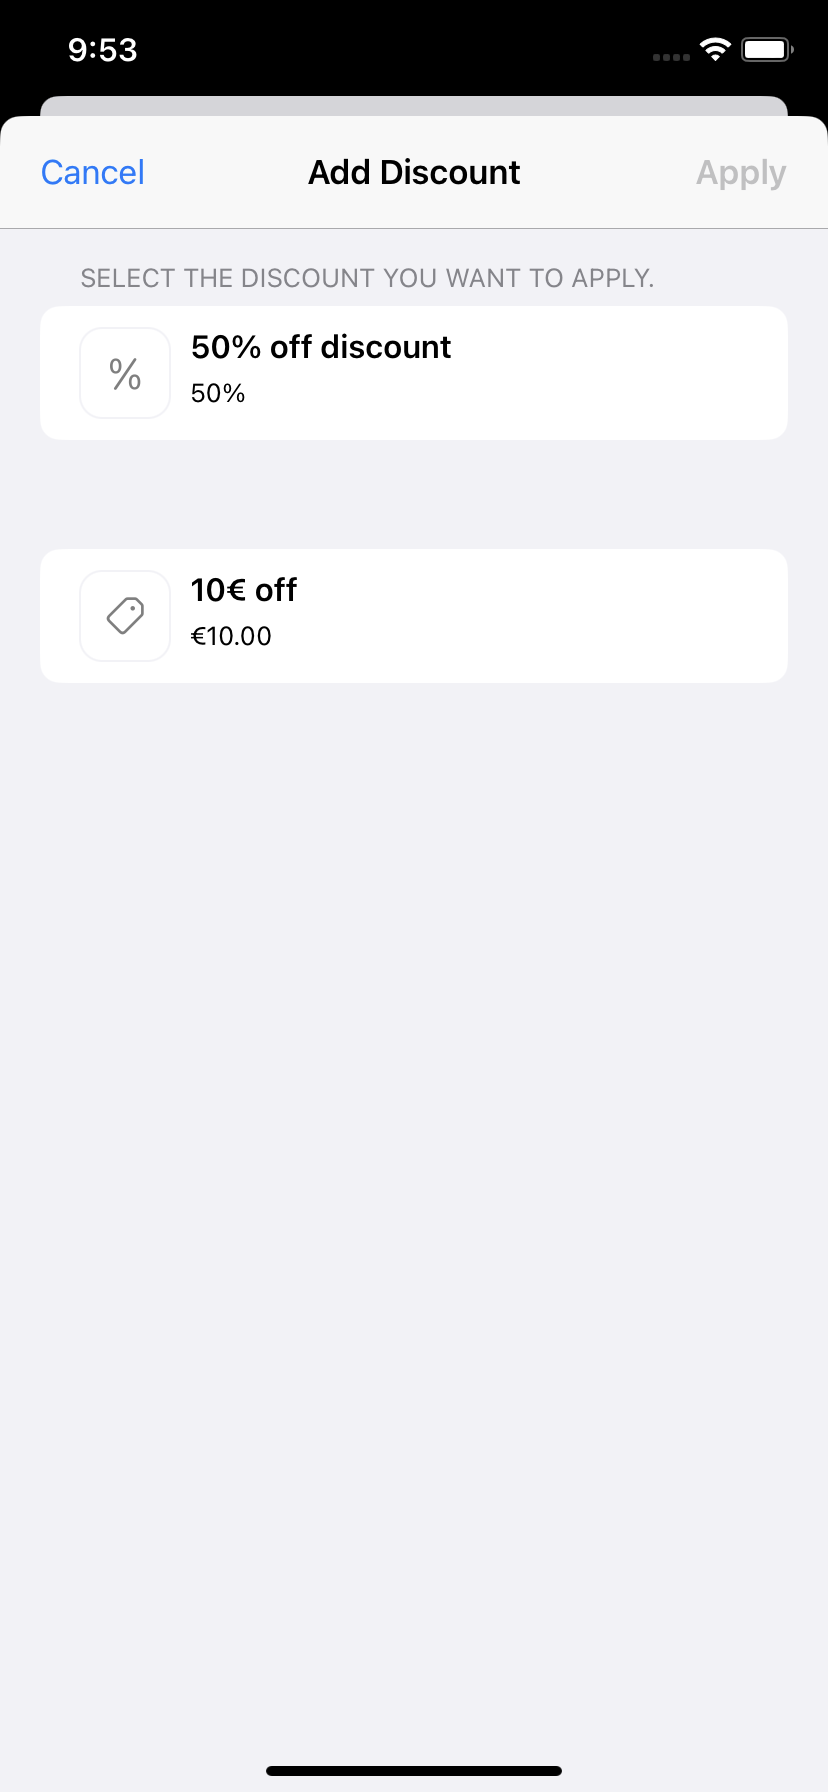
Discounts
After creating the order, you can add or edit discounts. These can apply to specific products or the basket as a whole. Opening the '...' menu in the basket will give you the Add Discount option. Here you can add previously configured discounts, this includes gifts with purchase. When there are options of gifts with purchase and the requirements are met, the gifted product will be automatically added to your basket.
Different icons are used here to differentiate between different discount types.
The ApplyManualDiscount and CancelManualDiscount functionalities are required in order for users to add and remove discounts freely. Otherwise, the elevation feature can be used to temporarily grant users with the authority.
Modify Price
This option can help you quickly adjust the price of products in your basket. This for example can be helpful if a product is damaged, or has some wear from being used as an exhibit. To add the modified price just click on the option and modify it. To remove it, you can repeat the steps and tap on Remove correction.
Additionally, a reason for price modification may be prompted if the setting Order:Lines:UnitPriceCorrections:RequireReason is set to true (default value is false).
The PriceCorrection is needed in order for a user to be able to use this. Further, the elevation feature with the Create can be applied to limit or elevate modifying prices authority of a user.
Add Customer
To add a customer to the order, tap the 'Add Customer' icon in the bottom-left corner. Please note that adding a customer is only possible when there are products in the basket during a sales order.
Proceed to Checkout
Once the basket is ready, tap the Checkout button in the Basket tab. It will redirect you to the checkout screen, where you can finish the order. Next to the checkout button, the open amount to the current order is also displayed, so you can give your customer an indication of what the current basket would cost them.
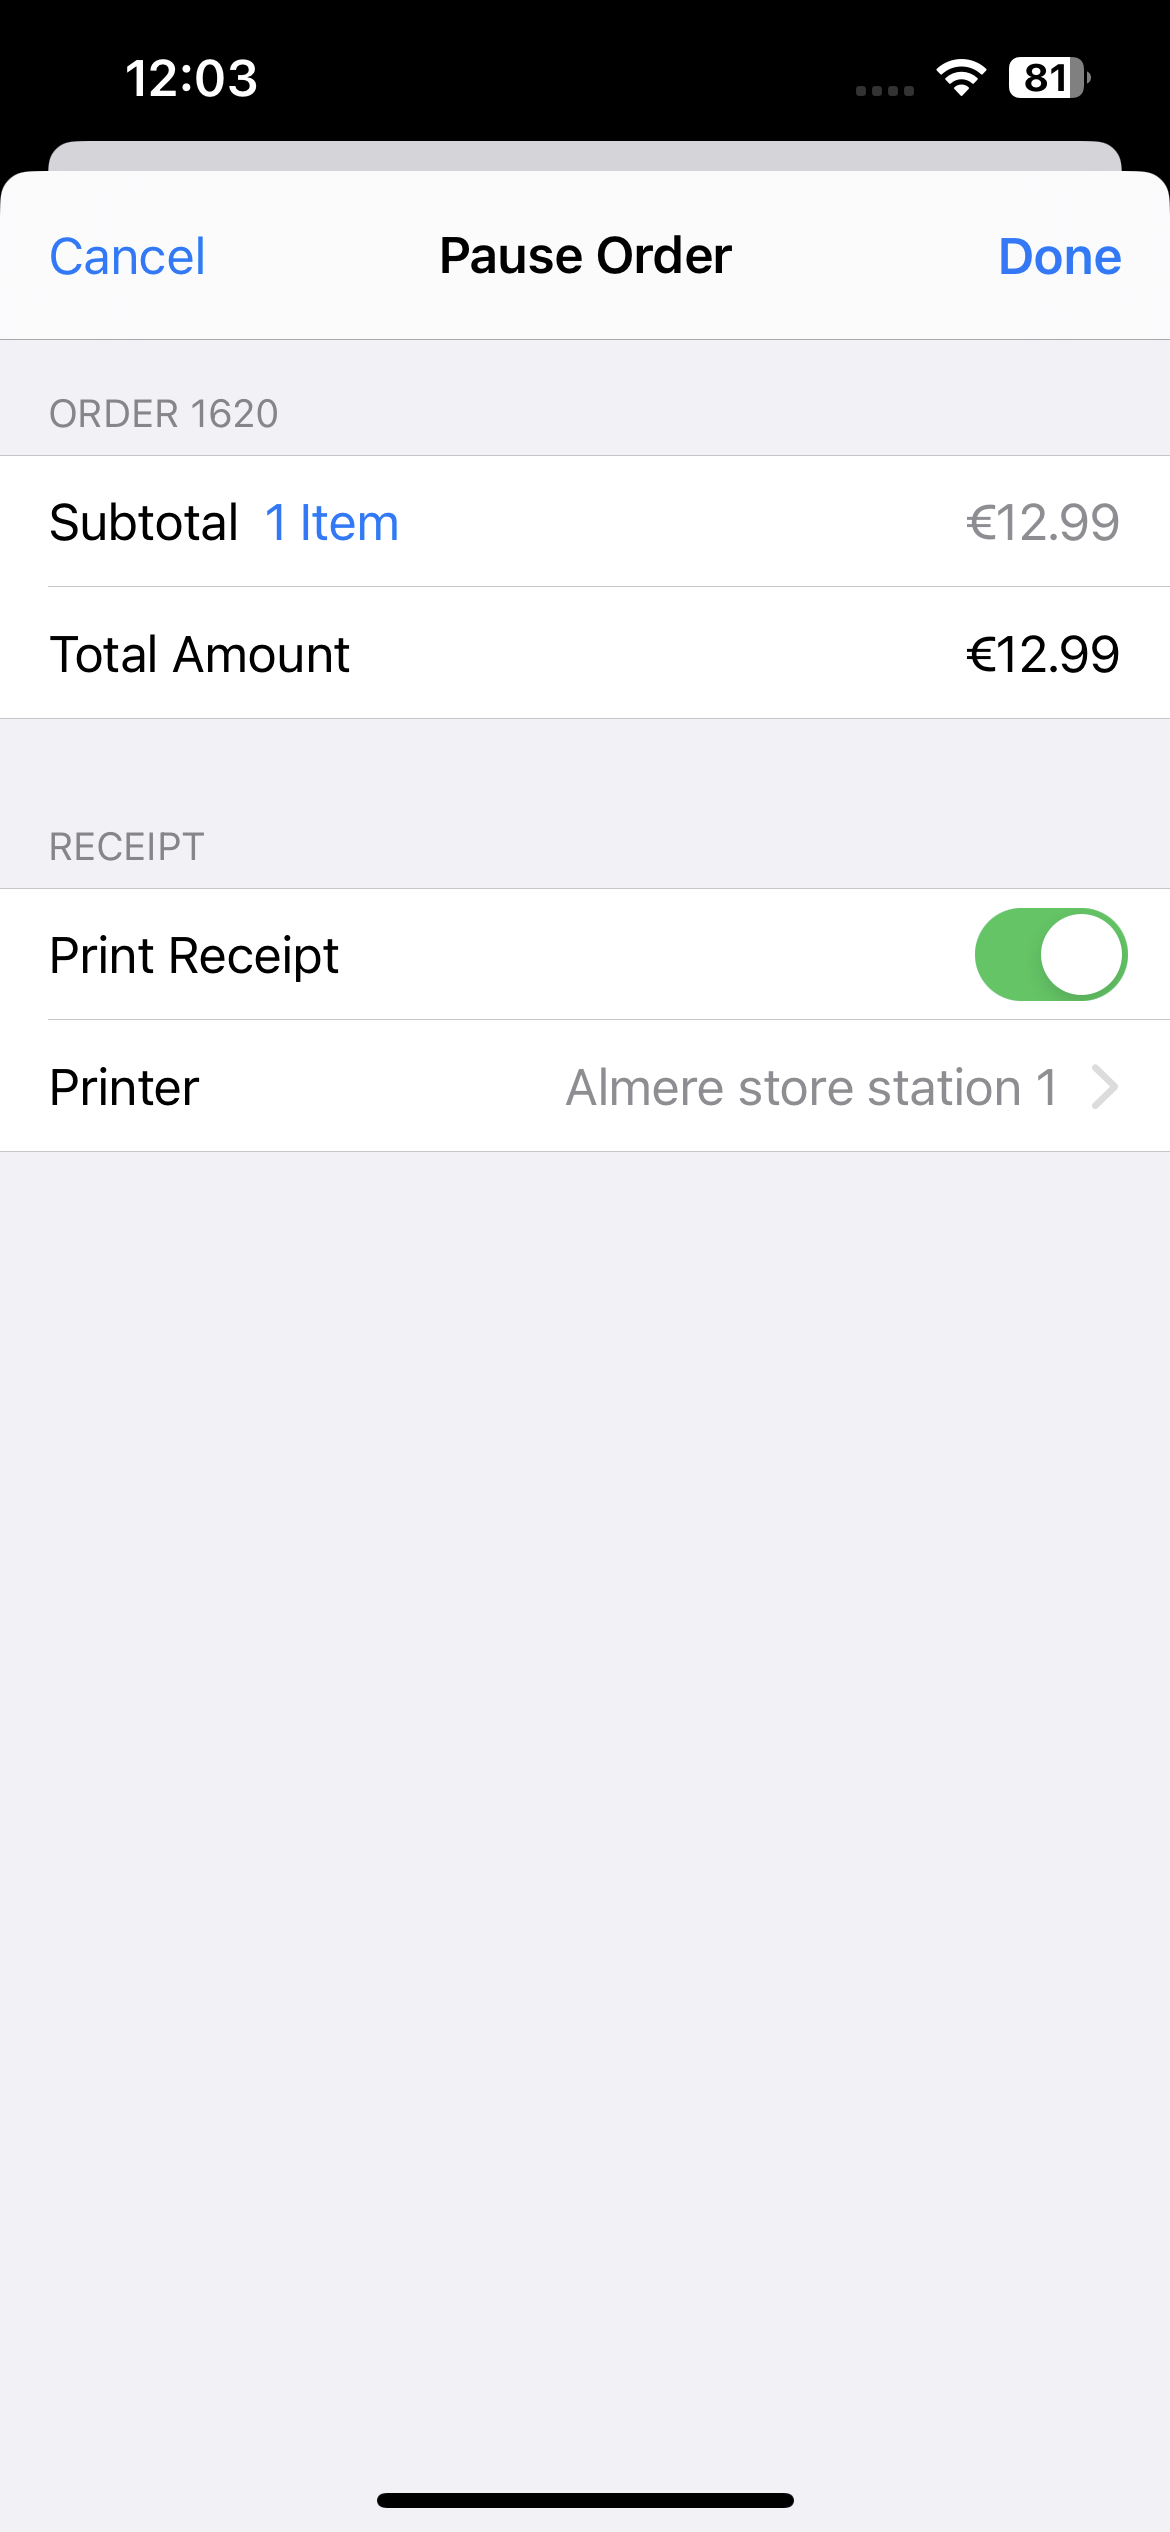
Pause Order
If you run into a situation where you need to pause an order and proceed with another, you can do that. Tap the '...' menu, and select the Pause Order option. This option will save the order, and you can print a receipt.
Switch Basket Types
You can create different orders in the app that are not intended for selling products to customers. You can do this by tapping the '...' menu and selecting the corresponding basket type.
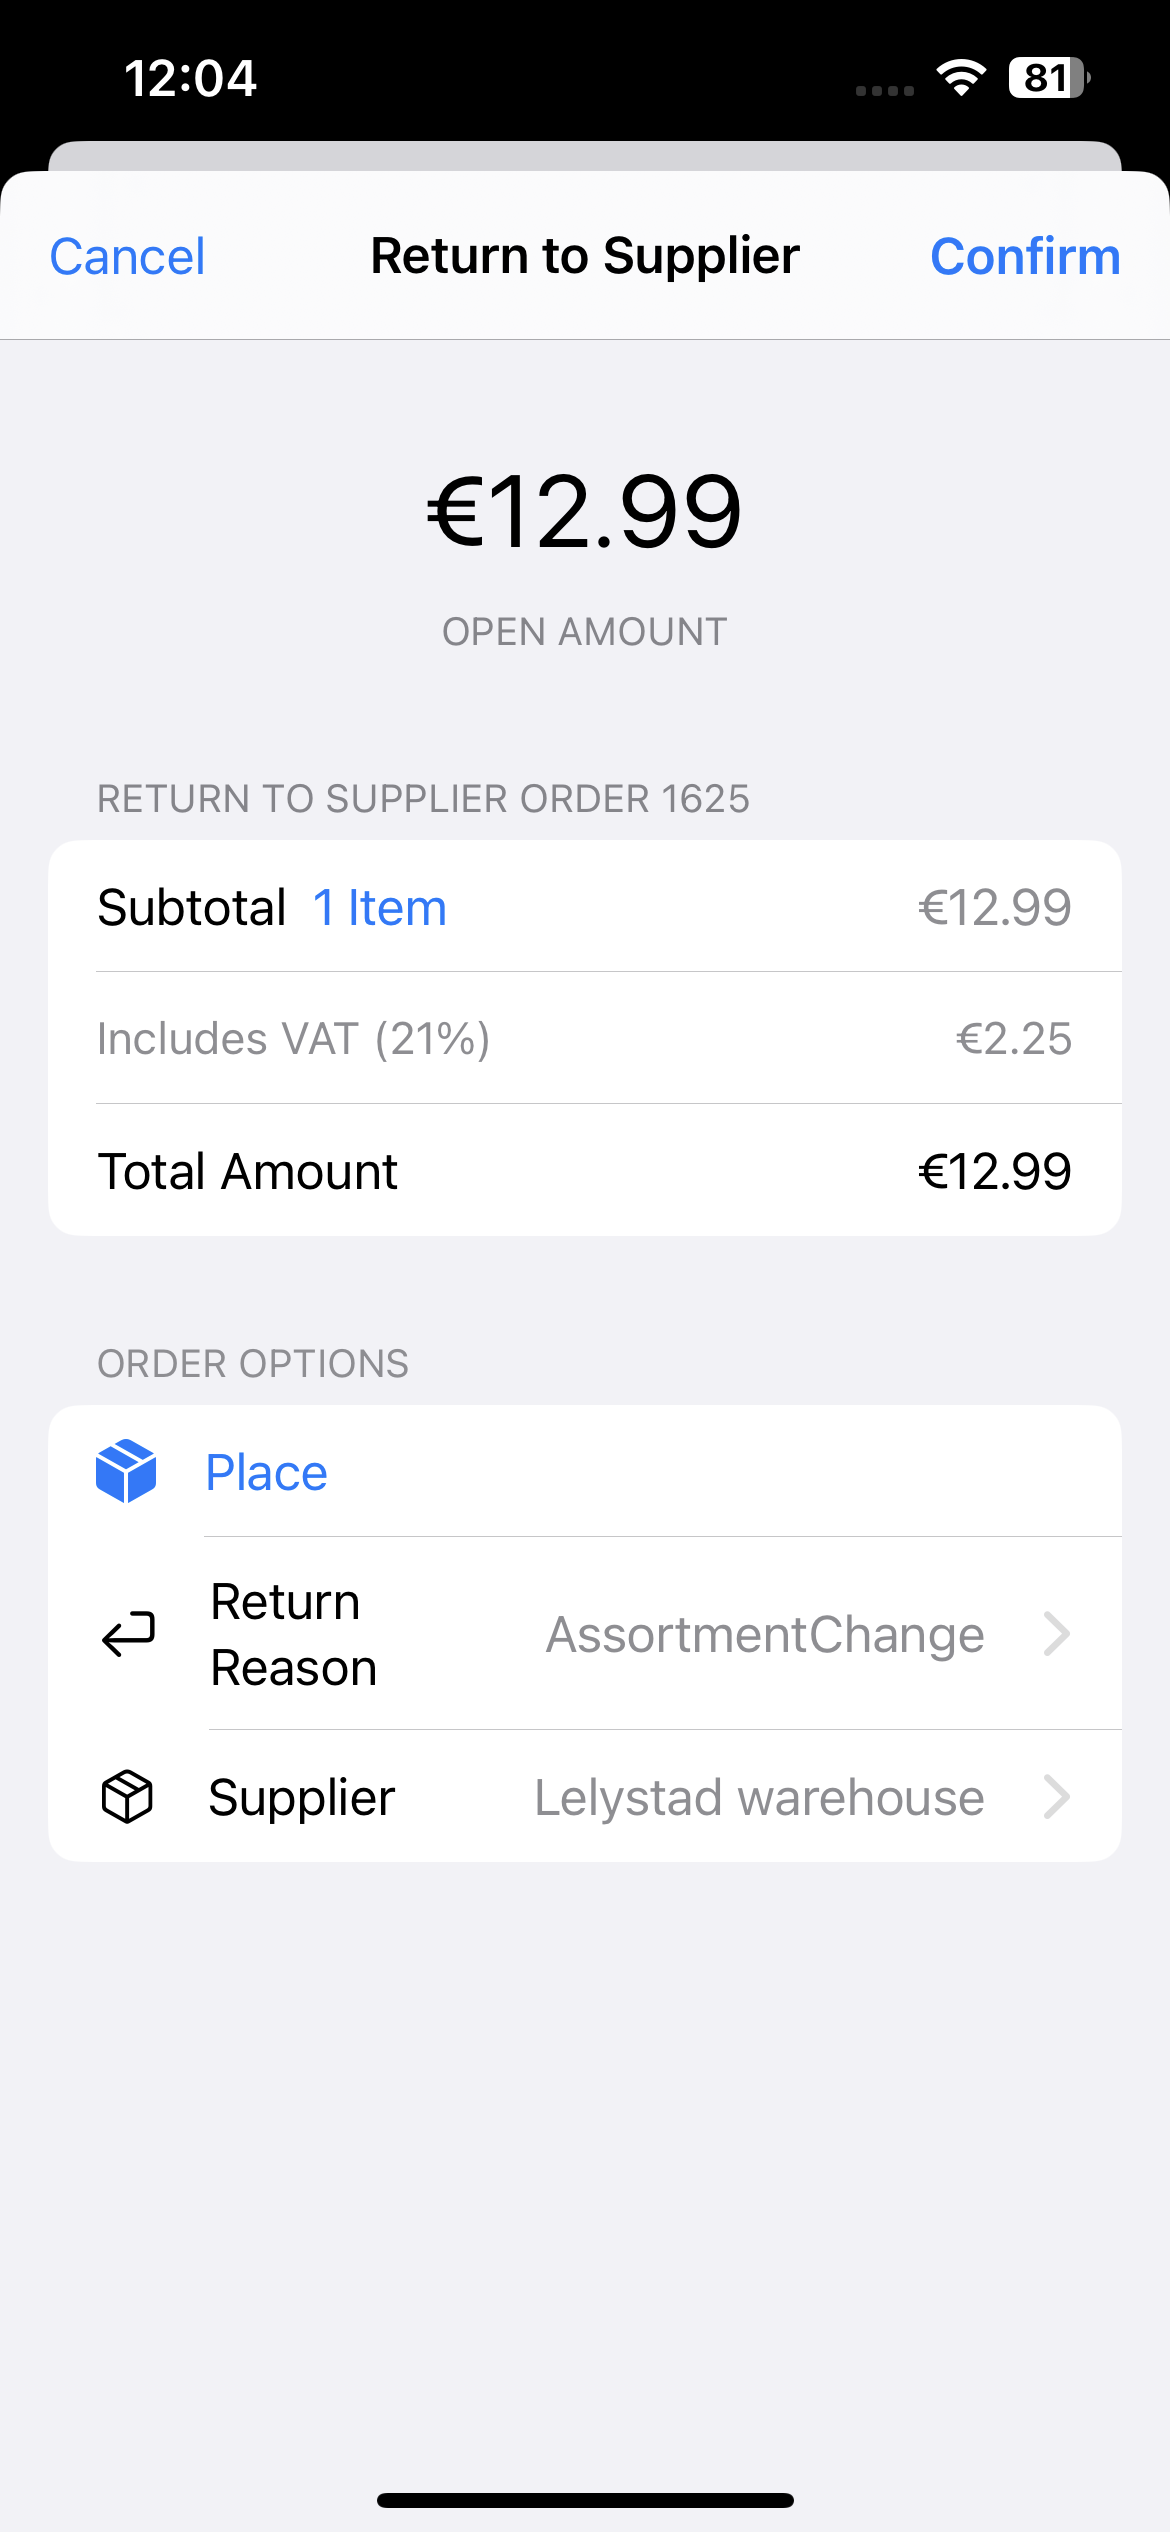
Return to Supplier
After you select Create Return to Supplier Basket, you can return a product to the supplier by adding it to the return order. Once you've completed this step, proceed by using the Return to Supplier button in your basket.
To specify a return reason, click on the order option and choose one of the pre-configured options. You can also make changes to the supplier, specify where the return is going, or leave an additional order remark.
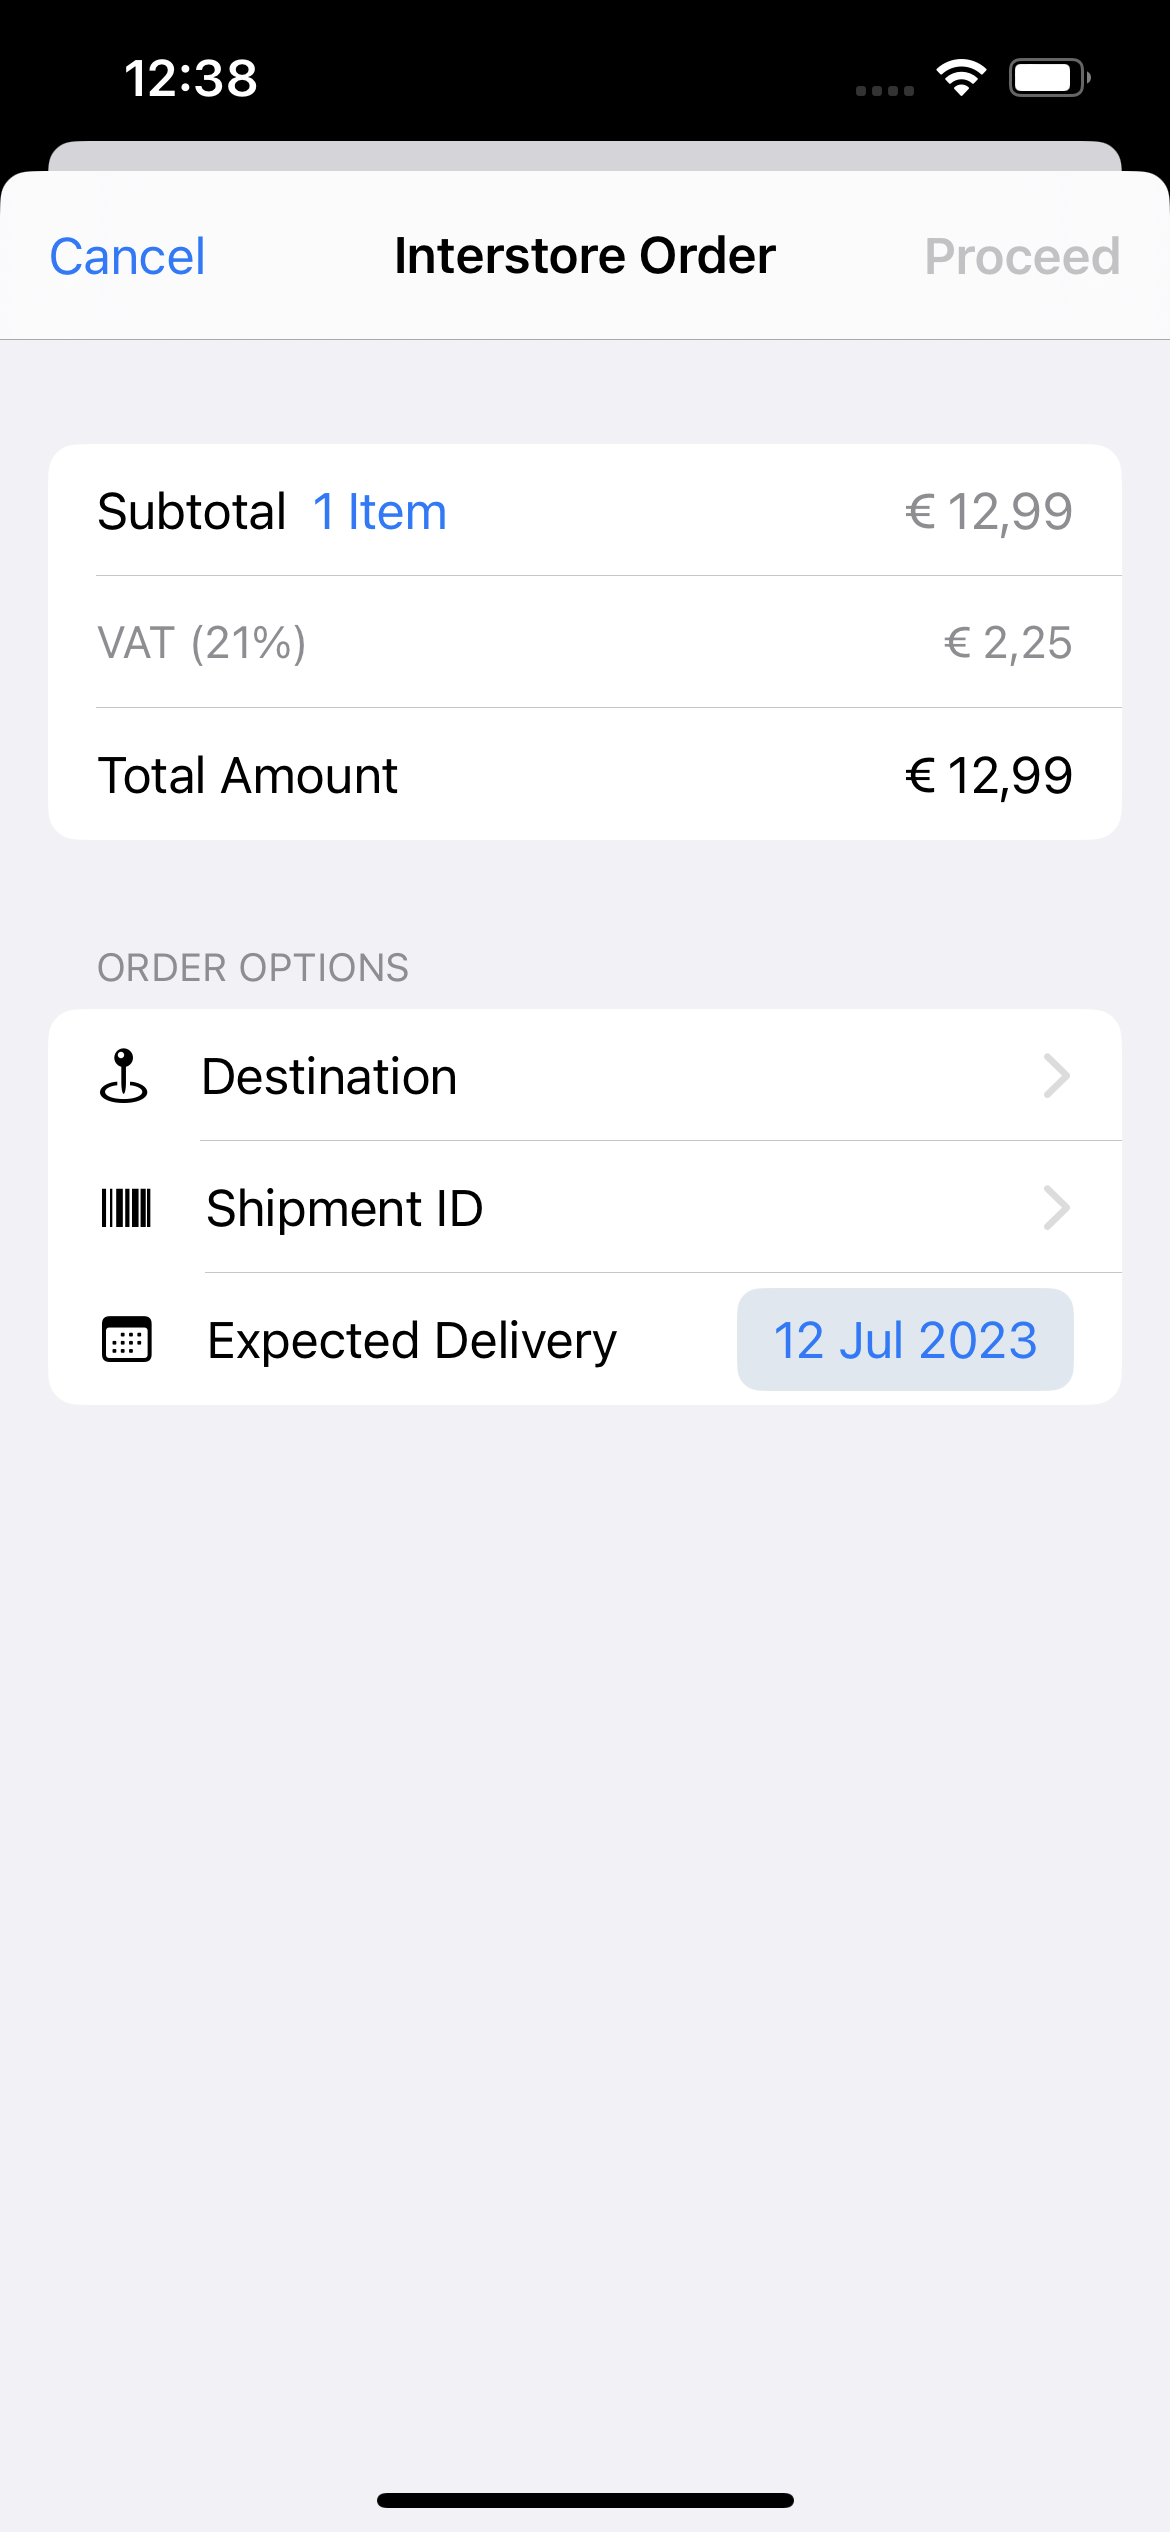
Interstore Order
After you select Create Interstore Basket, the steps are similar to those of a Return to Supplier order. For a more detailed explanation on Interstore Order, read here.
Transfer Order
Use the Transfer Order button to transfer an order from the Checkout App to the POS by use of a QR-code scan.
Mixed Orders
If Orders:AllowMixed is set to true, and your country allows mixed orders, you can include different line action types within the same order. For a more detailed explanation on Mixed Orders, read here.
Order Takeover Alerts
It's possible for multiple users to interact with the same order. This happens when for example an order is created on the Companion, but the consumer is sent to the POS to finish the transaction. In the meantime, the user on the Companion might still make (unwanted) changes.
To handle this, EVA notifies the active user whenever the order is being handled by another user. When prompted with this message, the user can choose to either continue working on the order, or to be detached from the order.
This (default) functionality can be influenced by means of the App:Order:ShowTakeoverAlert setting. Keep in mind that there are user types which - although technically employee type - are not actually employees but do trigger the alert. This can happen when using Riskified for example. Add its UserID to App:Order:IgnoreTakeoverUpdateUsers to prevent this from happening.
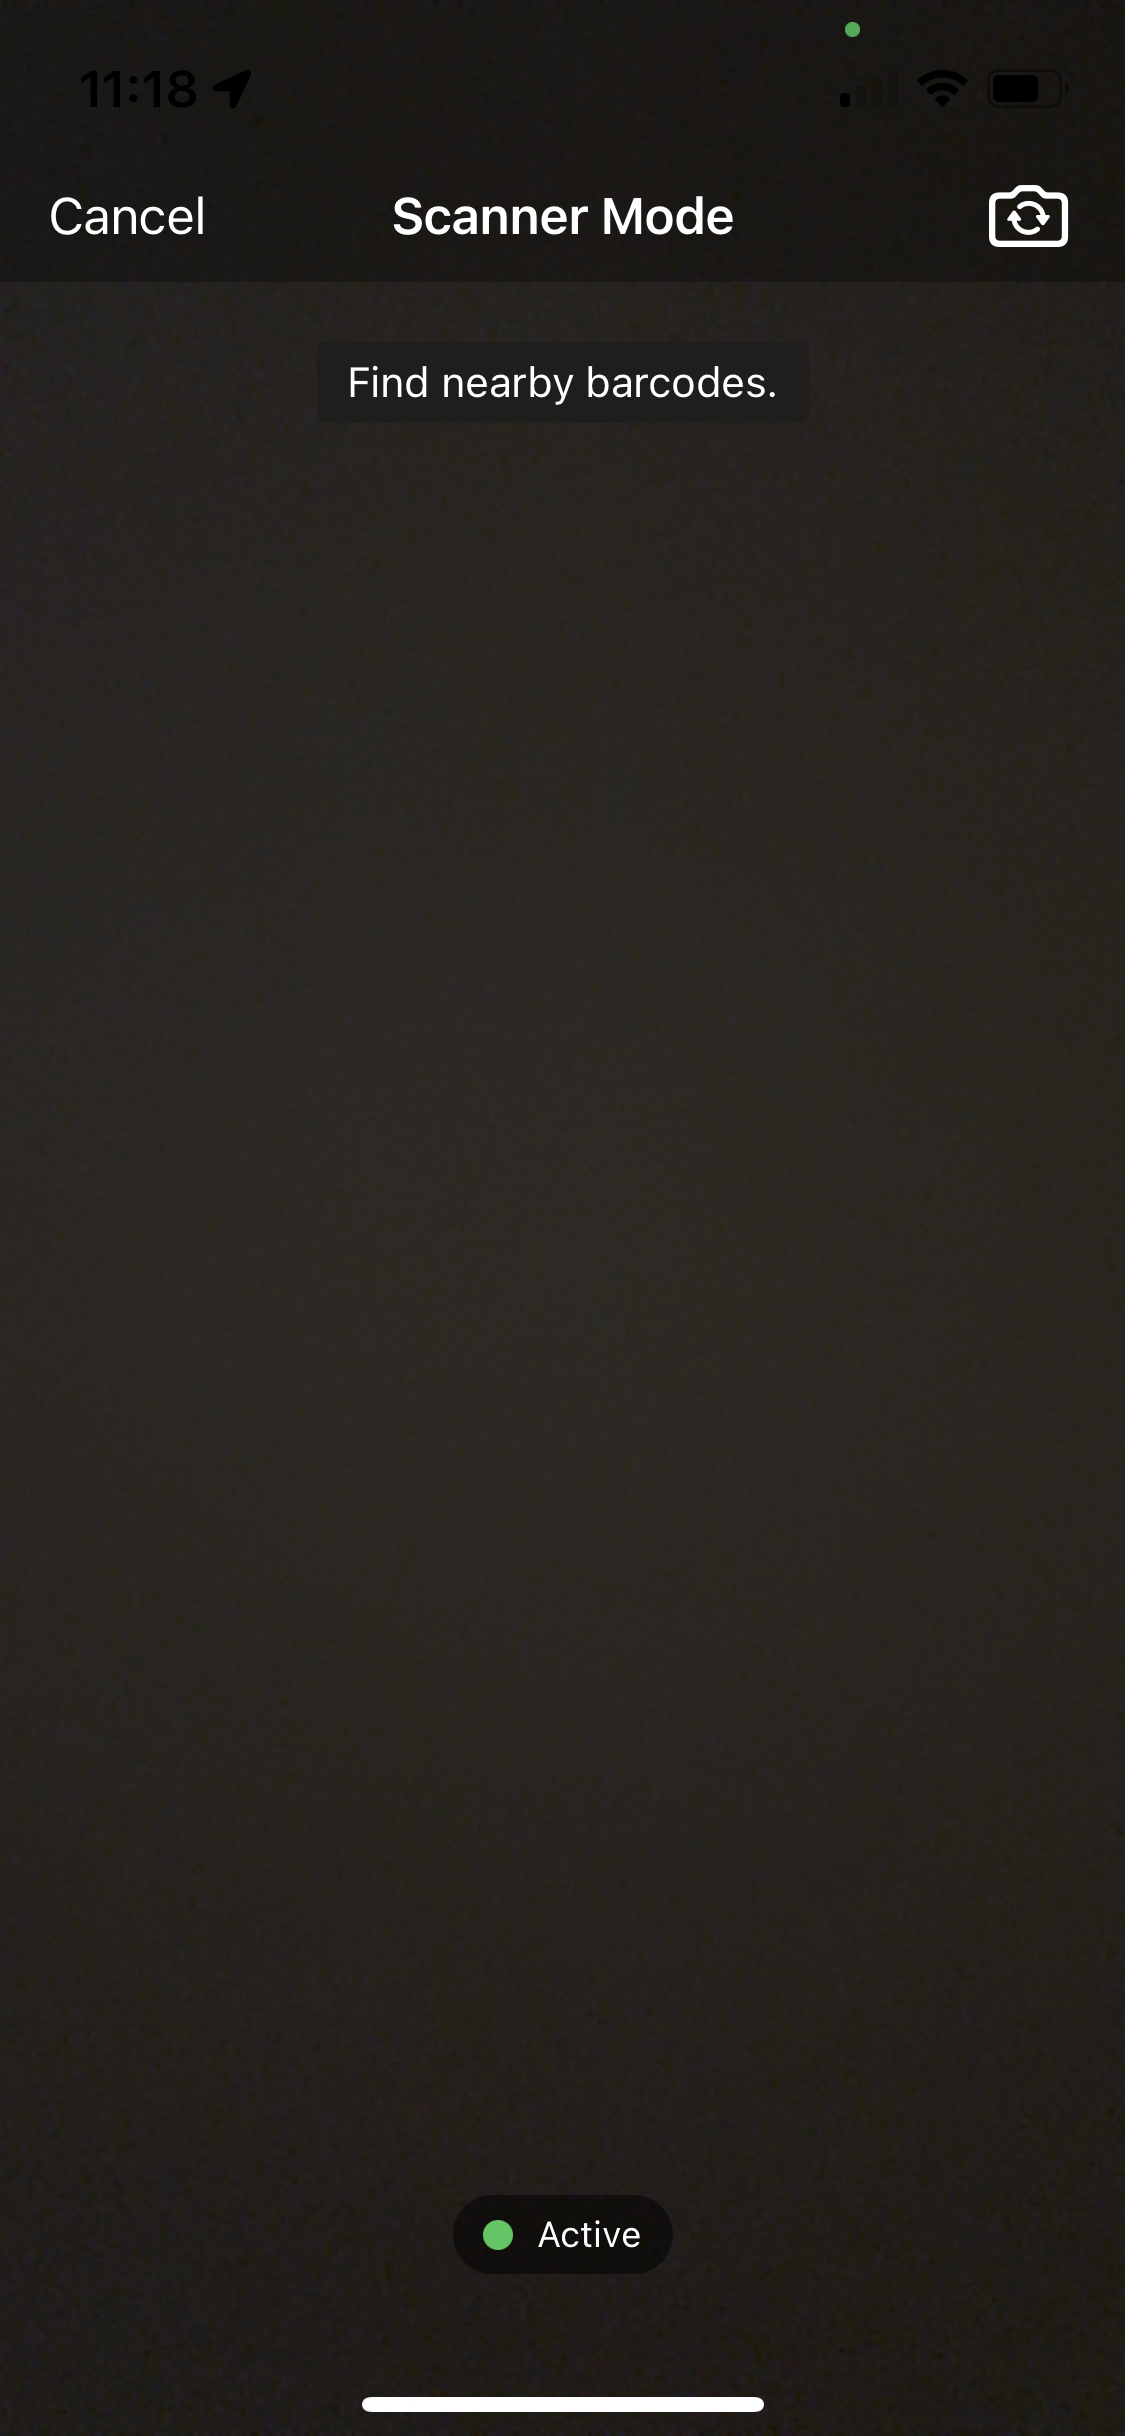
Scanner Mode
Scanning items to your basket can be done using the 'barcode' icon located in the top right corner of your Basket overview. Once tapped your camera will be activated and ready for scanning.
When scanning multiple barcodes consecutively, the scanner will pause after scanning each one. To continue scanning, you can simply tap on the scanner.
The 'barcode' icon can also be used to pair with the POS. This requires following the Configure manual scanner. Once successfully done/paired, you will enter the Scanner Mode where your device basically now serves as a manual scanner.
Please refer to Scanning in the App Suite for guidelines on scanner configuration.