Checkout
Checkout
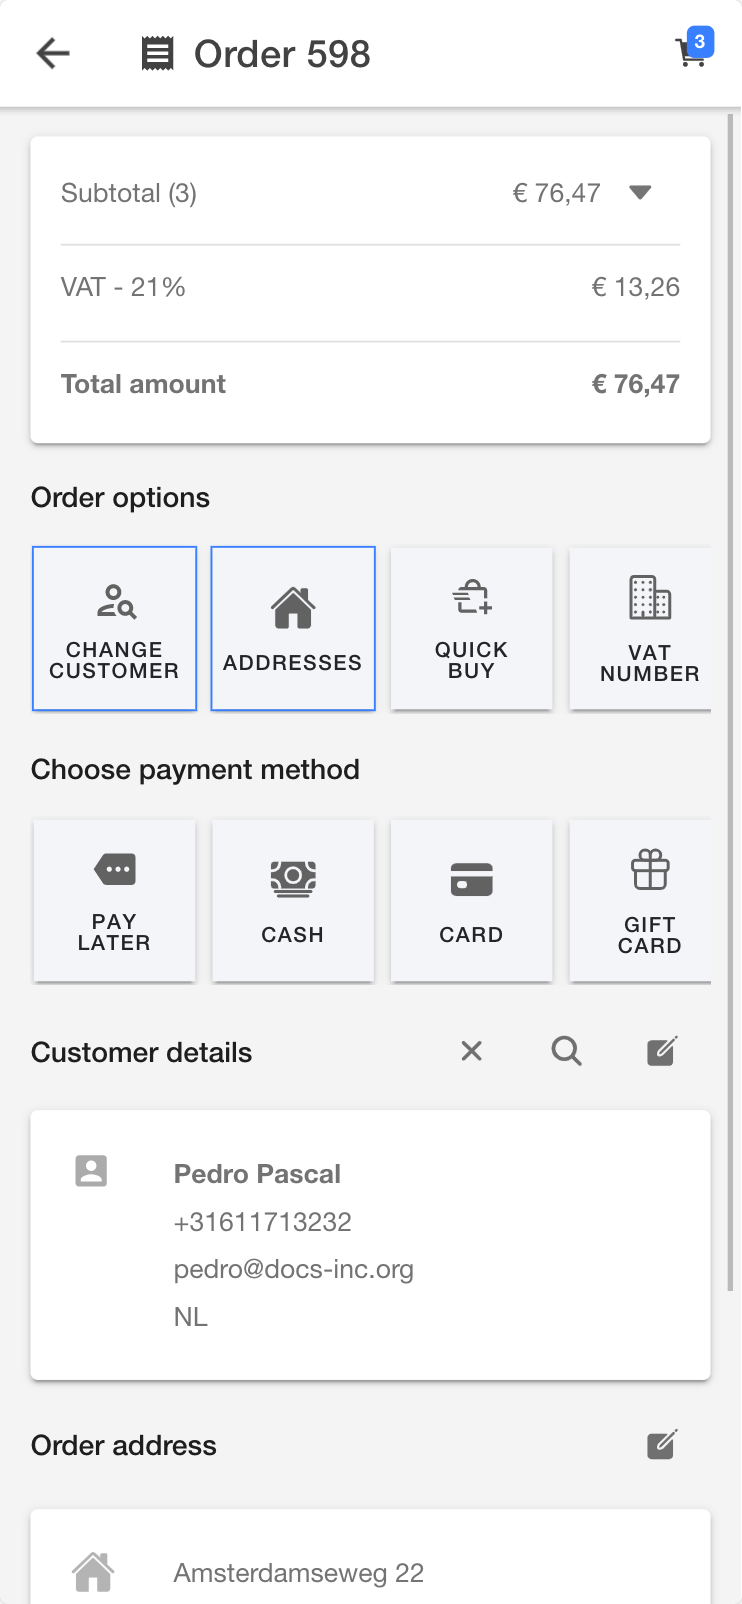
When you are done with assembling your order, use the action button to go to checkout. When in checkout, you have many options. Here's an example of possible options:
- Add customer: search for or create a new customer that will be attached to the order
- Tax exemption: you can create a tax exempted order, by adding a tax exemption remark
- Payment methods: all available payment methods are presented
- Shipping methods: all available delivery options are presented
- Tax number: input field for a person's or company's Value Added Tax registration number or Tax ID number
- Order remark: here you can add a comment to the order, can also be printed
- Signature: sign the order
- Due date: a custom deadline for the order
- Customer reference: a note that will be passed through to logistics
- Gift wrapping: choose to gift wrap products all together or separately
- Produce documents: print a receipt, A4 or email the invoice
Add customer
When the linking of customers to orders is enabled, a button is shown here to let you add a customer to the order. Adding customers however is in principle something that's optional. You can search for existing customers, or if implemented, you can scan a loyalty card. For Finland and Sweden, you can scan customers' Social Security Number (SSN). If a customer doesn't have an account, a new one can be created.
The form fields when adding a customer can be different per country, due to legislation requirements or country specific differences such as zip code usage. For the Netherlands, a zip code check is present. For other countries, Google Maps will auto-complete the address search. This is a convenient way of adding an address quickly.
For some order types, such as 'Reserve' and 'Delivery', customer information must be added to an order to proceed. Delivery order types will need address details to determine shipping and possible tax costs (in the USA). If you forget to enter this required information during the customer creation, there will be a red crayon icon in the checkout, signifying an edit must be done before the order can be completed.
Tax/VAT exemption
Certain countries allow for tax exemptions. If you've set up the relevant checkout option tile, you'll find the tax exemption tile available. Tapping on this tile will reveal a dropdown menu presenting a range of potential reasons for the exemption.
Once you make a selection, the tax amount on the order will automatically adjust to 0%. For more information see Tax exemptions.
Payment methods
Depending on which store you are logged into, you'll see multiple payment methods on the checkout screen. You can do a combined payment (e.g. partially cash, partially gift card, partially PIN). Please note that after selecting the payment method, you will have to choose a station. A station can point to a specific cash drawer or PIN terminal, depending on how many you have available in your store. For instance, two stations could be named '1st Floor' and '2nd Floor' respectively, enabling you to perform the payment on the desired floor.
Note that a payment flow and a refund flow are largely the same. Depending on your settings however, not every refund can be performed - or at least not by every user. If you'd like to know more about this, or refunds in general, see: Refund flows.
If payment fails due to product unavailability (i.e., out of stock), an error message will be displayed.
Cash
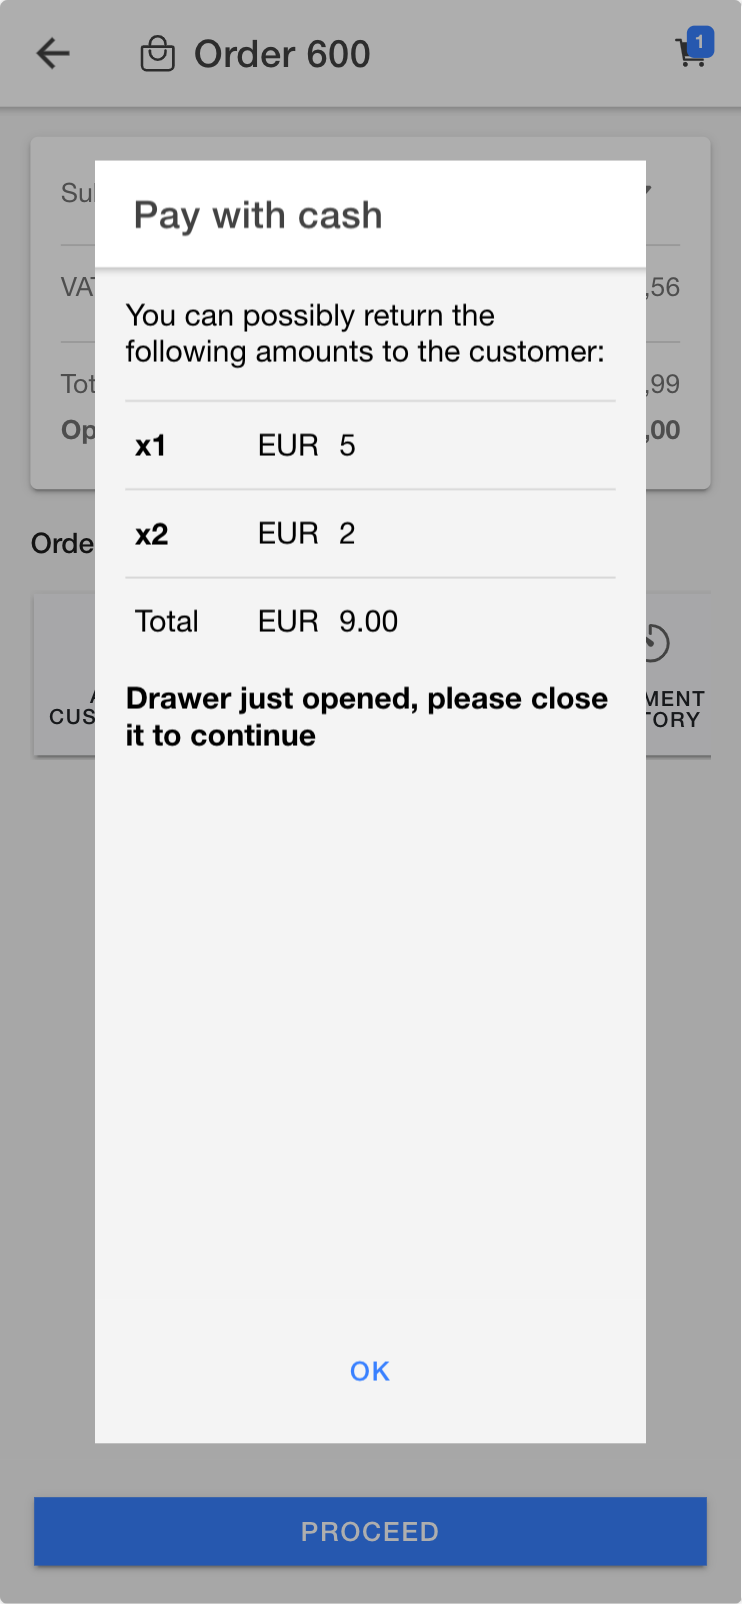
By default, the total order amount is pre-filled to match the open balance on the order. This can be adjusted however, to match any amount received from the customer or to make use of partial cash payments. When entering an amount which is higher than the order amount, you will see a modal with the recommended change to return to the customer.
If there is an outstanding amount to be paid to complete the order, all available payment methods can be used to pay the remaining amount.
If there is no open amount, you will automatically proceed to the 'Produce documents' screen where you can select from the available options. These options, for example print/email receipt, depend on the configuration.
Debit Card
On the checkout page, select PIN and the correct station for the device you want to use. By default, the amount will be pre-filled with the open amount. You can however modify the amount, to pay partially for example. Press the action button to start the transaction. Depending on the terminal, a customer can either insert, swipe, sign or use NFC to complete the transaction. Follow the instructions on the terminal display to complete the transaction.
If the customer aborts or cancels the transaction, the display on the terminal will turn red. The transaction can be restarted by following the instructions mentioned above. Transactions cannot be aborted from within the Companion, only from the terminal.
When the display on the terminal turns green, the transaction has been successful and the open amount is updated accordingly on the Companion.
If there is no open amount, you will automatically proceed to the 'Produce documents' screen where you can select from the available options. These options, for example print/email receipt, depend on the configuration.
Gift card
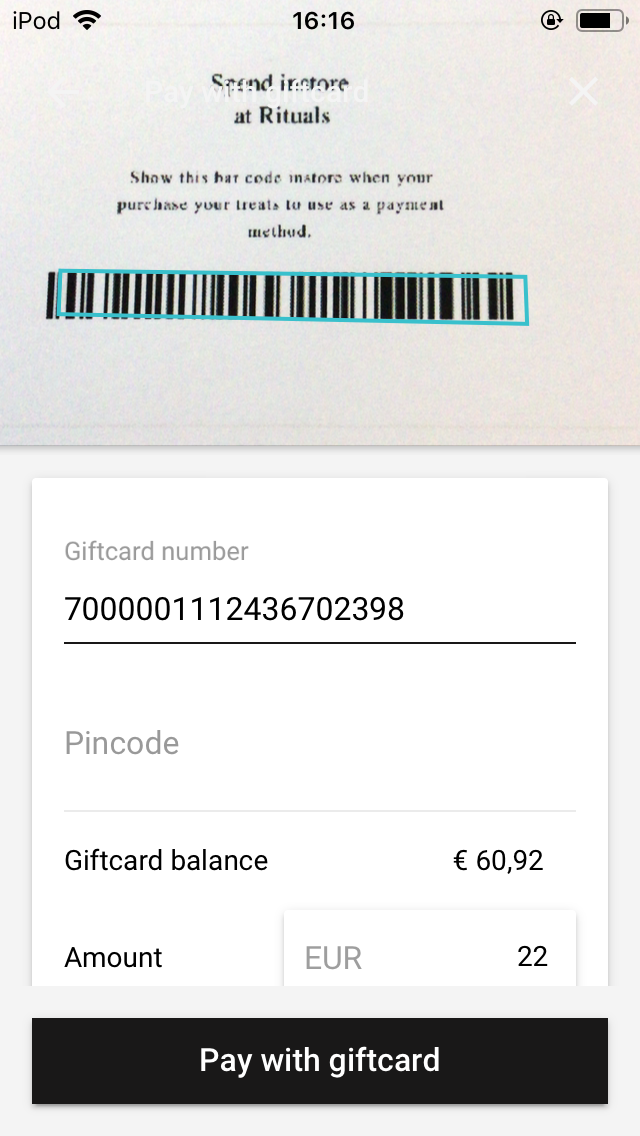
A gift card can be redeemed in the checkout by selecting 'Gift card', followed by scanning the card number. Be careful not to scan the EAN code of the gift card, which is the same number for every physical gift card. A PIN code is not mandatory when used in the store.
You can check the card balance before payment (or after creation of the gift card), by going to Gift card balance in the menu. You can then insert the serial number in Gift card number field and click 'Check balance'. The active balance of the gift card will then be shown in the currency of the gift card.
You can read more about the [gift card configuration here.
Pay later
Although not really a payment, 'Pay later' is mentioned here because it is listed as an option in the payment methods. This option allows you to place a reservation order for which no payment is required and allows you to put a product aside. Later when you hand over the product to a customer and want to print a receipt, you will need to select a different method to actually pay for the order.
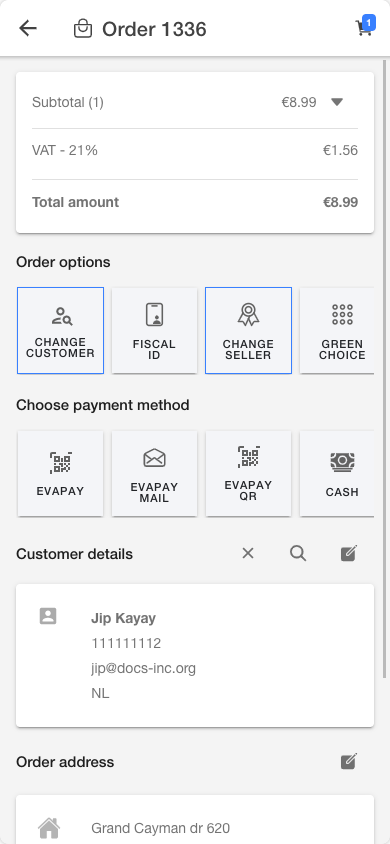
EVA Pay (Mobile pay)
EVA Pay is a mobile payment method that allows customers to pay the total amount of an order either directly or at a later moment. The EVA Pay payment method becomes available after a customer is attached to the order. Depending on the selected order option, the customer is able to pay either directly (for types: Ship, Order, Reserve & Deliver) or at a later time by using a payment link (only available for: Order, Reserve & Deliver). In both scenarios, a QR-code is generated which can be scanned with the camera on most smartphones.
This 'Mobile pay' tile is only shown if this payment option is available. Clicking on the tile opens up a payment modal in which the QR-code is generated. Scanning the QR-code will reroute the customer to the EVA Pay webpage. On this page the desired local payment method can be selected and in doing so the payment can be finished. The payment modal listens to payment status events and once the payment is confirmed, the modal is closed automatically. The Companion then proceeds to the 'Produce documents' popup to complete the order. Once a customer has scanned the QR-code and enters the EVA Pay webpage, the modal will show the payment's current status. This status also allows an employee to cancel the payment.
For the order options 'Order', 'Reserve' & 'Deliver', the payment modal shows an additional button 'Share Payment'. This allows the employee to send a payment link to the customer per email. The email contains a hyperlink and a QR-code to the EVA Pay webpage.
Please note that the payment link's 'Expiration Time' and 'Reminder Time' can be configured with the EVA Pay settings.
Order Options
Checkout order options entails the addition of extra tiles to your checkout screen. There are pre-configured tiles you can easily add, but you can basically create whatever kind of tile you like.
You can find a quick overview of the pre-configured tiles below, but you can read more about their fine-tuning and the creation of custom tiles in the Checkout options docs.
Custom fields
Although there are many options available by default, you can essentially add any kind of order option you like by using our Custom fields functionality.
Tax number
Input field for a person's or company's 'Value added tax registration number'. This number is dependent on your country's specific use and interpretation.
Order remark
It's possible to add a remark on the order for future reference, this will also be printed on the receipt.
Signature
When required for an order, this will be shown as an option at checkout. Simply let the customer sign and the signature will be stored on the order.
Due date
For some EVA customers, there may be a different deadline than the requested date. This allows you to plan further ahead and set the specifically requested date when that deadline gets closer.
Customer reference
This note can contain delivery details such as "Watch out for the dog", and will be passed on by EVA to the logistics partner.
Gift wrapping
This order option may be added to an order and provides the possibility to either wrap all items separately or all items together. Additional gift wrapping costs may be charged and added up to the total order amount.
You can read more about the gift wrapping configuration here.
Payment history
If there is an existing, partial payment on the current order, then a 'Payment history' tile will be shown among the 'Order options'.
Clicking this tile will display an overview of the payments on the order:
- Payment type (Cash, Pin, Gift card*, Fashioncheque et cetera)
- Date and time
- Payment status (Confirmed, Pending, New, Failed, Cancelled)
- Amount
Aside from those details, a 'dots' icon gives you the ability to perform refund related actions:
- Cancel
- Approve
- Refund
If you click the available action (e.g. Refund), the action will be processed and the result is shown by means of a toaster (e.g. "The payment is refunded").
Change seller
With the order option 'Sold by', the currently logged in employee is able to assign a sale directly to a specific colleague if different from self. After selecting the Seller tile a modal appears showing a list users. Selecting an employee immediately adds that employee to the sales order as the Sold by individual. This can be done on order line level in scenarios where more than one store employee was involved.
Type true in the App settings App:AllowSoldByOverride to make the tile Seller appear under Order options.
Quickbuy
Quickbuy offers you the opportunity to quickly add another commonly bought product to the order. This can be for example a snack close to the counter. You can create different sets of products, so you can click the product set in the Quickbuy tile and then find the product listed in that set.
Boarding pass
To comply with regulations on tax-free locations, stores operating on airports have the ability to scan a boarding pass on the checkout page. This boarding pass will be attached to the order, ascertaining that the customer is indeed eligible for tax-free shopping.
This will become visible as a tile in the order options. For more in-depth information, check Airport: boarding pass.
Shipping methods
Depending on the implementation and the country, different shipping options can be shown. For example in the Netherlands, there may be time slot options for PostNL delivery and the possibility of selecting a PostNL pickup point.
The app will guide you through the required steps, like setting up a customer with a valid address. When you click Delivery, a popup is shown with the available options. Now select a date and choose the desired shipping method. Shipping costs will then be added depending on the order amount, shipping method and address.
When the Shipping method is set, the 'Shipping' tile will be outlined and the section 'Delivery details', at the bottom of the checkout page, will show an overview of the delivery. The information provided for the delivery estimation is based on the product with the slowest shipping estimation.
Shipping restrictions
EVA supports the use of restrictions on shipments to customers. This can be used to block certain addresses from receiving a delivery, but it can also be used to prevent selected products from being shipped to any address.
Address restriction
Since this requirement is based on a shipping address, it will most likely occur once you are already in the checkout and add a customer with a restricted address to the order. When this restriction occurs you cannot continue the checkout flow anymore. This is displayed to you by means of a toaster stating the "Shipping address is restricted" along with an error message attached to the customer's details "This ShippingAddress is not allowed due to regulations".
Product restriction
Some products are not allowed for shipment. This is different from product status (doesn’t allow delivery), as it is based on product properties and will be shown on order line level. It's important to add that, unlike with the Address restriction, the product restriction can occur in both the basket and on the checkout page.
If the product restriction occurs in the basket page, then the action button to proceed to checkout will be disabled. Simultaneously you will be informed by the following error "This product is not allowed to ship due to regulations.".
If the product restriction occurs in the checkout, you will be presented a popup in which the order lines with the product restriction are listed.
You can either close this popup or use the action button at the bottom of the popup to remove the restricted product(s). After removing the restricted product(s), the checkout flow will no longer be obstructed.
If you close the popup without using the action button, the restricted product(s) will not be removed. The checkout flow however will remain obstructed with the payment methods disabled. The action button 'Shipping restriction' in the checkout flow lets you remove the restricted product(s) and continue the checkout.
Partial shipment
If you see a tile called 'Partial shipment' among the Order details, it means that this order is approved to be shipped or carried out partially. This is only possible if the order meets certain conditions, namely that the order quantity is greater than 1 and the order itself is of the 'Ship' type.
If you click the 'Partial shipment' tile on the checkout page, a new screen will appear and display which products can be shipped partially. Tap the order line(s) you would like to ship and then select the quantity of the products contained on that order line that have to ship. The default selection is the maximum amount listed on the order line, while the quantity selector will not be displayed at all if only a single product is available. Any order lines you do not select will simply not be shipped at that time.
After the selection is made, the confirm button can be used to finalize the selection. After confirmation the quantity of items that will be shipped is shown on the tile. Unfolding the cart overview shows more in-depth information on the level of order lines.
The customer has to pay the total order amount. After the first part of the order is shipped, the order can be found on the Orders page by filtering on 'Order status: Paid'. Clicking on the order provides the option to either ship the remaining products or create a return in case one complete order line has been partially shipped.
Ship to store
'Ship-to-store' is a feature which can be used during the checkout in combination with a 'Reserve' or 'Order' order type. This allows a customer to order products and pick them up in a different store. The customer will 'reserve' the order in a specific store. If there is no stock available in that store, then doing so will automatically create a shipment from the warehouse. If the order type is 'Order' however, then the product is shipped from warehouse by default.
If enabled, this feature can be used by opening the 'Reserve in store' tile on the checkout page. On the 'Reserve in store' page the current store is selected as the pickup store by default. An employee can change the pickup store by either searching for the customer's desired store in the search bar or by selecting a store from the list of stores provided. This list of stores is sorted by proximity to the current store. Once a store is selected the action button 'Reserve' becomes active.
To complete the order, a customer needs to be attached to it. The pickup store gets a reservation task to physically set aside the product(s) and process the task. Once the product is available for pickup, the customer will be notified by email.
For more information, see Click&Collect.
Produce documents
After processing a payment you have multiple ways of delivering a receipt to the customer. The ones available by default are EVA client specific; usually this is print receipt or email.
For printing receipts, a station (printer) needs to be selected. This may already be selected by default based on previous actions on the device. If no stations are available, you will be notified. If the print button is selected without a station being available, an error message will appear.
You can even print more documents after the order is completed. One of the options is to print a gift receipt. This allows you to create receipt(s) for every product you want, while personalizing the receipt for that particular gift - such as not including the price. You can create as many receipts as you need.
The following templates can be customized for this:
Non-certified
- ThermalGiftReceipt
- ThermalReceipt
- ThermalLastPinReceipt
- ElectronicReceipt
Certified (meaning you can only, optionally, alter header and footer)
- CertifiedInvoice
Preferred output
There are a few settings here which you can use to influence the default/preferred output type:
Auditing:PreferReceiptPrinting: Setting its value to true (default value is false) would mean a print output of type Receipt.Auditing:PreferPaperPrinting: Setting its value to true (default value is false) would mean a print output of type Paper.Auditing:PreferElectronicReceipt: Setting its value to to true (default value is false) would mean a print output of type ElectronicReceipt